Here's a quick demo of how to quickly update all your computers in PDQ Inventory to have a new Custom Field. We're going to look at adding Custom Fields to multiple computers with PowerShell and the PDQ Inventory Custom Fields Import Wizard.
Normally, the Custom Fields Import Wizard is used within PDQ Inventory itself (more info here); but, fortunately, the PDQ products have command line interface (CLI) utilities to help us do this with PowerShell as well.
Because PowerShell.
Identifying PDQ Inventory commands
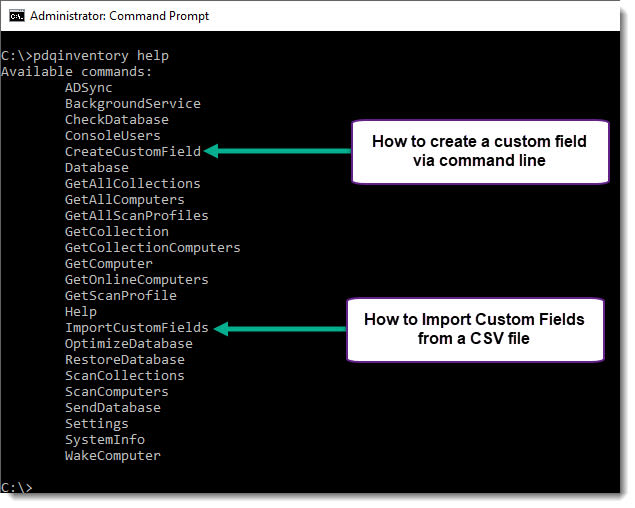
It turns out, PDQ Inventory has many commands that you can use from a command line.
So, how do we find what's available? We ask!
In fact, all you need to do is run the following command from an elevated command prompt or PowerShell window:
pdqinventory help

Look at all those helpful looking commands!
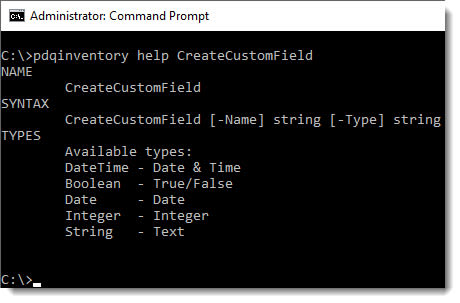
For this blog, we're looking at using the CreateCustomField and ImportCustomFields commands specifically. Let's find out more about their usage.
pdqinventory CreateCustomField

pdqinventory ImportCustomField

With that in mind, let's dive in and add all the things!
Adding Custom Fields to Multiple Computers with PowerShell
Below are the six sections needed to use PowerShell and PDQ Inventory commands to create a Custom Field and import data:
1. Identify computers to update
First, we need to identify which computers you wish to add values to.
If you want to update all computers, you'll need to use something like the following (using sqlite3.exe):
$DBPath = "C:\programdata\Admin Arsenal\PDQ Inventory\Database.db"
$SQL = "Select Name from Computers;"
$Computers = sqlite3.exe $DBPath $SQL
Otherwise, you'll need to craft your own SQL statement. For example, to get all computers that contain the word LAB, you would do something like this (emphasis added).
$DBPath = "C:\programdata\Admin Arsenal\PDQ Inventory\Database.db"
$SQL = "Select Name from Computers WHERE Name like '%LAB%';"
$Computers = sqlite3.exe $DBPath $SQL
2. Define Custom Field name and type
Once you've picked the computers you wish to update, we'll need to get the data that you want to add as a Custom Field.
Let's create a Custom Field called Department. We'll give it a data type of String since we'll be using text as the value. The only available Custom Field data types are: Boolean, String, Integer, Date, and DateTime.
$CustomFieldName = "Department"
$CustomFieldType = "String" # Boolean, String, Integer, Date, or DateTime
3. Loop through computers and update values
Since the ImportCustomFields command is expecting a CSV file, you're going to need to create one. So, let's create an array with our CSV headers.
$ComputerList = @("ComputerName,$CustomFieldName")
Then, we're going to loop through each computer (with ForEach-Object) in $Computers and then give it a value of Sales for the Department and add it to the $ComputerList array.
$Computers | ForEach-Object {
   $ComputerList += "$_,Sales"
}
4. Export computers and values to CSV
Next, we're going to create a temp file (with Out-File) for our CSV and export our $ComputerList to that file.
$TempFile = New-TemporaryFile
$ComputerList | Out-File $TempFile
5. Create Custom Field with PDQ Inventory command line
Before you can import the CSV file that we created, we're going to need to make the Custom Field. So, let's use the CreateCustomField command you looked at earlier.
PDQInventory.exe CreateCustomField -Name $CustomFieldName -Type $CustomFieldType
6. Use Custom Fields Import Wizard from command line
Since you've created the Custom Field, we can now use PDQ Inventory's Custom Fields Import Wizard to import the data into our database.
PDQInventory.exe ImportCustomFields -FileName $TempFile -ComputerColumn "ComputerName" -CustomFields "$CustomFieldName=$CustomFieldName" -AllowOverwritePutting it all together
Now that we've gone over each section, let's throw a script together that you can use.
$DBPath = "C:\programdata\Admin Arsenal\PDQ Inventory\Database.db"
$SQL = 'Select Name from Computers;'
$Computers = sqlite3.exe $DBPath $SQL

$CustomFieldName = "Department"
$CustomFieldType = "String" # Valid types - Boolean, String, Integer, Date, or DateTime

$ComputerList = @("ComputerName,$CustomFieldName")
$Computers | ForEach-Object {

$ComputerList += "$_,Sales"

}

$TempFile = New-TemporaryFile
$ComputerList | Out-File $TempFile

PDQInventory.exe CreateCustomField -Name $CustomFieldName -Type $CustomFieldType
PDQInventory.exe ImportCustomFields -FileName $TempFile -ComputerColumn "ComputerName" -CustomFields "$CustomFieldName=$CustomFieldName" -AllowOverwrite
And that's it! Now, you can modify this to suit your needs and get all your data imported like a boss.
Wrapping up
You now wield the power to more easily create Custom Fields and fill them with glorious data. Hopefully, this will help get all kinds of custom data into your PDQ Inventory database for a more complete view of your environment.
Happy PowerShelling!
To see this in action, please check out this short video:
Loading...


