

Did you know you can take screenshots with PowerShell? While PowerShell is usually used to manage systems and automate processes, with a little know-how and some creativity, there’s not much it can’t do. And that includes taking super crisp, clean screenshots.
Why use PowerShell to take screenshots?
Now you might be asking yourself why you would take screenshots with PowerShell when other GUI-based alternatives already exist. The main reason is flexibility.
Perhaps you need to automate a process and include screenshots. Maybe you need to take a screenshot of a remote system. While the ability to quickly fire off a screenshot is handy, and the editing capabilities of something like Snagit are great for procedures, blogs, etc. — they’re limited to what they were designed to do.
How to take a screenshot with PowerShell and .NET
Capturing a screenshot with PowerShell breaks down into several key steps. First, we need to get the screen information to determine the screen capture size. Next, we create a bitmap object to save our screen capture to. Then, we create a graphics object to perform the screen capture. Lastly, we save our screen capture to a file.
1. Identify the total screen width and height
The first thing we need to do is get our screen width and height using the System.Windows.Forms.SystemInformation.VirtualScreen class. This sets the properties for the area we want to capture.
$Screen = [System.Windows.Forms.SystemInformation]::VirtualScreen
$Width = $Screen.Width
$Height = $Screen.Height
$Left = $Screen.Left
$Top = $Screen.Top
2. Create a bitmap object
We need to create a bitmap object to store our image. We can do that in a number of ways thanks to the many constructors of System.Drawing.Bitmap. One of the simplest ways is to just specify the width and height (in pixels) for the bitmap that you wish to create, which we already collected in the previous step.
$bitmap = New-Object System.Drawing.Bitmap $Width, $Height3. Create a graphics object
The System.Drawing.Graphics class is used as a drawing surface to draw on the bitmap object. This is what we’ll use to perform a screen capture. For our purposes, we will create a graphics object by using the previously created bitmap object. This creates a graphics object with the same width and height as the bitmap.
$graphic = [System.Drawing.Graphics]::FromImage($bitmap)4. Perform a screen capture
Using the graphics object we previously created, we’ll use one of the methods provided, (CopyFromScreen) in order to capture an area of the screen. We’ll set the coordinates to copy to and from (destination and source, respectively). We’ll also set the size of the area that we wish to copy.
$graphic.CopyFromScreen($Left, $Top, 0, 0, $bitmap.Size)5. Save to file
The last thing we need to do is to save the bitmap to a file.
$bitmap.Save($File)You can compress and save this bitmap in other formats, but that is out of the scope of this blog post. If you want to learn more, Microsoft showed off how to output as a JPEG with several different quality levels.
Finalized script to take a screenshot with PowerShell
With all those steps out of the way, it’s time to put it all together into a complete script that allows you to take a screenshot with PowerShell. Here’s the script:
#############################################################################
# Capturing a screenshot
#############################################################################
$File = "\\SomeLocation\SomeDirectory\MyFancyScreenshot.bmp"
Add-Type -AssemblyName System.Windows.Forms
Add-type -AssemblyName System.Drawing
# Gather Screen resolution information
$Screen = [System.Windows.Forms.SystemInformation]::VirtualScreen
$Width = $Screen.Width
$Height = $Screen.Height
$Left = $Screen.Left
$Top = $Screen.Top
# Create bitmap using the top-left and bottom-right bounds
$bitmap = New-Object System.Drawing.Bitmap $Width, $Height
# Create Graphics object
$graphic = [System.Drawing.Graphics]::FromImage($bitmap)
# Capture screen
$graphic.CopyFromScreen($Left, $Top, 0, 0, $bitmap.Size)
# Save to file
$bitmap.Save($File)
Write-Output "Screenshot saved to:"
Write-Output $File
#############################################################################
Before you run this script, make sure you modify the $File variable and set the location to where you want to save the screenshot. You can use a UNC path or a local directory, though if you want to utilize this to capture a remote screenshot, you’ll want to use a UNC path. More on that in the next section.

Install (and uninstall) without disruption
Try PDQ Deploy & Inventory — free for 14 days.
Remote screenshots with PDQ Deploy
Since PDQ Deploy is awesome and can deploy pretty much anything (software, scripts, patches, you name it), we can utilize it to take a screenshot of a remote user desktop with a modified version of the screenshot script. Before we build the package in Deploy, save this PowerShell script as a PS1 file to your PDQ Deploy repository or somewhere that you can easily reference it.
#############################################################################
# Capturing a screenshot
#############################################################################
Param(
[Parameter(Mandatory = $true)][string]$Path
)
$FileName = "$env:COMPUTERNAME - $(get-date -f yyyy-MM-dd_HHmmss).bmp"
$File = "$Path\$FileName"
Add-Type -AssemblyName System.Windows.Forms
Add-type -AssemblyName System.Drawing
# Gather Screen resolution information
$Screen = [System.Windows.Forms.SystemInformation]::VirtualScreen
$Width = $Screen.Width
$Height = $Screen.Height
$Left = $Screen.Left
$Top = $Screen.Top
# Create bitmap using the top-left and bottom-right bounds
$bitmap = New-Object System.Drawing.Bitmap $Width, $Height
# Create Graphics object
$graphic = [System.Drawing.Graphics]::FromImage($bitmap)
# Capture screen
$graphic.CopyFromScreen($Left, $Top, 0, 0, $bitmap.Size)
# Save to file
$bitmap.Save($File)
Write-Output "Screenshot saved to:"
Write-Output $File
#############################################################################
Here’s how to set up the package in PDQ Deploy.
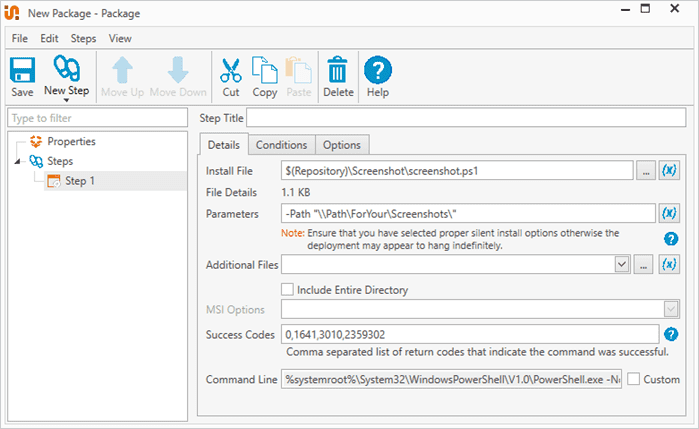
Click New Package, then give the package a name.
Click New Step > Install.
In the Install Filefield, navigate to or enter the path of the saved script.
Add -Path “\\Path\ForYour\Screenshots” to the Parameters field, using a UNC path where you want the file to be saved.
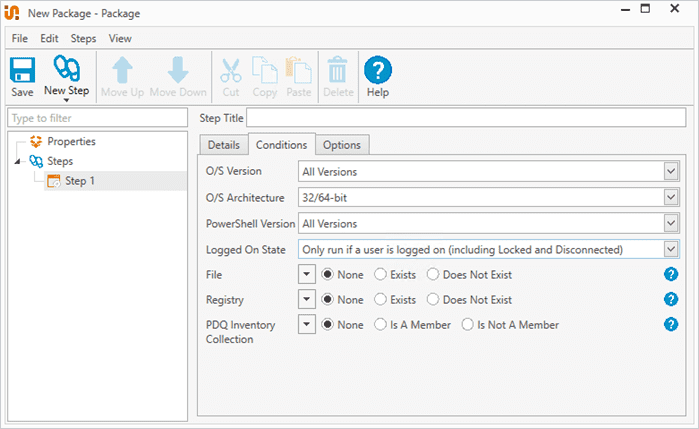
Click the Conditions tab, then set the Logged On State to Only run if a user is logged on (including Locked and Disconnected).
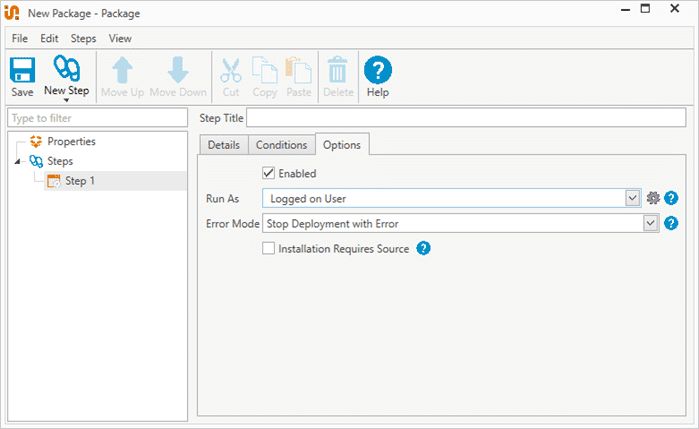
Click the Options tab, then set Run As to Logged on User.
Click Save to save and close the package.


With the package saved, you’re ready to collect screenshots from your managed endpoints. But there are a few details I should point out.
The script fails if somebody isn’t logged in to the machine, which is why we set the conditions the way we did.
Since we’re running this script with PDQ Deploy in the context of a logged-on user, the logged-on user needs write permissions to the path that you specify in the Install Step. Otherwise, they won’t be able to save the screenshot.
The path you specify needs to exist for this to work. You can add logic into your script to check for the path or to force its creation. For example, to force the directory to be created, you can do something like this:
New-Item -ItemType Directory -Force -Path $Path
A video is worth a thousand screenshots
If a picture is worth a thousand words, then a video must be worth at least a thousand screenshots. Which is why the ability to remote in to a device to troubleshoot issues live in PDQ Connect is so valuable. In fact, if you really wanted, you could take a screenshot while connected to a remote desktop session.
To demonstrate the power of remote desktop, here’s a video showing just how effortless remote desktop is with PDQ Connect.
Loading...
When you’re ready, you can try out remote desktop and all the other powerful endpoint management tools that come with PDQ Connect free for 14 days.


