

TL;DR: There are three ways to change DNS server settings in Windows:
Control Panel: The classic method that works in both Windows 10 and 11.
Settings App: Streamlined in Windows 11; a bit clunky in Windows 10.
PowerShell: For scripting, automation, and IT pros who like total control or want to level up their skillset.
Popular DNS servers:
Google DNS: 8.8.8.8, 8.8.4.4
Cloudflare DNS: 1.1.1.1., 1.0.0.1
OpenDNS: 208.67.222.222, 208.67.220.220
You can change DNS server settings in Windows 10 and Windows 11 using Control Panel, the Settings app, or PowerShell. Switching DNS servers can improve internet speed, reliability, and privacy. This guide explains all three methods step by step.
What is DNS?
DNS (Domain Name System) translates domain names like www.pdq.com into into IP addresses so devices can locate and communicate with each other on a network. IP addresses are unique numbers given to networkable devices like computers, cellphones, smart devices, and domains that allow them to communicate and transmit data with one another. An example of an IPv4 address is 104.16.210.88.
DNS is important because it allows people to use domain names like www.pdq.com and network resource names like FILE-SERVER01 instead of IP addresses, which are more difficult to remember. When a user tries to navigate to a website or network resource using a name, DNS is queried and returns the corresponding IP address that can then be used to navigate to the correct destination. This process happens seamlessly and in the background. (Which is my favorite way for processes to happen.)
Understanding how DNS works makes it easier to know why and how to change DNS server settings in Windows. To learn more about DNS, check out our ultimate guide to DNS.
Why change your DNS server settings in Windows?
Changing DNS server settings can improve speed, security, and reliability. Here are the main reasons to switch.
Faster DNS resolution
Most internet-connected devices automatically use DNS servers designated by their internet service providers (ISP). For example, if your ISP is Comcast, it automatically directs you to its DNS servers at the IP addresses 75.75.75.75 and 75.75.76.76. But if you're looking to change your DNS server in Windows for better speed, tools like DNS Benchmark can help.
Privacy concerns
In our modern, always-connected society, our privacy is constantly at risk. And while limiting our compulsive social media habits would significantly reduce that risk, even DNS provides a means for service providers to collect our DNS queries, which can be used to establish a user profile.
If privacy is a concern, I recommend looking into the privacy policy of various DNS hosts to find one that meets your privacy expectations.
Reliability
Reliability is a major concern when it comes to DNS. An unreliable DNS server can result in slow, unresponsive DNS queries and ultimately lead to a loss of internet connectivity. When deciding which DNS server to use, pick one from a reputable provider with high availability and redundancy.
How to change DNS server settings in Windows using Control Panel
One of the easiest ways to change DNS settings in Windows is through the classic Control Panel. It’s quick, straightforward, and probably the oldest method on this list. Best of all, it still works on both Windows 10 and Windows 11. Even though Microsoft keeps nudging everyone toward the newer Settings app, the Control Panel remains functional — and honestly, I still find myself clicking into it out of habit. There’s just something comforting about the familiar. If you’re like me, here’s how you can update your DNS settings using Control Panel.
Enter control panel into the Windows search bar, then click on the Control Panel app.

2. Click on View network status and tasks.

3. Click on the name of your connection next to the Connections: field.

4. In the status window, click Properties.
5. In the properties window, select Internet Protocol Version 4 (TCP/IPv4), then click Properties.

6. Select Use the following DNS server addresses: and enter the IP addresses of the DNS servers you want to use. Here are a few popular servers that you can try.
OpenDNS: 208.67.222.222 & 208.67.220.220
Cloudflare DNS: 1.1.1.1 & 1.0.0.1
Google DNS: 8.8.8.8 & 8.8.4.4
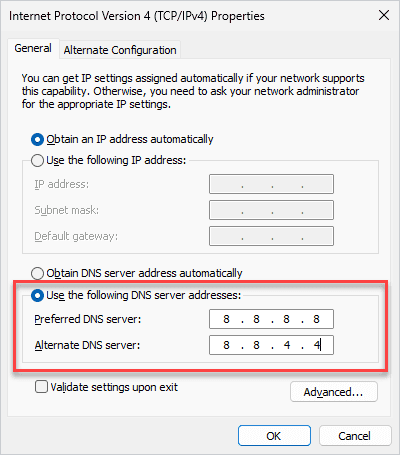
This is where you enter new IPs to configure your DNS settings in Windows manually.

7. When you’re finished, click OK, then close the Properties and Status windows.
That’s all there is to it. You’ve successfully changed your DNS server settings. However, continue reading to learn about the newer methods, especially since Control Panel may disappear in future versions of Windows.

Patch, secure, and support endpoints from anywhere
Deploy software, automate maintenance, remediate vulnerabilities, and troubleshoot remote Windows and macOS devices with PDQ Connect.
How to change DNS server settings in Windows 10 using Settings
Microsoft is transitioning all the settings away from Control Panel and into the Settings app. In Windows 10, the Settings app has many — but not all — of the configuration options found in Control Panel. As a result, this method uses a combination of both the Settings app and the Control Panel.
1. Click on the Windows button.
2. Click on the Gear (settings) icon.

3. Click Network & Internet.

4. Click Change adapter options.
5. Double-click on your adapter.

6. Repeat steps 4 through 7 of the previous method.
While this method works, transitioning from the Settings app to Control Panel feels a bit clunky.
How do to change DNS server settings in Windows 11 using the Settings app
In Windows 11, you can change DNS server settings directly in the Settings app without opening Control Panel. Here's how to update your DNS settings using just the Windows 11 Settings app.
1. Right-click on the Windows button, then click Settings.

2. Click Network & internet.
3. If you are using Wi-Fi, click Wi-Fi, click Hardware properties, then click Edit next to DNS server assignment. If you are using an ethernet connection, click Ethernet, then click Edit next to DNS server assignment.

4. Using the drop-down menu, select Manual, then toggle IPv4 to On.
5. Enter the Preferred DNS address and the Alternate DNS address, then click Save.

While the Settings app in Windows 10 was a bit cumbersome, Microsoft significantly improved it in Windows 11, and it might be the quickest way to configure your DNS settings.
How to change DNS server settings with PowerShell
You can change DNS server settings in Windows using the PowerShell command Set-DnsClientServerAddress.
If you’re new to PowerShell, don’t worry. This method uses some basic PowerShell commands, and we’ll walk you through the entire process.
1. Right-click on the Windows button and click Windows PowerShell (Admin). If you’re using Windows 11, click Terminal (Admin).

2. Click Yes if prompted by a User Account Control dialog box.

3. Input the PowerShell command below in the PowerShell prompt to set new DNS servers:
Get-NetIPConfiguration
4. Make a note of your InterfaceIndex number. In the image above, my InterfaceIndex is 6.
5. Enter the following command replacing your InterfaceIndex number and the server address you wish to use:
Set-DnsClientServerAddress -InterfaceIndex 6 -ServerAddresses 8.8.8.8, 8.8.4.46. Ensure the settings have changed by reentering the command: Get-NetIPConfiguration

As you can see, the DNSServer was changed from 192.168.60.30 to Google’s DNS servers, 8.8.8.8 and 8.8.4.4. Now that you know how to change your DNS server using PowerShell, check out The PowerShell Podcast to discover all the other awesome things you can do with PowerShell.
DNS server FAQ
How do I change DNS server settings in Windows 10 and Windows 11?
You can change DNS server settings using Control Panel, the Settings app, or PowerShell. The steps vary slightly by Windows version, but all methods let you set preferred and alternate DNS servers.
What is DNS?
DNS translates domain names like www.pdq.com into IP addresses so devices can locate and communicate with each other on a network.
Why change DNS server settings in Windows?
Changing DNS servers can improve speed, reliability, and privacy compared to default ISP DNS, depending on your network and provider.
What are popular DNS servers?
Common public DNS options include Google DNS (8.8.8.8, 8.8.4.4), Cloudflare DNS (1.1.1.1, 1.0.0.1), and OpenDNS (208.67.222.222, 208.67.220.220).
It’s always DNS
Sysadmins often joke that every network issue eventually leads back to DNS.
Hopefully this guide helps reduce your DNS woes so you can enjoy a smoother, faster, and more secure online experience. Whether you’re using Control Panel, PowerShell, or the Settings app, changing your DNS server settings in Windows 10 or 11 puts you back in control.
Ready to take your skills further? Check out our guide on writing your first PowerShell script.


