

Managing large files can be enough to test the patience of any IT professional. Deploying large files, on the other hand, is what separates the veteran sysadmins from the help desk heroes. But what if I told you deploying large files doesn’t have to be difficult? That’s right, PDQ Connect now supports files up to 20 GB in size, making large file deployments easier than ever.
Why the limit increase?
Many of today’s most commonly used applications, like Chrome, Firefox, Notepad++, 7-Zip, and Visual Studio Code have relatively small installation files, ranging from a couple dozen to a couple hundred megabytes. These types of applications are common among the vast majority of the work force.
Designers, engineers, and architects, on the other hand, are a different breed, often requiring applications that start in the gigabytes and go up from there. Applications like AutoCAD, Revit, SolidWorks, and Unreal Engine can push the boundaries of your bandwidth, disk space, and patience. That’s why it was important for us to ensure sysadmins had a simple solution to manage these massive installers.
How to deploy Autodesk Revit offline installer with PDQ Connect
To demonstrate the increased file size capabilities of PDQ Connect, I’ll walk you through the process of deploying a notoriously large application: Autodesk Revit.
While we’ve highlighted deploying Autodesk applications before, that method used a custom installer that downloads all the installation resources directly from Autodesk. In this article, we’ll actually use the direct download provided by Autodesk to deploy the entire package using PDQ Connect. While both approaches get the job done, it’s up to you to decide which method is best for your endpoints.
How to obtain the Revit direct download files from Autodesk
The first thing we need to do is download the offline Revit files from Autodesk.
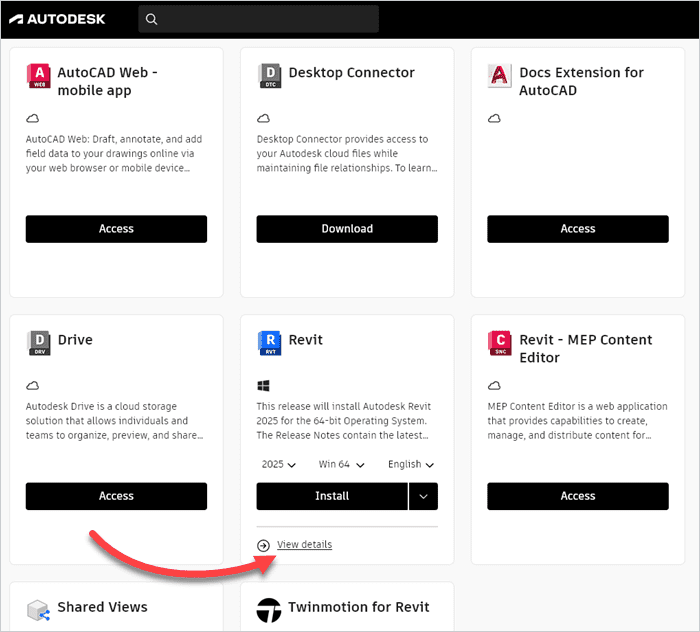
Log into your Autodesk management portal, then click the Products and Services tab.
Locate Revit, then click View details.
Click the drop-down menu next to the Install button, then click Direct download.
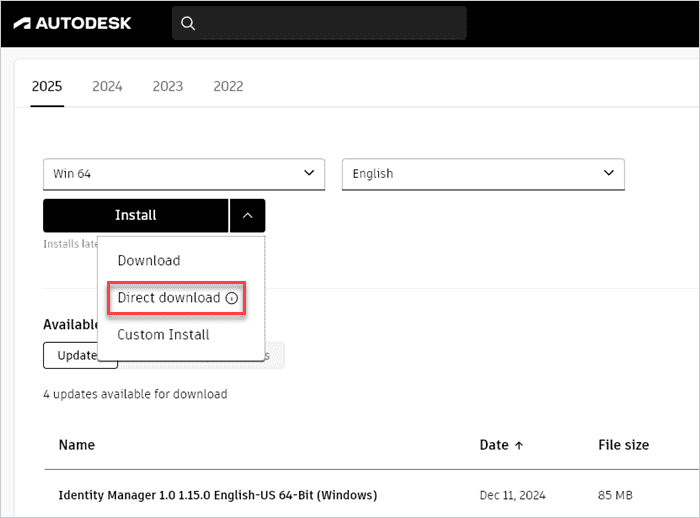


An installer file and an archive (7-Zip) file should begin to download into your Downloads directory. The installer file should be small, only a dozen or so megabytes, but the archive file will likely be over 10 gigabytes, so make sure you have plenty of free disk space.
Creating an Autodesk Revit package in PDQ Connect
Once the files finish downloading, we’re ready to create our Revit package in PDQ Connect.
Log in to PDQ Connect, then click on the Packages tab.
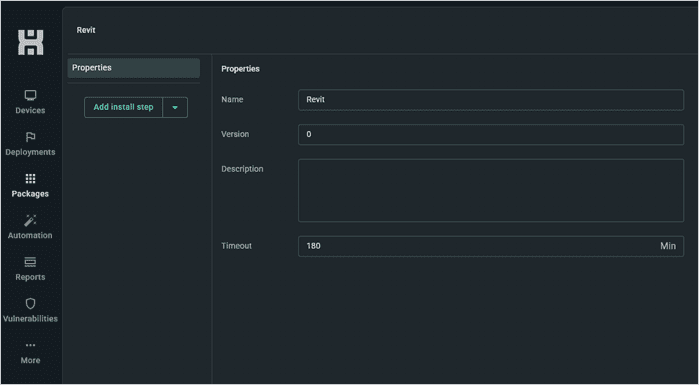
Click Create package, then give the package a name.
I recommend configuring the Timeout setting somewhere between 120 and 180 minutes since we’re dealing with such a large file. This setting can be changed in the future once you get a better idea of how long the deployments take, which will largely depend on your target’s bandwidth.
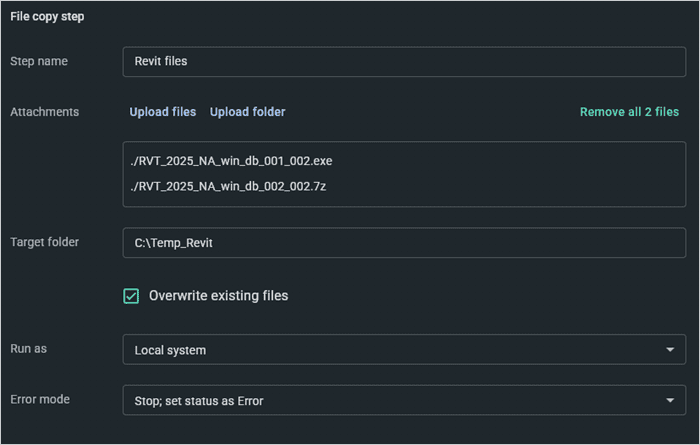
Click the drop-down next to the Add install step button, then click Add file copy step.
Click Upload files, select the Revit files, then click Open. It’ll probably take a couple of minutes for the files to upload.
Set the Target folder location.
Click the drop-down button again, then click Add script step.
Set the type to Cmd, then add this command:
“C:\<target_folder>\<revit_installer_name.exe>” -q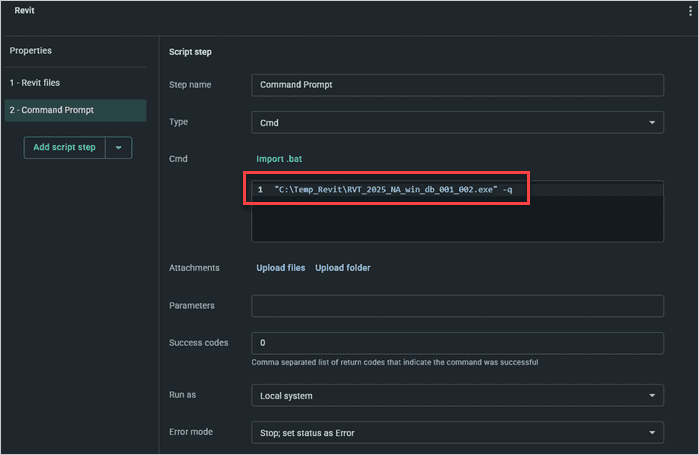
Click Save to finish and save the package.


With the package saved, it’s ready to deploy. If disk space is a concern, you could add an additional script step to remove the installation files at the end.
Keep in mind that this is my preferred package configuration when dealing with large files to ensure all the files get transferred. You could simplify this package and only use one install step. Attach the installer, attach the .zip file as an additional file, then add your silent parameter.
Deploying Revit with PDQ Connect
Deploying a large package like Revit with PDQ Connect is just as easy as any other package deployment. The only real difference is the time it takes for the deployment to finish. Here’s how to do it.
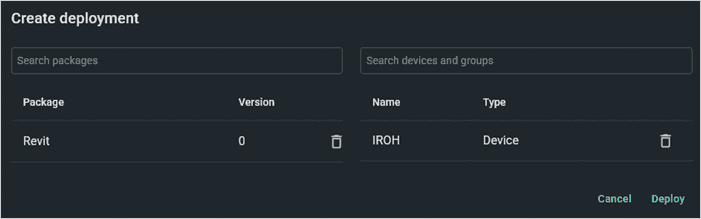
Select the Revit package, then click Deploy. If you don’t see the package right away in the Packages tab, use the search bar at the top of the page to filter for it.
In the Search devices and groups field, enter the name of a device or group that you want to deploy the package to.
When you’re ready, click Deploy.

As with any new package, I recommend deploying to one or two test devices to ensure everything is working. This also gives you a rough estimate of how long your deployments will take.
Large application deployments made easy
Deploying large applications like Revit across a local area network is one thing, but being able to deploy it to remote devices with a simple package is next-level convenience.
Does this mean we have to stop complaining about Autodesk deployments? Nah. I’m sure we can find something other than the large file size to complain about.
Loading...

