If there’s one thing that sysadmins have an abundance of, it’s acronyms. I’m pretty sure we have enough at this point that it could be considered a new language. Today’s acronym of discussion is DFS. No, I’m not referring to daily fantasy sports or discount furniture stores. We’ll have to table those topics for another time. Instead, this article will take a deep dive into the world of distributed file systems.
What is DFS
DFS (distributed file system), as the name suggests, is all about distributing your files across multiple servers and locations to provide high availability and reduce network traffic across the WAN. Replication ensures that no matter which server you connect to, the files will always be the same.
To keep this acronym train going, let’s add on a couple more. DFSR, which stands for distributed file system replication, and DFSN, which stands for distributed file system namespace, are two core components of DFS. DFSR is what ensures data is synchronized across servers. DFSN enables location transparency by allowing users to access file shares under a unified namespace.
With the acronyms out of the way, let’s look at an example of how this might be configured. Company A has two sites, site 1 and site 2. Site 2 is located an hour away and has a slow WAN connection. Currently, site 2 accesses the file shares across the WAN, which is slow, and this setup doesn’t provide fault tolerance. To resolve this, Company A installs a server at site 2 and configures DFSR and DFSN. With DFSR, the files are now distributed and synchronized across the servers on site 1 and site 2, providing quicker access to files for users at site 2 and providing fault tolerance if one of the servers goes down. With DFSN, the users don’t have to decide which server to connect to. They just connect to the unified namespace, and Windows will take care of the rest.
How to configure DFS
Configuring DFS is pretty straightforward, and with this guide, we’ll have you distributing your files all over the place in no time. If you haven’t already, go ahead and get at least 2 Windows servers setup and online before proceeding to the next step.
Installing server roles
We’ll start by installing the server roles. This process is similar for both servers, except you only need to install the DFS Namespaces roll on your primary server.
Open Server Manager
Click Manage > Add Roles and Features
Click Next on the Before You Begin page
Select Role-based or feature-based installation and click Next
Ensure you have the correct server selected for the installation and click Next
Expand File and Storage Services and then expand File and iSCSI Services
Select DFS Replication
When the Add features window appears, click Add Features
For the primary server only, also select DFS Namespaces
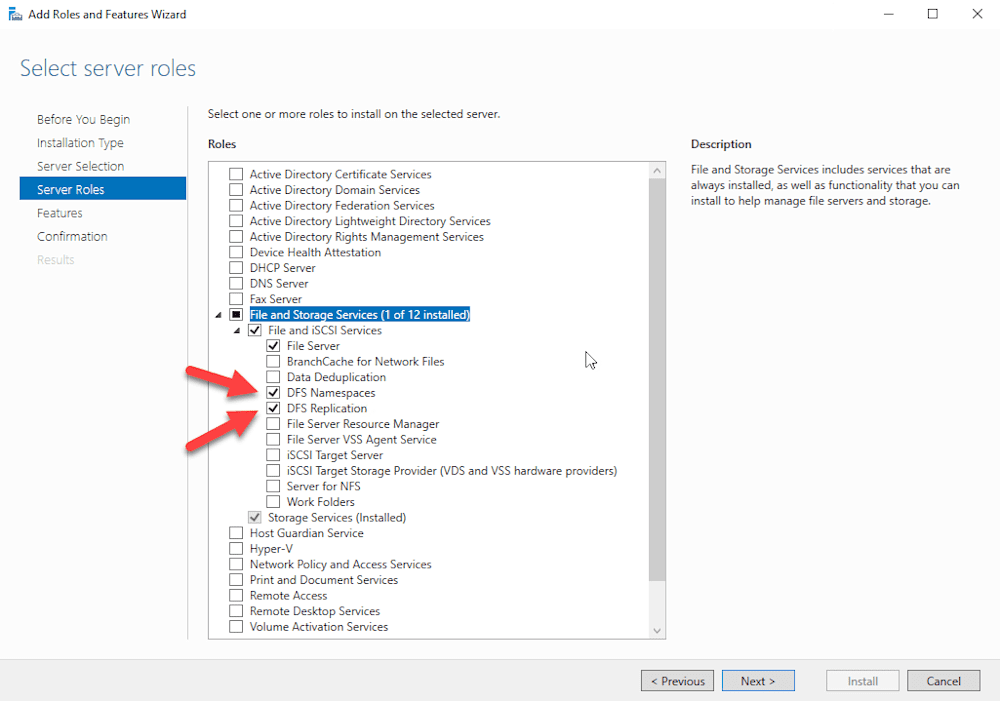
Click Next twice and then click Install
Repeat this process for remaining servers, skipping step 9
Configuring DFS Namespaces
Now that the roles are installed, we’ll configure the DFS Namespace.
From Server Manager, click Tools and then click DFS Management
Right-click on Namespaces and select New Namespace
Enter the server name for your namespace server and click Next
Enter a name for the namespace. In my example, I’ll use the name Data, then click Next
On the Namespace Type page, you should use the Domain-based namespace with Windows Server 2008 mode enabled unless you have a specific reason to use a stand-alone namespace
Review your settings and click Create
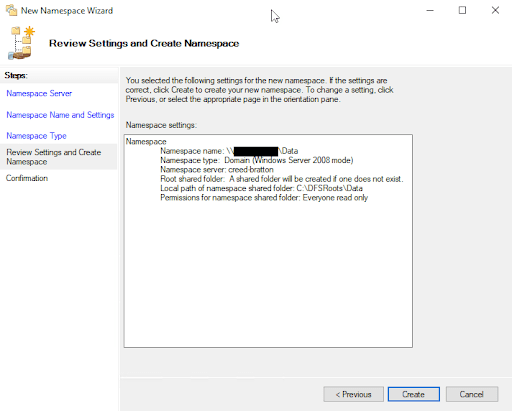
Click Close when finished
Configuring replication
With the namespace created, let’s move on to setting up replication.
With the DFS Management console open, right-click on Replication and select New Replication Group
Select Multipurpose replication group and click Next
Name your replication group, ensure you have the correct domain selected, and click Next. For our example, we’ll use the name stick with the name Data
On the Replication Group Members screen, click Add, type in the names of the servers we want to add to the group
Once you’ve added all your servers to the group, click Okay and then click Next
For topology, select Full Mesh and then click Next
The Replication Group Schedule and Bandwidth page allows you to customize how much bandwidth you want to use. If you aren’t concerned with bandwidth usage, you can select Replicate continuously using the specified bandwidth and choose Full under bandwidth and watch that replication fly. If you want to limit your bandwidth usage, you can change Full to any bandwidth limit that works for you. If you only want to limit bandwidth usage during office hours, you can select Replicate during the specified days and times and click Edit Schedule. Here is an example that allows full bandwidth at night and on the weekends but limits bandwidth to 32Mbps from 6 AM to 6 PM Monday through Friday.
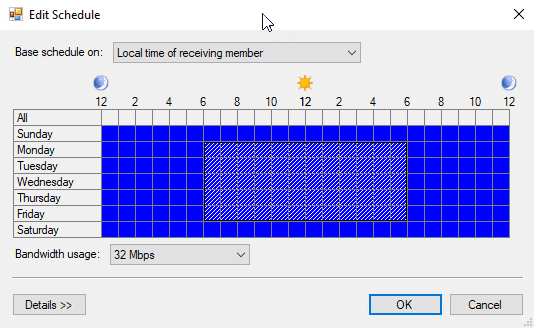
Once you configure your bandwidth settings, click Next
Select your primary member server and click Next
Click Add, then type in the path of the folder you want to replicate or browse out to it using the Browse button. Ensure you have shared this folder and have configured the NTFS permissions appropriately.
Click OK and then click Next
Click Edit to edit the path of the folder we want to share on other servers in our replication group
Click Enable and enter the folder path or browse to it using the Browse button. Once entered, click OK
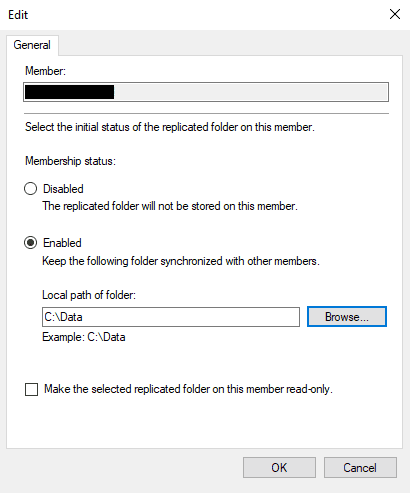
Click Next, then review your settings carefully and click Create
Click Close, and a Replication Delay message will appear informing you that replication will not begin until the configuration is picked up by all the members of the replication group.
Click OK
Publishing our namespace
Now with everything configured, all that’s left to do is to publish our namespace.
With the DFS Management console open, click on Replication and then double-click the replication group
Click on the Replicated Folders tab, and you will see that our replication folder is not published
Right-click on the replicated folder and click Share and Publish Namespace
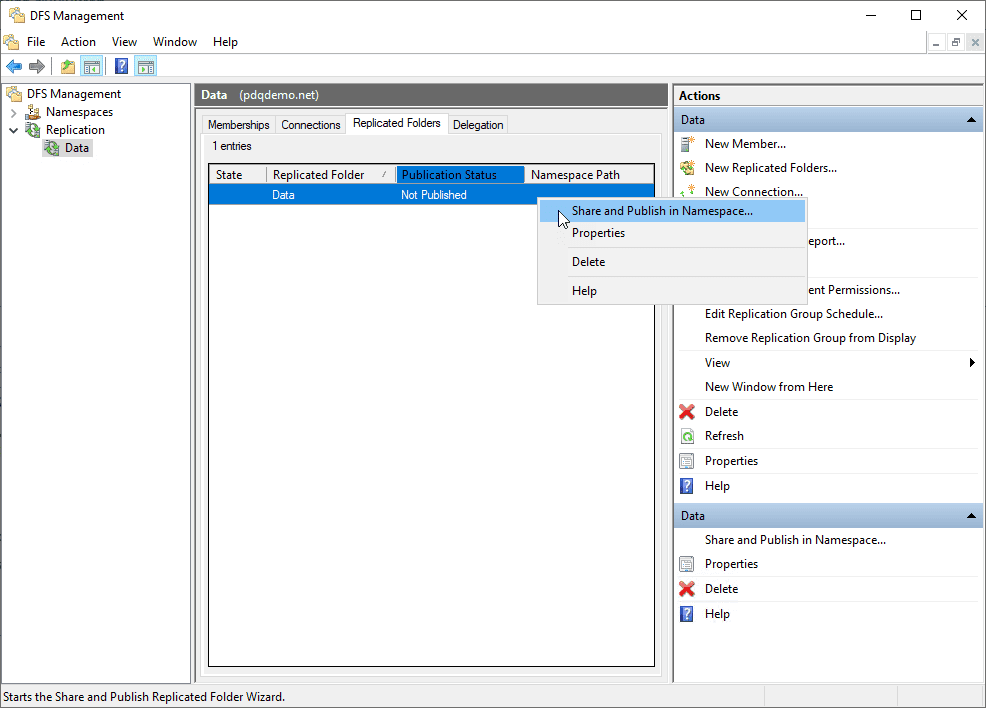
When the wizard pops up, make sure Share and publish the replicated folder in a namespace is selected and click Next
Click Next on the Share Replicated Folders screen
On the Namespace Path screen, click Browse and select your namespace and click OK
Name your folder. I’ll use the name Files and click Next
Review your settings and if everything looks good, click Share
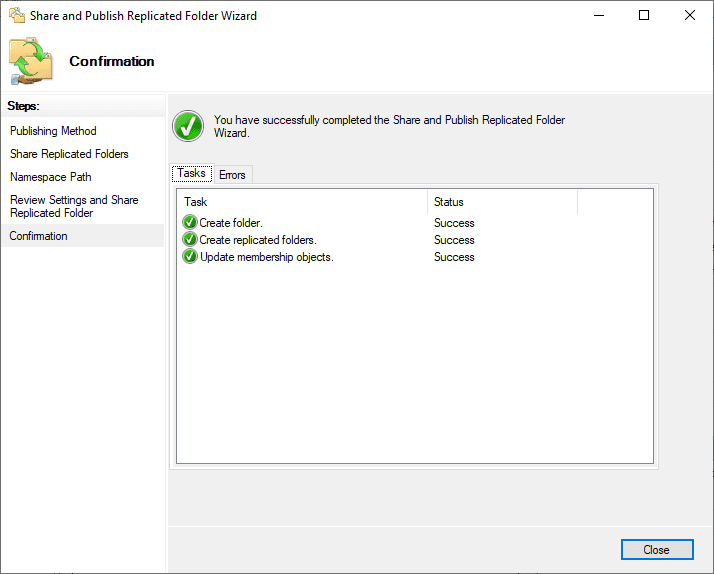
You should be given a confirmation screen that lets you know if everything completed successfully. Click Close
Testing
With our namespace published, it’s a good idea to test things out before blasting out an email to all users. Let’s first make sure replication is working. An easy way to do this is to create a text file on the replicated folder on server 1, then check it on server 2 to make sure it replicated. To ensure replication is happening both ways, you can add another file on server 2 and go back to server 1 the make sure it’s there.
With replication checked, let’s make sure we can access our namespace. If you’re like me and have already forgotten your namespace’s path, you can double-check it by launching DFS Management and opening up the replication group. Click on the Replicated Folders tab, and your namespace path will be listed there. Copy that path into Windows Explorer and make sure you can access it. If you left the test file from your replication test in your replicated folders, you should see it when you access the namespace path.
DFS and PDQ Deploy
You know what goes together like peanut butter and chocolate? DFS and PDQ Deploy. By harnessing the power of DFS, we can keep local copies of deployment files on our DFS shares. While we all love large packages, deploying those large packages across a slow WAN is no fun. Let’s go over everything needed to make this terrific tag-team duo work.
First, make sure you have a DFS share created, and that replication is working. If you’ve done everything in this article up to this point, then you should be covered. Next, and this is crucial, ensure that the credentials you use for PDQ Deploy have read and write access to this share. If the permissions aren’t set correctly on the folders, your deployments will fail.
If your share is configured and you’ve triple-checked your permissions, then go ahead and copy your deployment files from your current repository into your new DFS share. If you have a large amount of data that needs to replicate, consider doing this overnight.
Once all of the data has been replicated across your DFS servers, we can configure PDQ Deploy to point to the new repository. To do this, open PDQ Deploy and click on Options > Preferences > Repository. Now change the repository field to point to the DFS namespace you created.
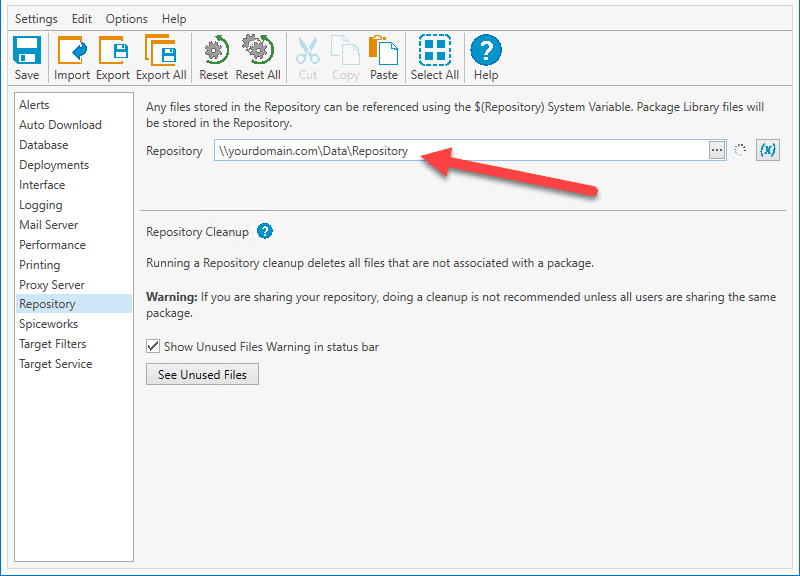
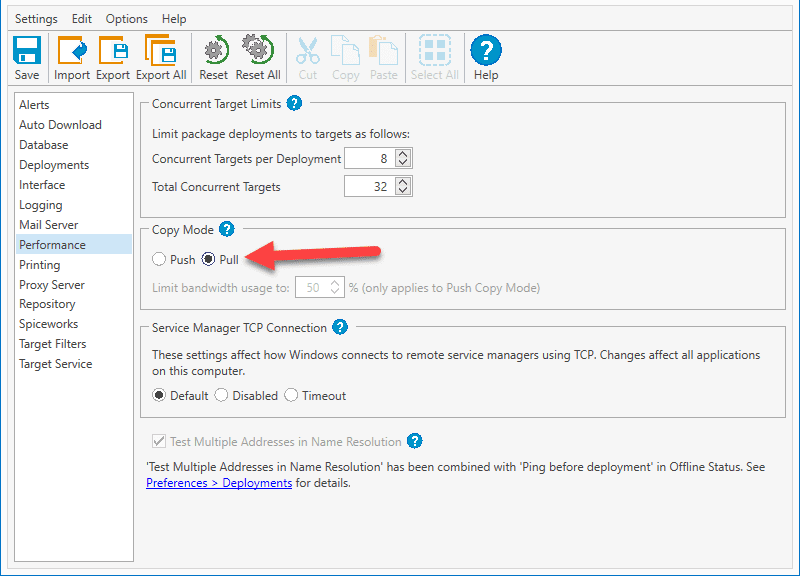
Last but not least, we need to make sure we change our copy method from Push to Pull. With the PDQ Deploy Preferences window still open, click on Performance. Under Copy Mode, select Pull.
If DFS isn't right for you, fear not! Explore PowerShell as a DFS alternative.
Wrapping up
One of the most valuable assets a company owns is its data. DFS not only protects this data by providing fault tolerance, it also makes it quicker to access from remote sites. Win-win! Also, check out how PowerShell can help your data safe by securing passwords.
Hopefully, this article was able to help you set up your own DFS. If you need more help, you can always check out one of our many YouTube videos that cover this topic, like this one. If you’re running into issues trying to implement DFS with PDQ Deploy, we’ve got a whole team of support people willing and eager to help.

