APPX packages can be difficult to manage. Even knowing what .appx packages are installed on a Windows device can test the patience of veteran IT professionals. Thankfully, Microsoft provides a way to find and manage even the most stubborn .appx packages with PowerShell.
Why are .appx packages hard to manage?
APPX packages, otherwise known as Microsoft Store apps, Universal Windows Platform (UWP) apps, and MSIX apps, aren’t built like traditional machine-wide installers. Unlike most traditional MSI and EXE installers, .appx packages are per-user installs, which means that many of the installation files and registry entries are tied to the user profile that installed the application.
So why are per-user installs an issue? I’m glad you asked.
When installation files and registries are tied to a specific user profile, knowing what software is installed on a device becomes more challenging. For example, the Start menu likely won’t list .appx packages installed under another user’s profile, which makes it difficult for administrators to identify all the software installed on a device. This can also pose a security risk, especially if there is unauthorized software installed on a user’s profile.
How to identify .appx packages with PowerShell
The easiest way to identify installed .appx packages is with the PowerShell cmdlet Get-AppxPackage. Get-AppxPackage returns a list of all .appx packages installed on the current Windows user profile. Keep in mind that if you don’t include any additional filters or parameters, this command returns a lot of results but does not include .appx packages installed on other users’ profiles.
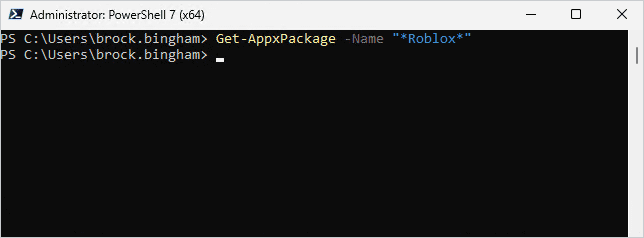
For example, I have a Windows 11 machine with the Roblox .appx package installed on it. If I run Get-AppxPackage -Name “*Roblox*” while logged into my administrator account, Roblox is not returned as a result.
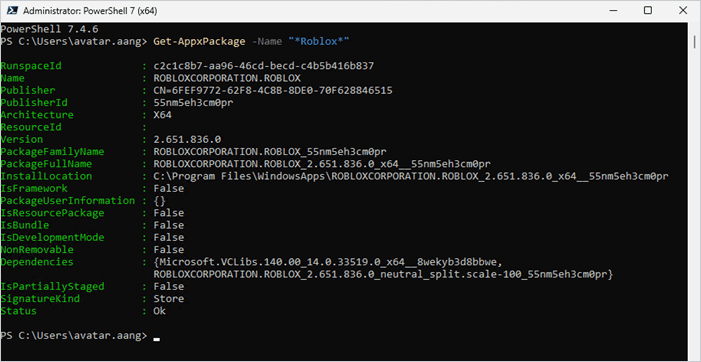
But, if I log into the profile that installed Roblox and run the same command, I now get the result I’m looking for.
How to identify .appx packages for all users
To look for .appx packages installed under all user profiles, use the -AllUsers parameter with the Get-AppxPackage cmdlet. The -AllUsers parameter searches for .appx packages installed under all user profiles. Make sure to launch PowerShell as an administrator any time you intend to use the -AllUsers parameter or the command will fail.
To show the -AllUsers parameter in action, I’ll search for the same Roblox package as before using the account that doesn’t have it installed. However, because I’m using the -AllUsers parameter, the package information should be returned.
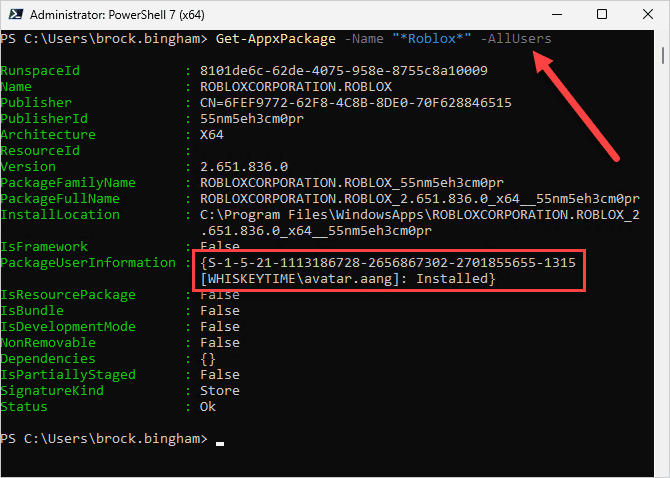
Another benefit of using the -AllUsers parameter is that that the command returns which profile the .appx package is installed under.
How to scan for .appx packages with a PowerShell Scanner in PDQ Inventory
To make it even easier to identify .appx packages on your managed devices, let’s create a PowerShell Scanner in PDQ Inventory. For this scanner, we’ll specifically scan for .appx packages that have the property NonRemovable set to false.
Get to know your devices on an intimate level
PowerShell Scanners in PDQ Inventory ensure your devices aren’t keeping any juicy secrets to themselves that you should know about.
Here’s how to create an .appx PowerShell Scanner in PDQ Inventory.
In PDQ Inventory, click Scan Profiles.
In the Scan Profiles window, click New.
Name the scan profile, then click Add, then click PowerShell.
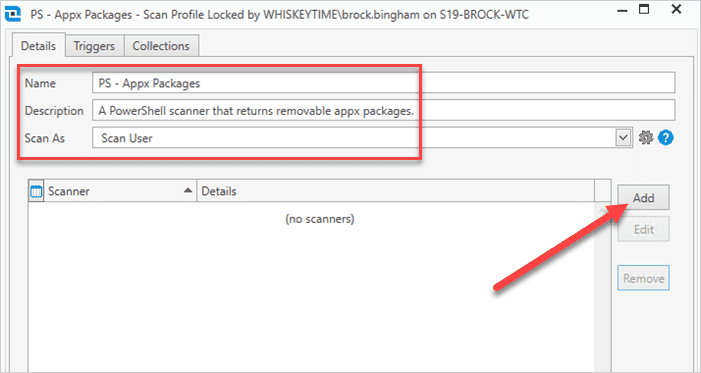
Add a scanner name, then select the Script radial button.
Add this PowerShell script to the script pane:
$apps = Get-AppxPackage -AllUsers | Where-Object { $_.NonRemovable -eq $false }

ForEach ($app in $apps){
    [PSCustomObject]@{
        Name = $app.Name
        Location = $app.InstallLocation
    }
}
Click OK to save the scanner, then click OK to save the scan profile.
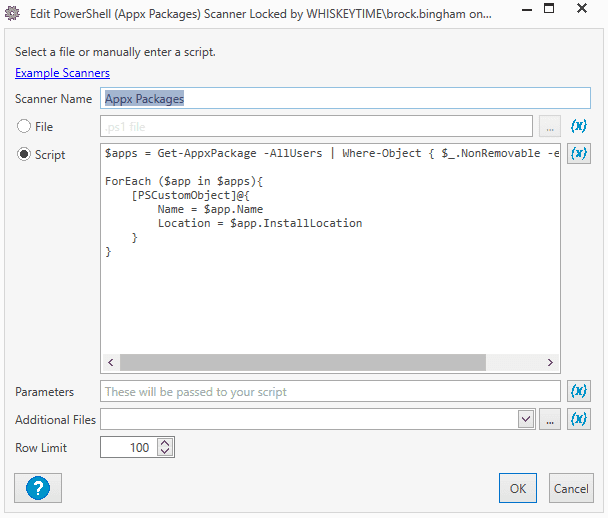
With the scan profile created, you’re ready to run it against your devices and view the results. Here’s how.
Right-click All Computers, then click Scan Collection > (Your scanner name).
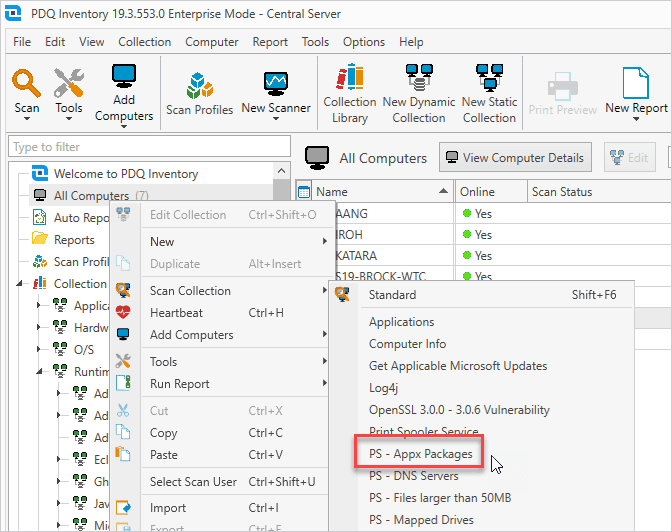
Once the scan finishes, double-click on a device to open the device details window.
In the left menu, click PowerShell.
Select your PowerShell Scanner from the PowerShell Scanner drop-down menu.
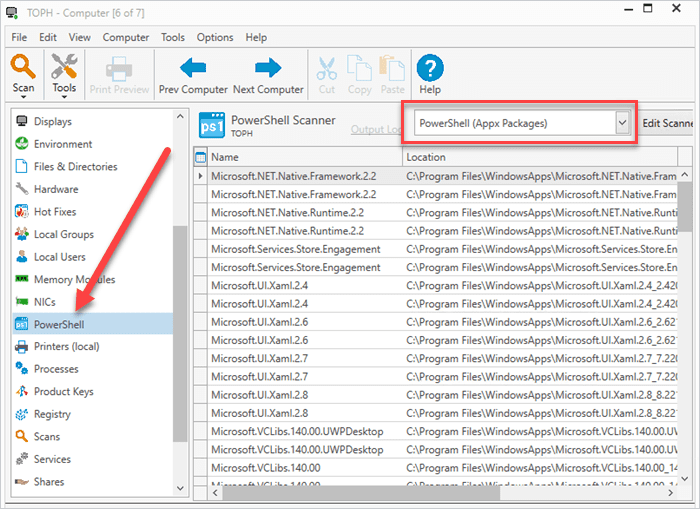
With your computers scanned, you can easily see what .appx packages are installed on your devices. When you’re ready, you can take that information and create dynamic collections and reports based on the scanner results.
How to create an .appx allowlist in PowerShell
Often, the reason you are trying to find installed Microsoft Store apps (.appx packages) is so you can uninstall them. And I am completely on board with this train of thought. However, as Microsoft transitions more necessary applications to .appx packages, it’s important not to accidentally uninstall something important. That’s where an allowlist comes in.
To create an allowlist in PowerShell, make an array listing all the .appx package names you want to keep. Keep in mind that this list is only an example and not an exhaustive list. Please verify your installed packages and which you want added to your allowlist.
$AllowList = @(
'*WindowsCalculator*',
'*Office.OneNote*',
'*Microsoft.net*',
'*MicrosoftEdge*',
'*WindowsStore*',
'*WindowsTerminal*',
'*WindowsNotepad*',
'*Paint*'
)
Now that we have our allowlist, we can create a script that removes unwanted .appx packages.
How to remove .appx packages with PowerShell
Removing .appx packages can be tricky since they are tied to user profiles. However, by running PowerShell as an administrator and using the Remove-AppxPackage with the -AllUsers parameter, we should be able to get most .appx packages uninstalled.
Here’s an example PowerShell command to uninstall an .appx package for all users.
Get-AppxPackage -AllUsers -Name “*Roblox*” | Remove-AppxPackage -AllUsers
In the image above, you can see that I ran the command to uninstall Roblox (sorry kids). After the command finished, I used Get-AppxPackage to search for the Roblox package and no results were returned, meaning the uninstall was successful.
If we want to take this a step further and remove most .appx package installations, we can use a combination of the allowlist we created earlier and the Remove-AppxPackage cmdlet. Again, this is an example and should be used with caution after thoroughly identifying apps you need to include in your allowlist.
#Get appx Packages
$Packages = Get-AppxPackage

#Create Your allowlist
$AllowList = @(
    '*WindowsCalculator*',
    '*Office.OneNote*',
    '*Microsoft.net*',
    '*MicrosoftEdge*',
    '*WindowsStore*',
    '*WindowsTerminal*',
    '*WindowsNotepad*',
    '*Paint*'
)

#Get All Dependencies
ForEach($Dependency in $AllowList){
    (Get-AppxPackage  -Name “$Dependency”).dependencies | ForEach-Object{
        $NewAdd = "*" + $_.Name + "*"
        if($_.name -ne $null -and $AllowList -notcontains $NewAdd){
            $AllowList += $NewAdd
       }
    }
}

#View all applications not in your allowlist
ForEach($App in $Packages){
    $Matched = $false
    Foreach($Item in $AllowList){
        If($App -like $Item){
            $Matched = $true
            break
        }
    }
    #Nonremovable attribute does not exist before 1809, so if you are running this on an earlier build, remove “-and $app.NonRemovable -eq $false” rt; it attempts to remove everything
    if($matched -eq $false -and $app.NonRemovable -eq $false){
        Get-AppxPackage -AllUsers -Name $App.Name -PackageTypeFilter Bundle  | Remove-AppxPackage -AllUsers
    }
}
This script essentially iterates through all the returned .appx packages on a system, then compares the results to the applications in the allowlist. It skips the matched items in the allowlist and any .appx packages with the NonRemovable attribute set to true, then removes all other .appx packages.
Again, thoroughly test this script before running it against production machines.
A closing .appx rant
I’ve yet to meet an IT professional who likes .appx packages. The reason is simple: They’re just more difficult to manage than traditional installations. Unfortunately, Microsoft seems determined to force .appx packages on us. Hopefully they plan on making it easier to manage .appx packages in the future. Until then, I’ll be here, quietly complaining to myself — and to you, the reader, of course. 😘


