Here is the easiest way to install fonts in Windows 11: Download a font file from a font hosting website > double-click to open the downloaded .zip file > double-click the font file to open the font viewer > then click Install.
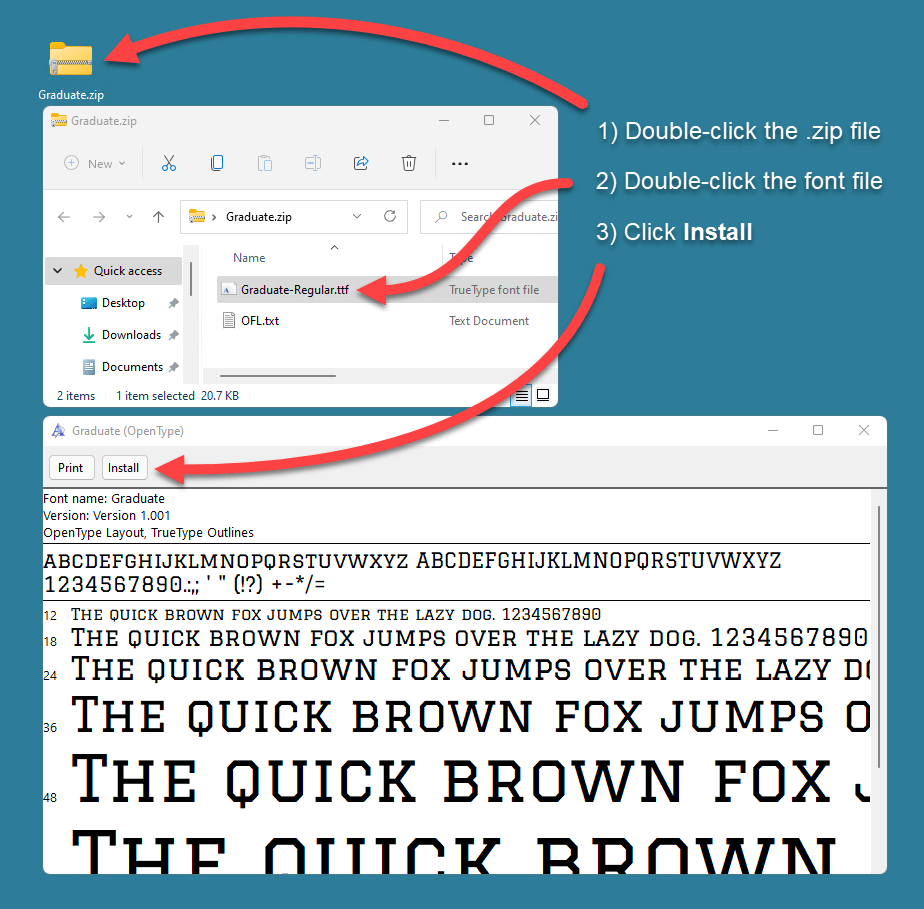
If this method seems familiar, it's because it hasn't changed much since at least Windows Vista. It's quick, it's easy, and it gets the job done.
But if you're a real connoisseur of fonts, and you download fonts by the dozens, installing them one at a time using this method could take ages. No worries; we've got you covered. Here are a few other ways to install fonts that would satisfy even the most hardcore sans serif savant.
Quick & easy Windows patch management
Unlock automated patching that's simple, secure, and pretty damn quick.
Installing fonts using the context menu
Installing fonts using the context menu is a popular method. This method takes a couple of extra steps and clicks compared to our first example, but there is also one significant benefit. Here's how it works.
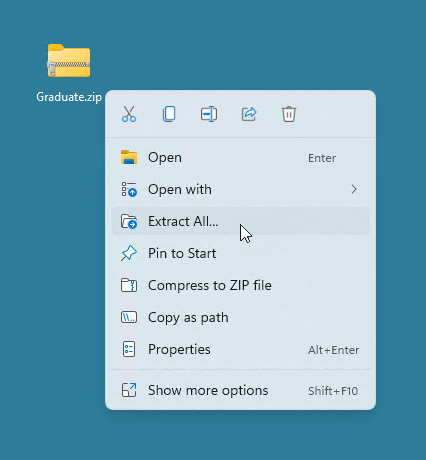
Right-click on the .zip file containing the font, then click Extract All…
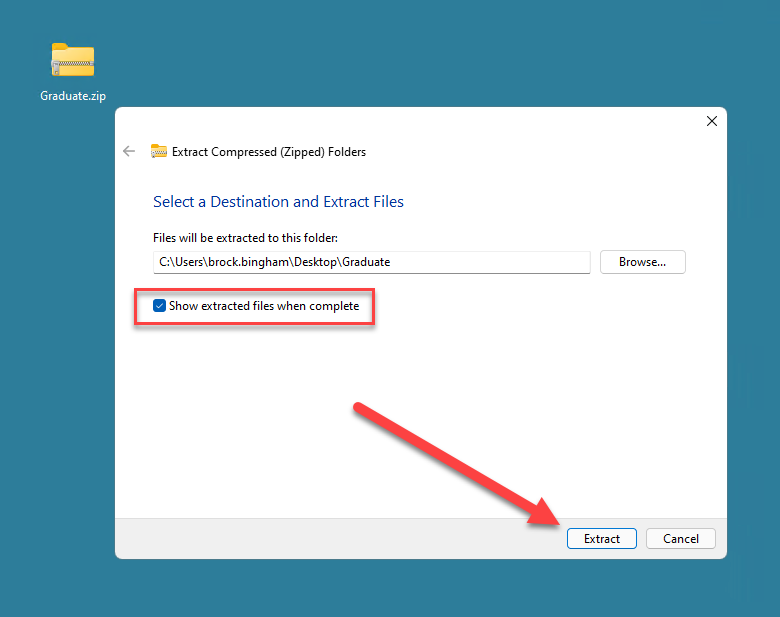
When the Extract window opens, select the folder where you want the files extracted, select Show extracted files when complete, then click Extract.
With the extracted folder open, right-click on the font file, click Show more options, then click Install.
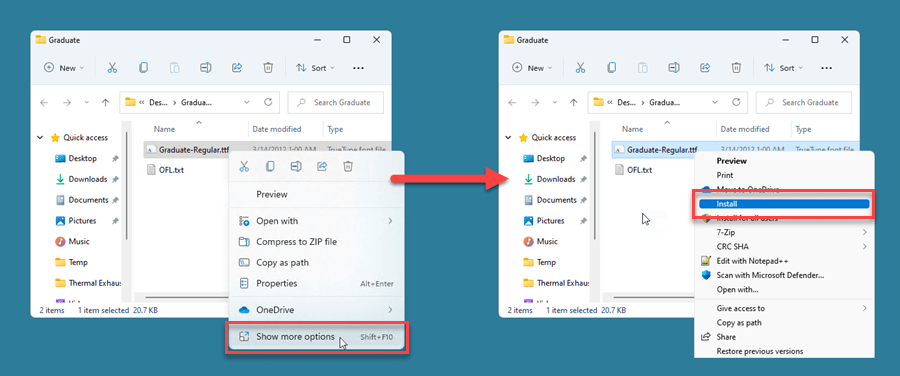
If you're an administrator, you can click Install for all users, which will (you guessed it) install the font for all users of that computer.
You may wonder why you would use this method over the first method we covered. It adds an extra step to the process because the contents of the .zip file have to be extracted first before you can install the font. And if you were only installing one font, I wouldn't recommend this method. However, if you need to install multiple fonts, this method will definitely save you some time.
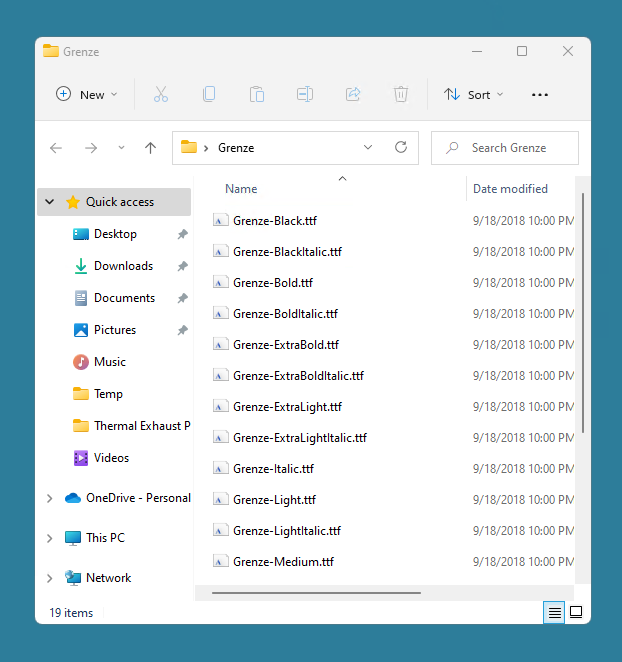
Here's another font folder that I've already unzipped. It contains multiple font files that all need to be installed. Using the first method we covered, you would need to open up each font individually to install them. However, using the context menu allows us to install all of these fonts simultaneously. Here's how.
Left-click on the first font file to select it.
Scroll down to the last font file in the folder.
While holding Shift on the keyboard, left-click on the last font file. This action should select all the fonts between the first and last font files.
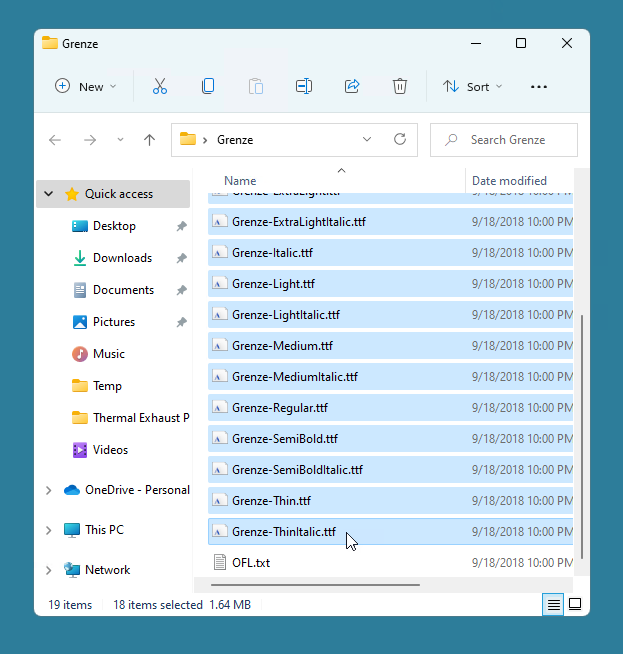
Make sure you don't include any files that are not font files in the selection. In the image above, you can see that the OFL.txt file is not selected.
With the font files selected, right-click on any highlighted file, click Show more options, then click Install.
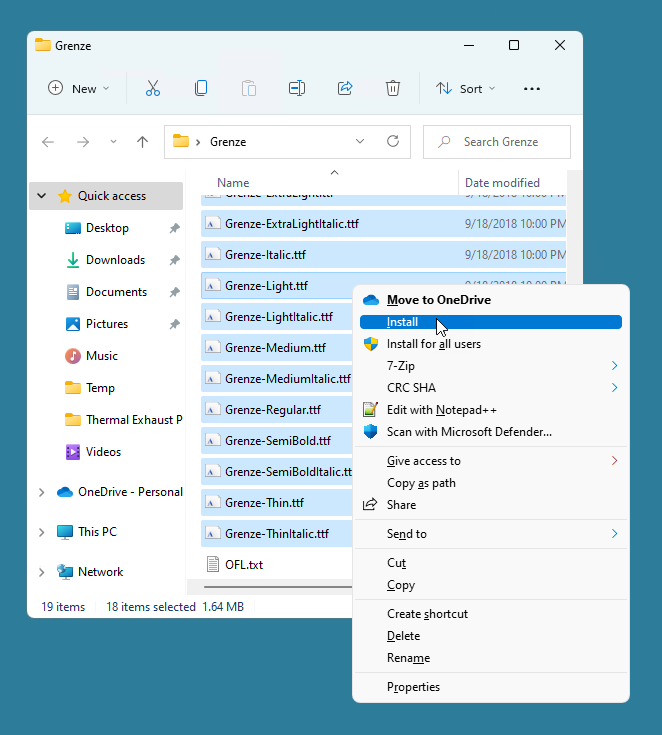
After clicking Install, Windows will install each highlighted font.
To ensure the fonts were installed correctly, click the Windows 11 search button and type in font settings. Next, click the Font settings app to view all the installed fonts.
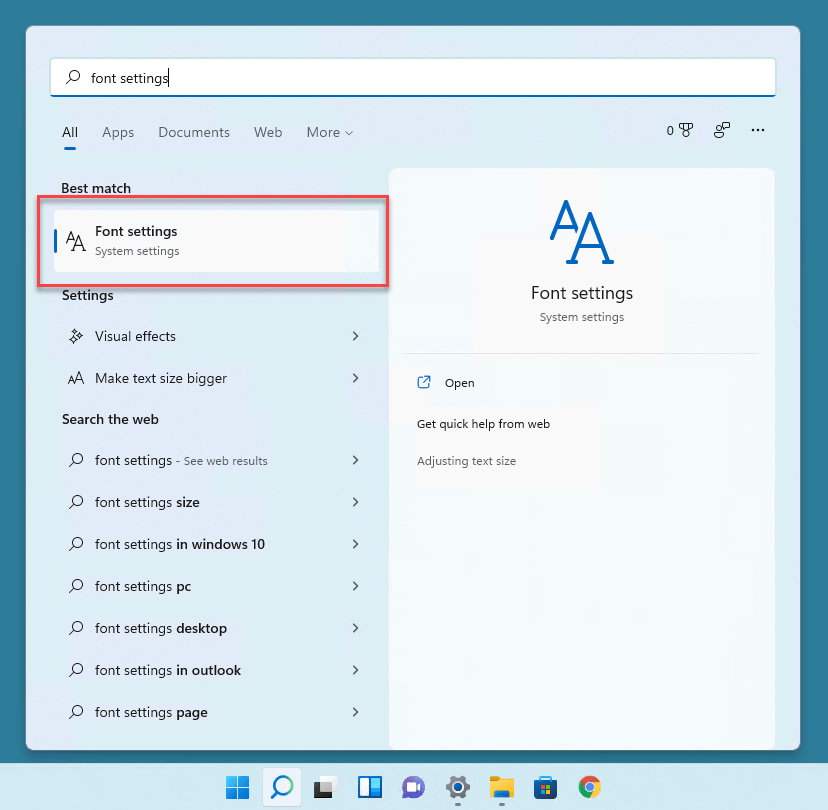
In the Font settings window, enter the name of the fonts you installed to search for them.
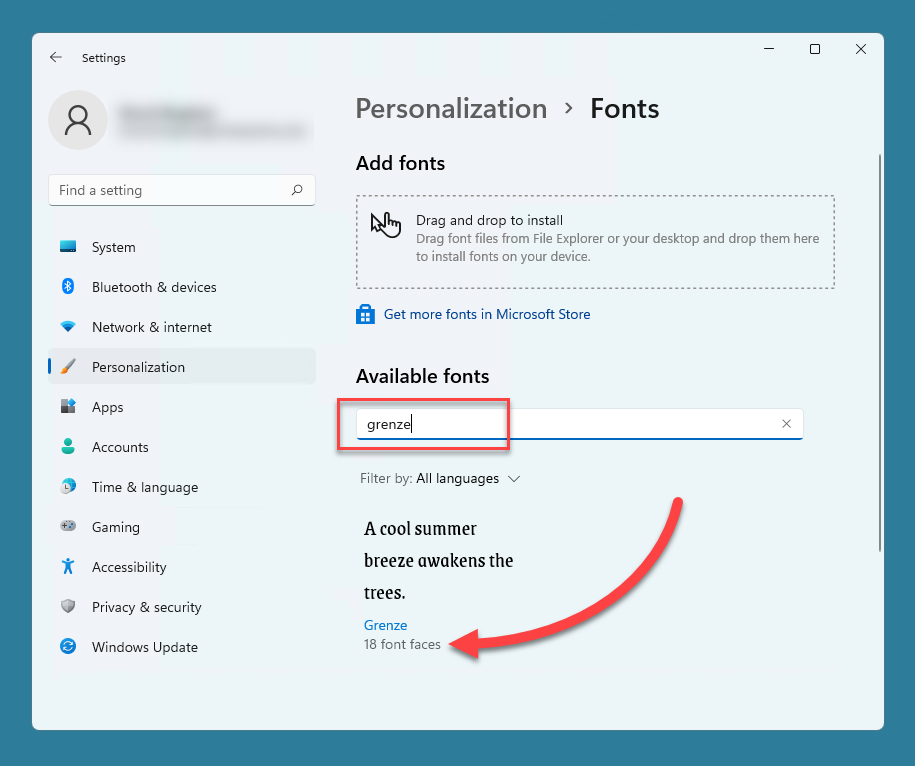
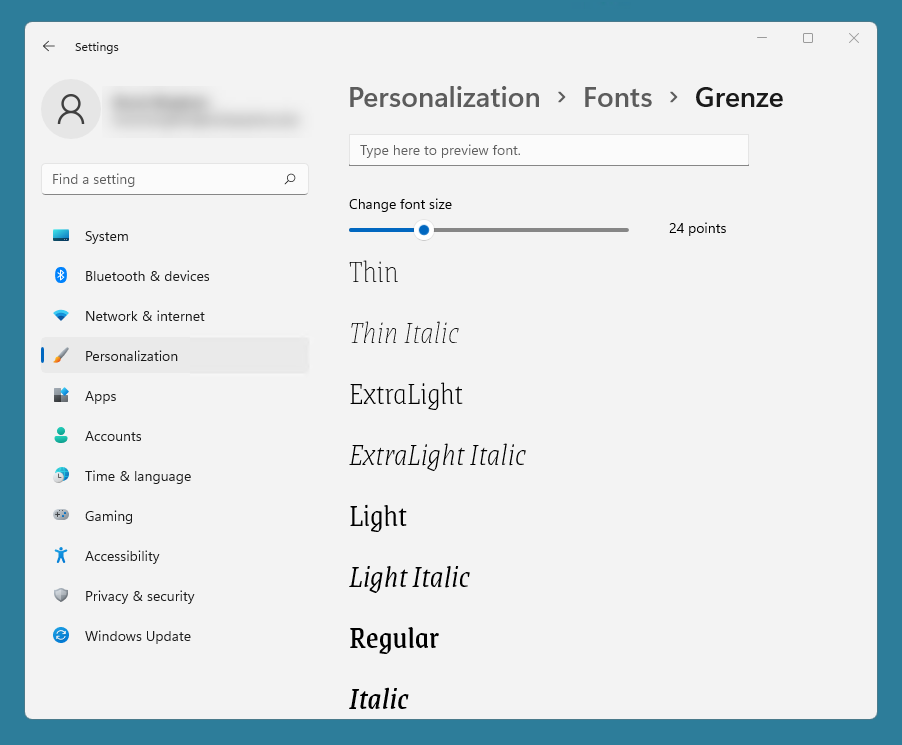
If your fonts are listed on the fonts page, they've been installed correctly. You can click on the different fonts to preview them, including additional font faces.
Installing fonts using the Font settings page
While we're at the Font settings page, we can actually drag and drop fonts onto this page to install them. This method also allows us to install multiple fonts at a time.
For this example, I have another folder containing multiple font files which have already been extracted. Just as with the context menu example, font files have to be extracted from their .zip file before being installed using this method.
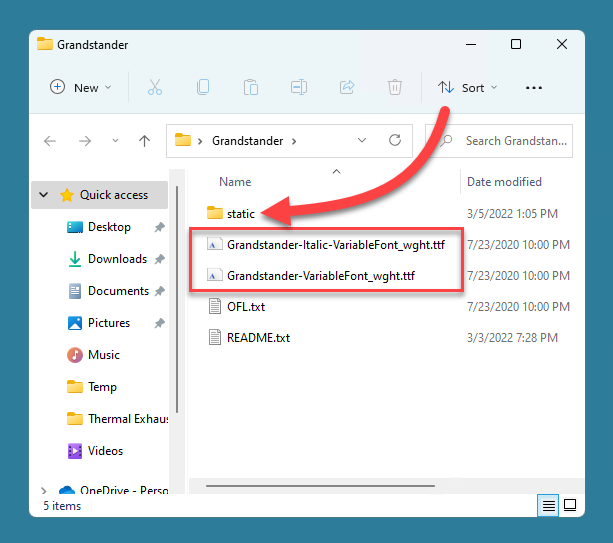
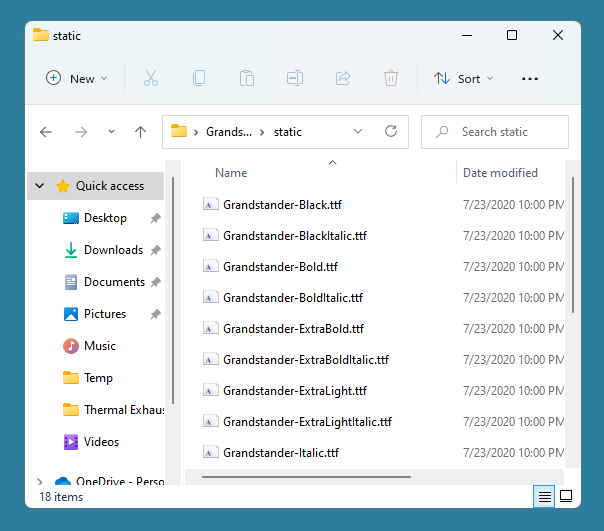
Notice that there are two font files located on the root of this folder. There is also a subfolder called static that contains additional font files.
Here's how to install fonts via the Font settings window.
Open up both the folder containing the fonts and the Font settings window. Ensure you can see both windows at the same time.
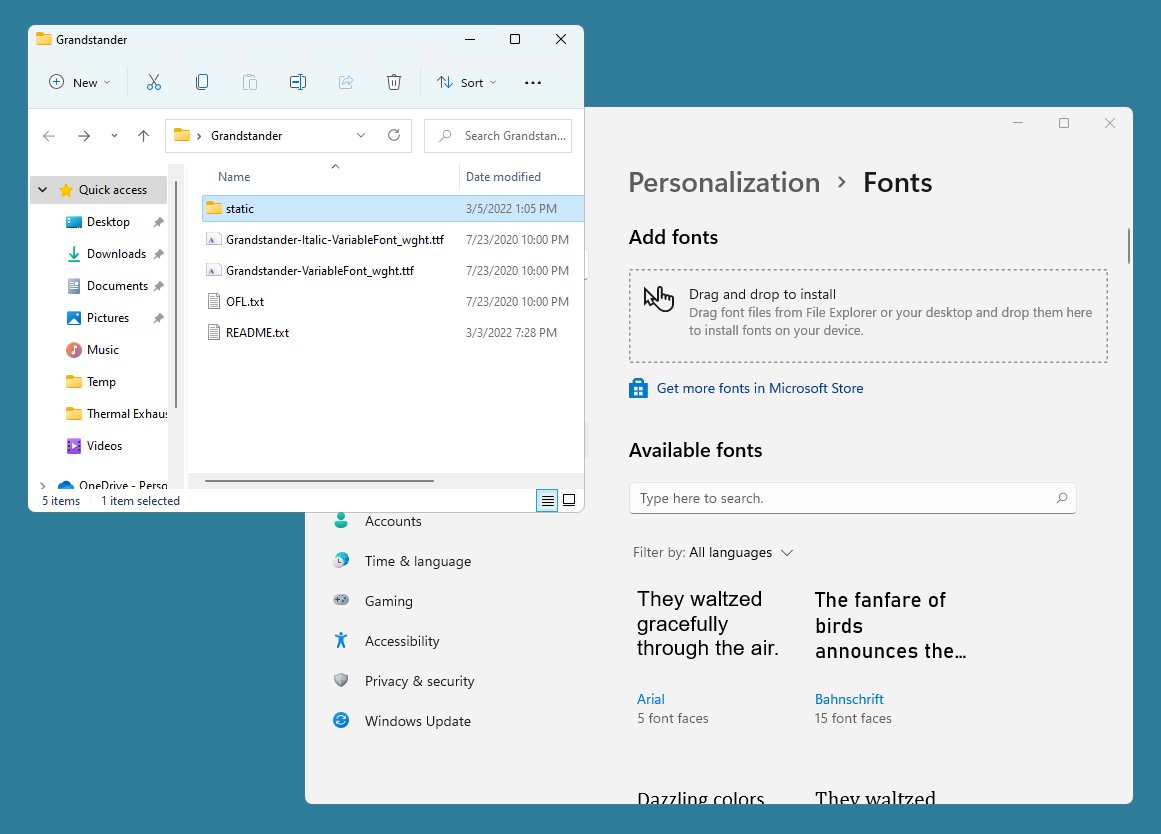
Select the fonts you want to install. You can left-click and drag with your mouse to select the multiple files or use the Shift key method we used in the previous example.
Drag the files onto the section of the Font settings window that says Drag and drop to install.
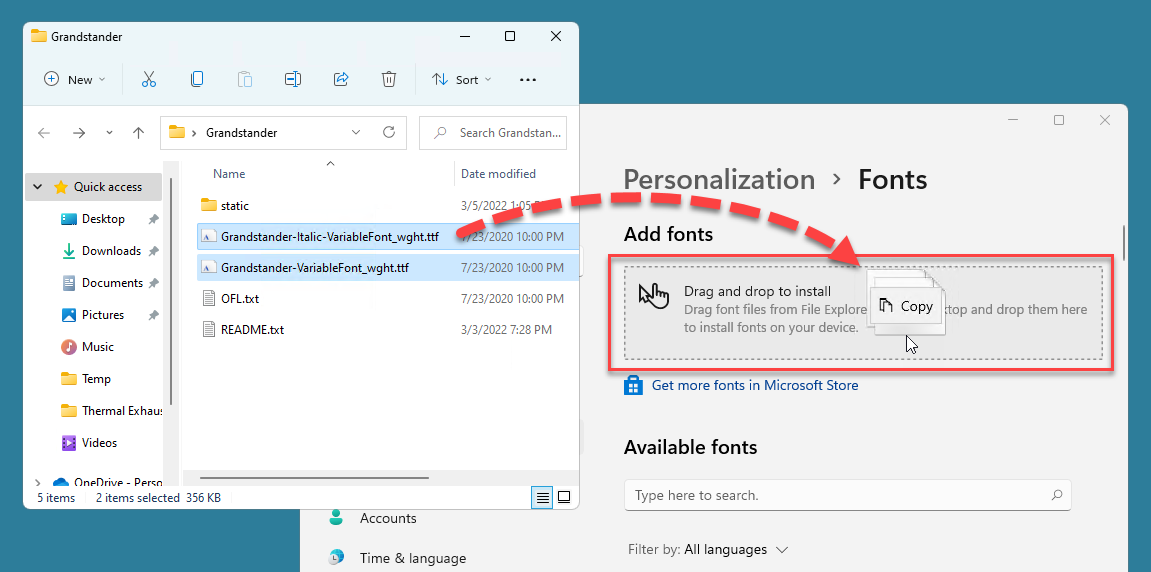
That's all there is to it. Using this method makes it easy to install multiple fonts simultaneously. If you have a subfolder containing more font files, you'll need to open it separately and repeat the process to add those files.
Installing fonts using the Control Panel
If you're a bit more old school and you've got a tattoo that says "Control Panel 4 Life," you're in luck. The Control Panel still exists in Windows 11, and we can use it to install fonts. Here's how.
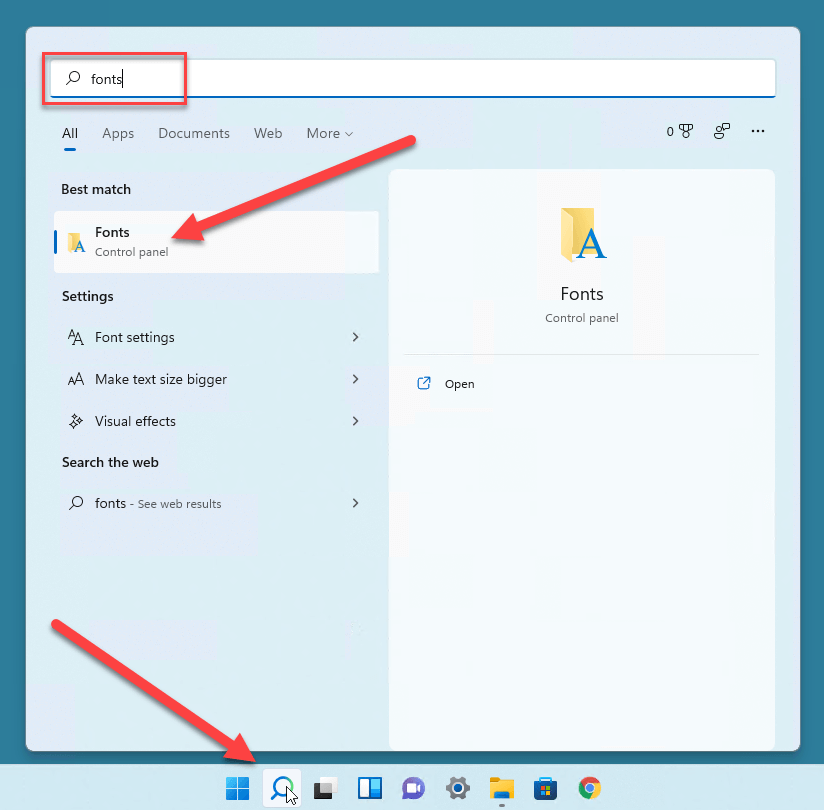
Click on the Windows 11 search button and type in fonts.
Click on the Fonts Control panel application link.
With the Fonts control panel window and a folder with font files open, select all the fonts you want to install and drag and drop them onto the Fonts control panel window.
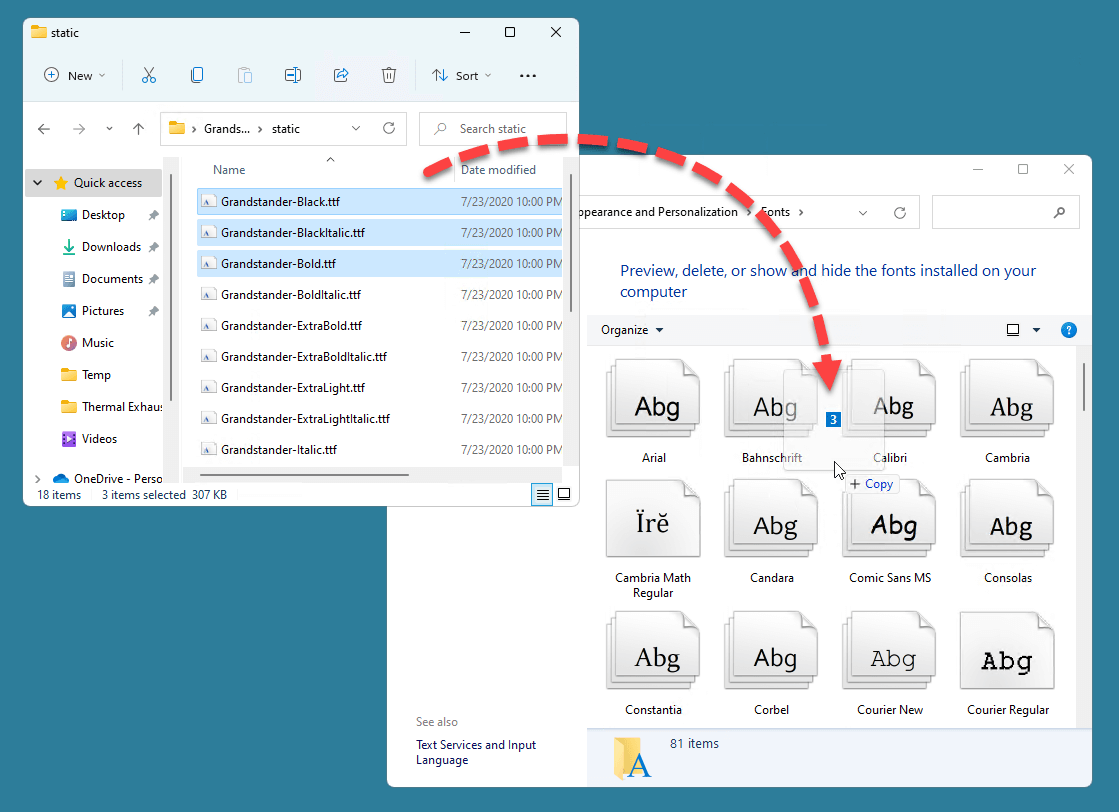
This process is almost identical to the settings panel method, so pick whichever way you prefer.
Installing fonts using Windows Explorer
Not to be outdone by the Settings or Control Panel, you can actually use Windows Explorer to copy font files directly into the default Fonts folder.
Select the font files you want to install, right-click them, then click Copy.
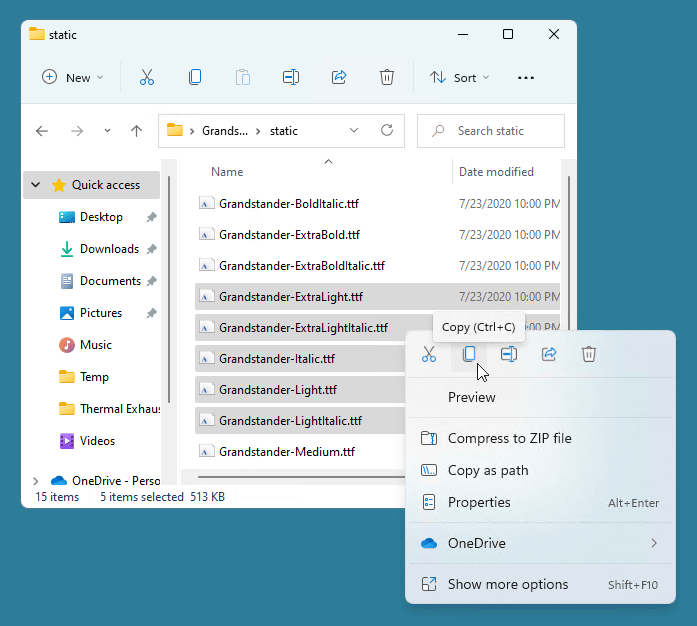
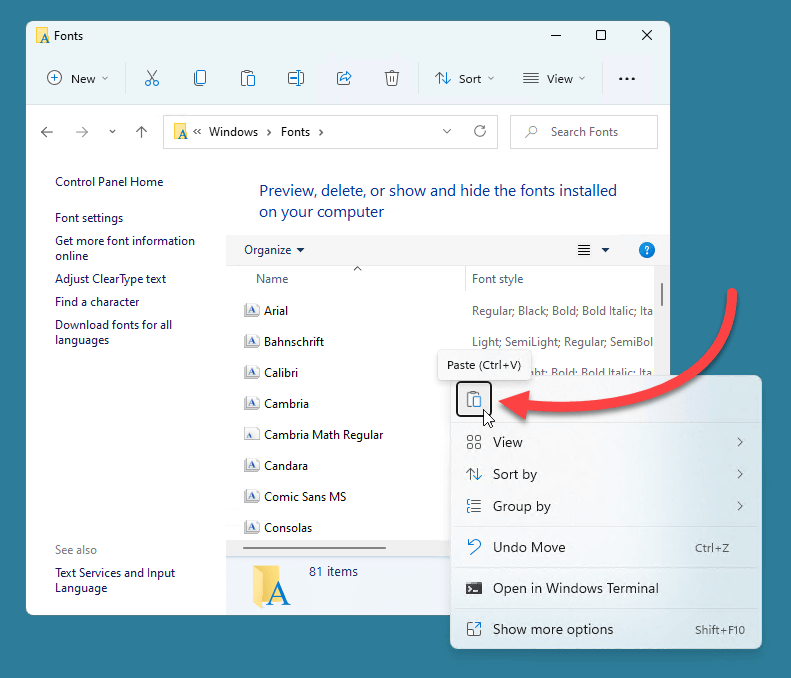
Navigate to your Fonts folder. By default, this is located at C:\Windows|Fonts.
Right-click anywhere in the folder and click Paste.
A message will display indicating that the fonts are being installed.
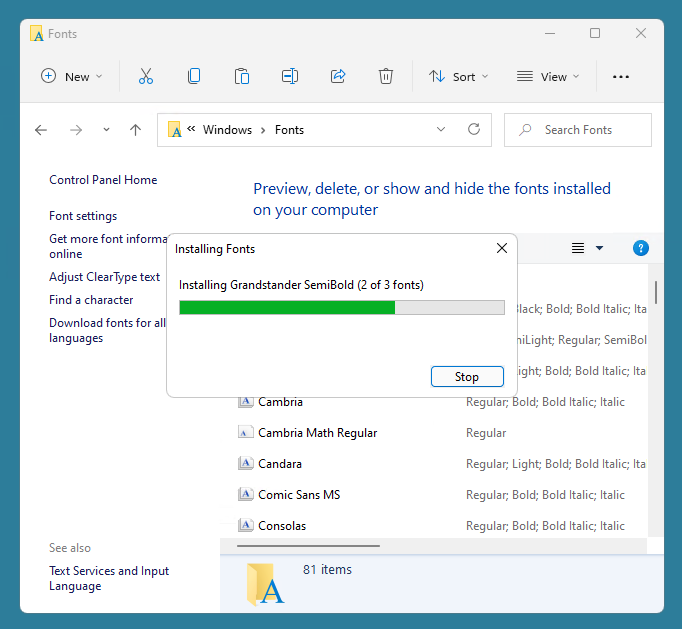
And just like that, you have even more fonts to spice up your resume!
Installing fonts from the Microsoft Store
Like many things introduced with Windows 8, the Microsoft Store seemed like a good idea that was executed poorly. Windows 11 introduced changes to make the Microsoft Store more attractive for downloading apps, entertainment, and assets, but it doesn't feel fully fleshed out yet. With that said, the Microsoft Store does offer a limited selection of free fonts you can download. The only problem is just how limited it is. Let's take a look.
Launch the Microsoft Store by clicking on the app icon or by searching for it and clicking on the application link.
In the search bar of the Microsoft Store, type in fonts and hit enter.
Click Explore new fonts.
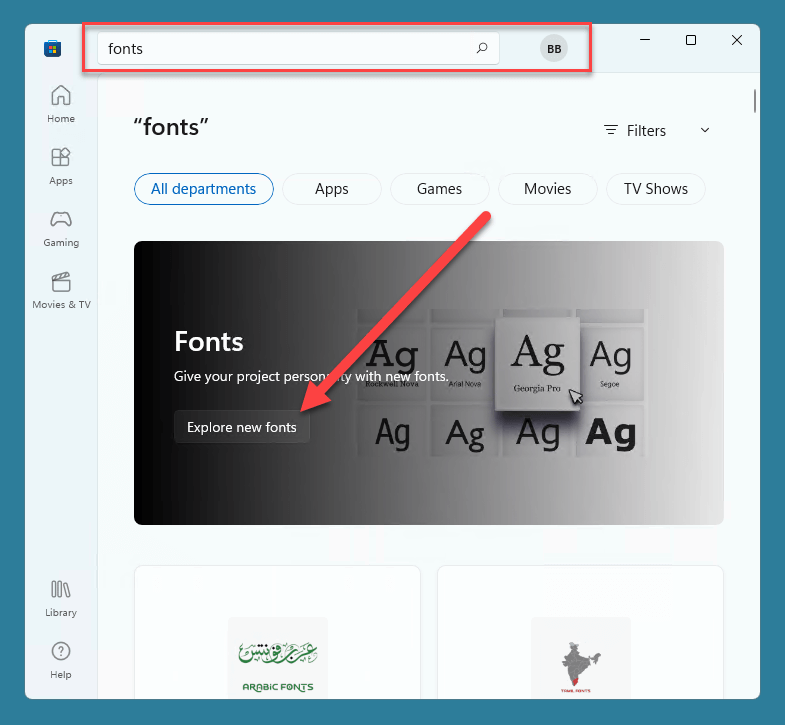
You'll see a list of fonts you can download. Some of these fonts are free; some you have to purchase.
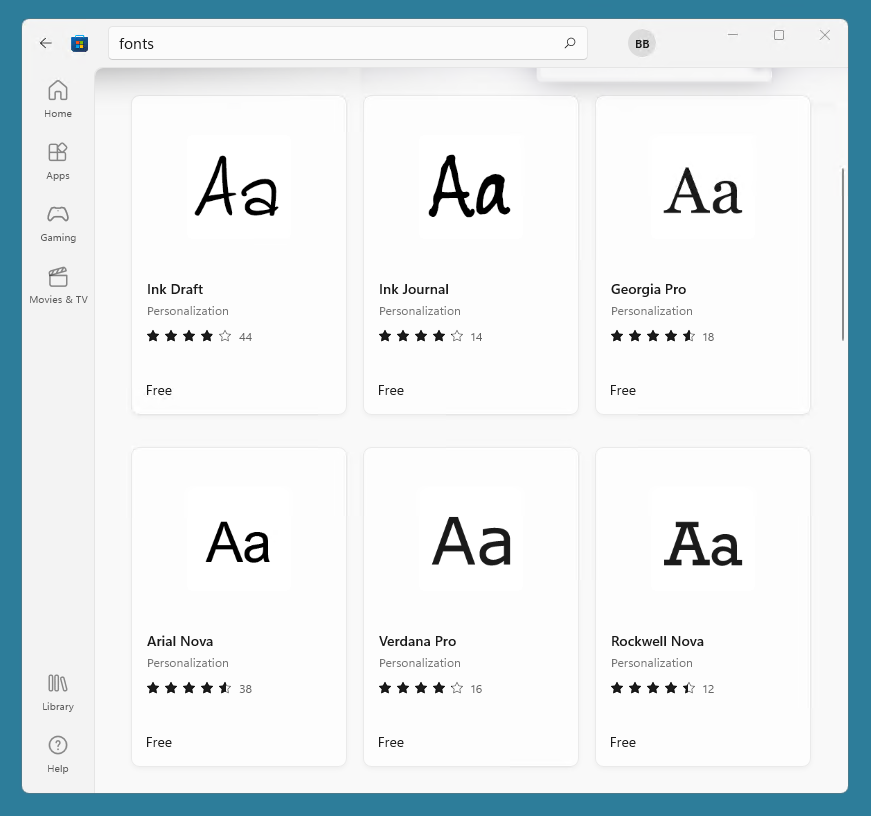
Click on a font you'd like to install, then click Get.
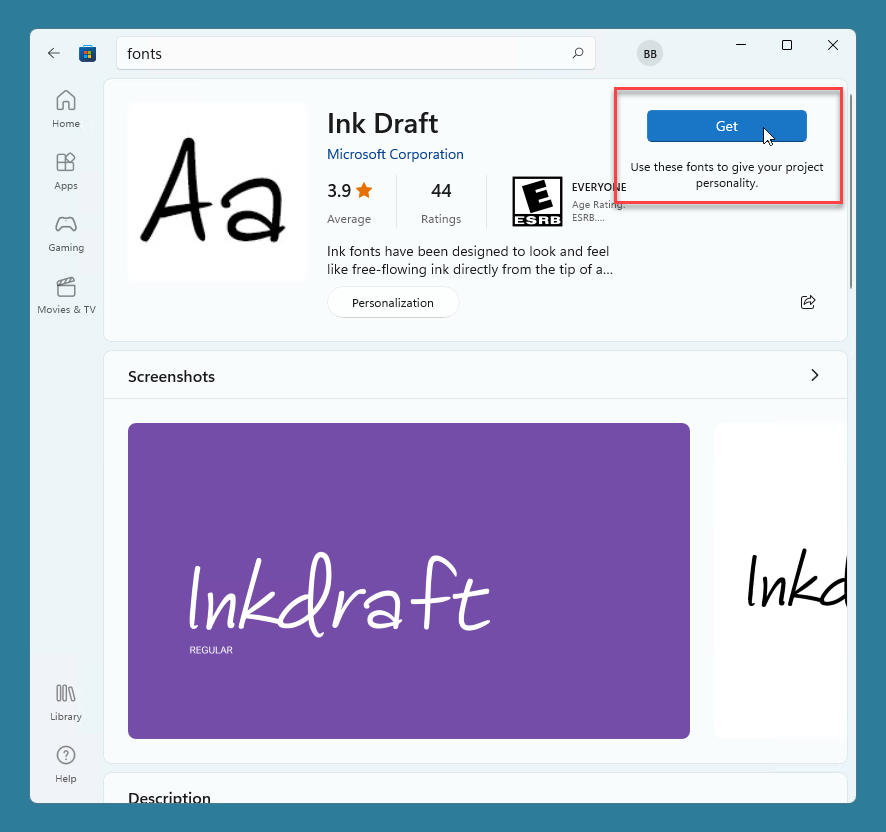
That's all there is to it. The font will install automatically onto your computer.
As I mentioned, the major downside to this method is the limited font selection. At the time of writing, I only counted 19 fonts in the store (not including language packs), 10 of which were free. Keep in mind that some of the items in the store are font packs that include multiple fonts.
How to deploy fonts with PDQ Deploy
This section is geared toward system administrators looking for a way to deploy fonts remotely to users.
When a user calls IT and needs a font installed on their system, the standard procedure is to remote into their computer and manually install the font file. However, since sysadmins are swamped with things like Wordle and solitaire, they most likely don't have time for that nonsense. Instead, we can use PDQ Deploy and PowerShell to deploy the font files for us.
Here's how.
1. Create a folder called Fonts in your PDQ Deploy repository. By default, the repository is located at C:\Users\Public\Documents\Admin Arsenal\PDQ Deploy\Repository.
2. Next, copy this script and save it as a PowerShell (.ps1) file in the Fonts folder you just created in your repository. If you've changed your system's default font folder location, you'll need to modify the $fontFolder variable value.
#Set folder paths and grab font files from the repo
$source = $PSScriptRoot
$fontFolder = 'C:\Windows\Fonts'
$fonts = Get-ChildItem -Path $source -Include '*.ttf', '*.otf' -Recurse


# Process each font contained in the source directory
foreach ($font in $fonts) {


    $targetFontPath = Join-Path $fontFolder $font.Name


    # If the font does not exist in the target folder, copy the font
    if (!(Test-Path $targetFontPath)) {

    $sourceFont = Join-Path $Source $font.Name


    Copy-Item $sourceFont -Destination $targetFontPath -Force

    # Change the registry based on the font type
    switch ($font.extension) {
        '.otf' {
            New-ItemProperty -Path 'HKLM:\SOFTWARE\Microsoft\Windows NT\CurrentVersion\Fonts' -Name "$($font.Name -replace ".{4}$") (OpenType)" -Type String -Value $font.name -Force


        }
        '.ttf' {
            New-ItemProperty -Path 'HKLM:\SOFTWARE\Microsoft\Windows NT\CurrentVersion\Fonts' -Name "$($font.Name -replace ".{4}$") (TrueType)" -Type String -Value $font.name -Force
            }
        }
    }
}
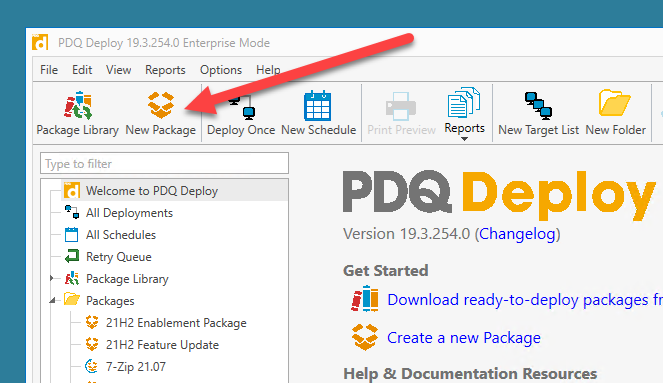
3. Open PDQ Deploy and click New Package.
4. Name the package, then click the Options tab.
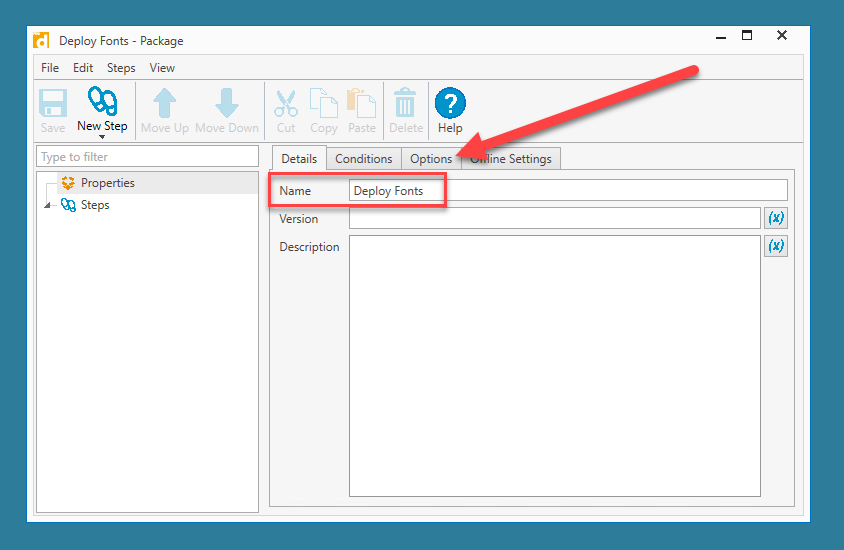
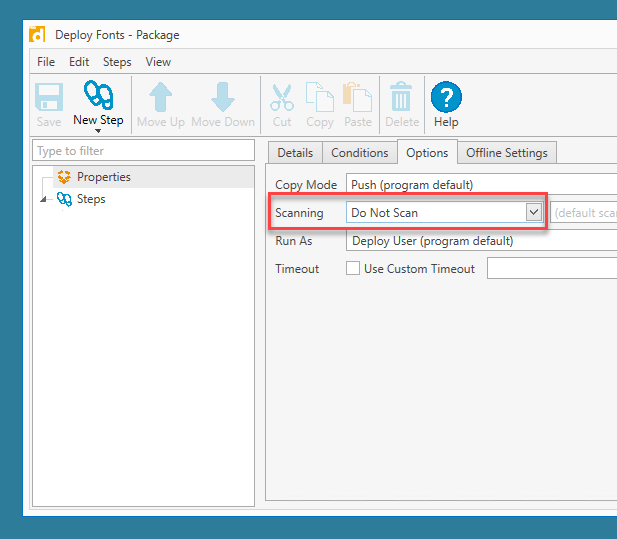
5. Change Scanning to Do Not Scan.
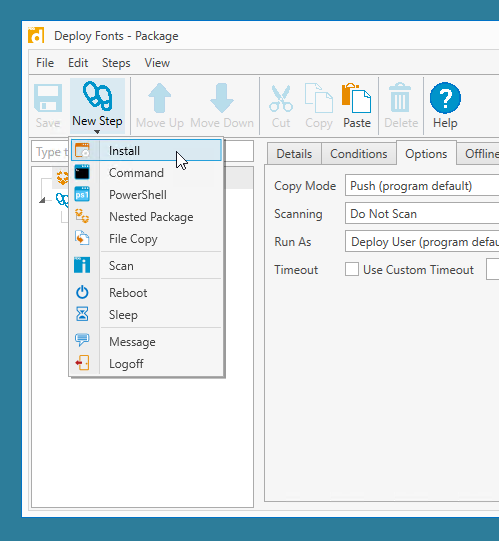
6. Click New Step > Install.
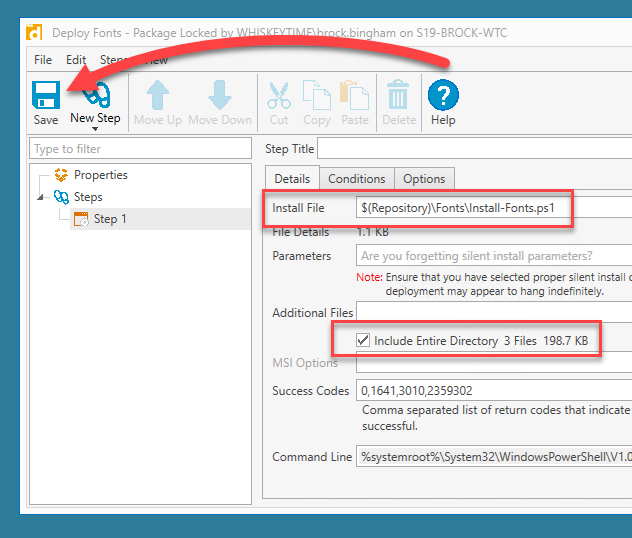
7. In the Install File field, enter the path to the PowerShell file you created.
8. Select Include Entire Directory.
9. Click Save to finish creating the package.
10. With the package created, the last thing we need to do is copy some font files into the Fonts folder in the repository. Download and extract whichever fonts you need, then copy them into the Fonts folder. Here are the contents of my Fonts folder.
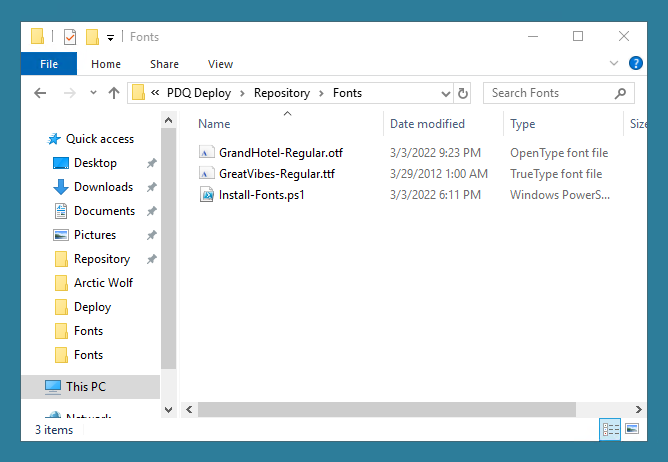
As you can see in the image above, I have two font files and the PowerShell script in my Fonts folder. At this point, our package is ready to deploy.
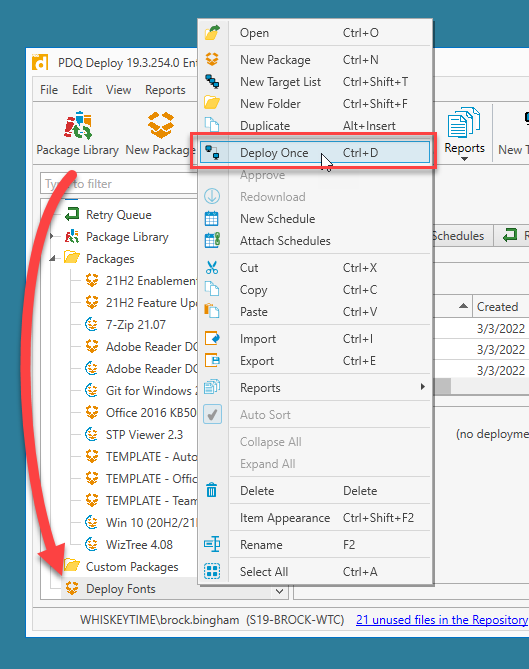
1. In PDQ Deploy, right-click on the package you created, then click Deploy Once.
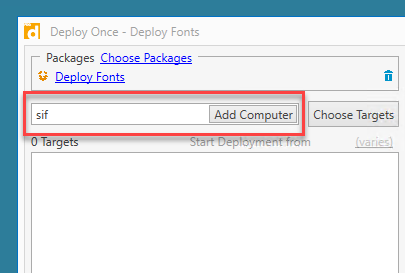
2. Enter a target computer in the Add Computer field, then click Add Computer. Alternatively, you can select a target from a source using the Choose Targets button. Since this article is about Windows 11, I'll target my Windows 11 computer, Sif.
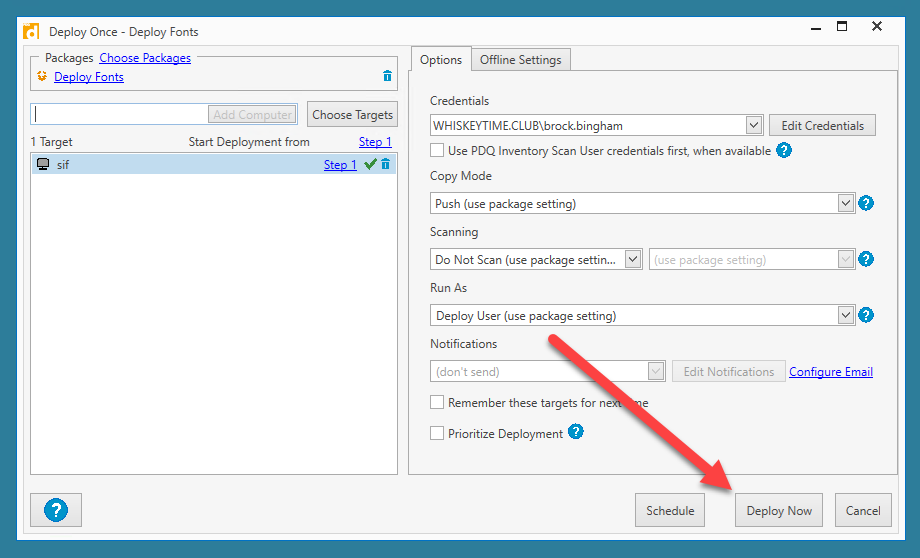
3. Click Deploy Now to deploy the package.
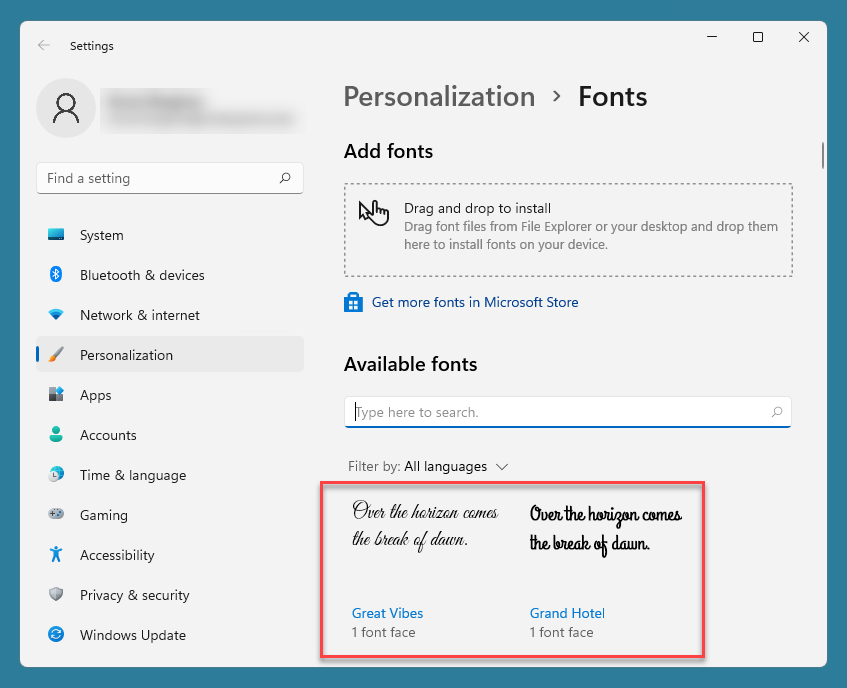
Once the deployment has finished, I can remote into my Windows 11 computer and see that both fonts were installed successfully.
Who knew there were so many ways to install fonts?
Whether you need just one font installed or ALL the fonts installed, this article should have a method that meets your needs. With so many different tools at your disposal, go wild and start spicing up all your written documents. Your coworkers may, or may not, love it!
If you're a sysadmin that can't play a single game of solitaire without being interrupted by a user wanting a font or application installed, do yourself a favor and download a free trial of PDQ Deploy. PDQ Deploy makes deploying everything from fonts and scripts to applications and updates super easy, leaving you with more precious me time.


