

There’s a new Microsoft Outlook in town, and you know what that means. Yup, it’s time to figure out how to remove it. Unless, of course, you are excited to use the new Outlook. In that case, carry on (as I will carry on silently judging you).
Even astronauts can’t escape Outlook problems
Apparently, Outlook issues aren’t just an Earth problem. According to reports, even the Artemis II crew ran into Outlook trouble mid-mission.
Identify computers that have the new Outlook installed
The first step to uninstalling any software is identifying which Windows computers have the software installed. Normally this process is super easy. But because the new Outlook is a provisioned app, we have to get a bit creative with how we track it.
The easiest way to see if the new Outlook is installed is to check if it’s in the Start menu. If you see the new Outlook icon, it’s installed. However, if you don’t see the new Outlook icon, that doesn’t necessarily mean it’s not installed.
For example, if I look for the new Outlook on my Windows 10 device, it doesn’t pull up. In fact, you can see that the old Mail icon (which the new Outlook replaces) is still there.

However, I know it’s installed, and there are a couple of ways to prove it. First, you can go to the directory “C:\Program Files\WindowsApps” and look for a folder called Microsoft.OutlookForWindows_#######_x64__8wekyb3d8bbwe. The version numbers in the folder name vary, but the basic folder naming convention should be the same. Here’s what it looks like on my Windows 10 computer.

Keep in mind that the WindowsApps folder is a hidden directory, and you’ll also need to take ownership of the folder to open it up.
The next way to check if Outlook is installed is with a simple PowerShell command.
Get-AppxPackage -Name "Microsoft.OutlookForWindows" -AllUsers
If the new Outlook app isn’t found, PowerShell won’t return anything. But if the new Outlook app is installed, this command returns a bunch of information about the app, including the user profile it’s installed on.

Track new Outlook installs with PDQ Connect
Now let’s look at how to track new Outlook installs at scale with PDQ Connect. We still run into the same tracking issues mentioned in the previous section because the new Outlook is a provisioned app. However, we can use a modified version of the script above and a dynamic group in PDQ Connect to identify which devices have the new Outlook installed.

Run PowerShell scripts on remote devices
Execute PowerShell scripts on managed devices from anywhere with PDQ Connect.
In PDQ Connect, click the Packages tab, then click Create package.
Name the package, then click the down-arrow next to the Add install step button, then click Add script step.
Set the type to PowerShell, then add this script to the scripting pane, replacing <connect_org> with the name of your Connect organization.
# PowerShell Scanner
# Define the path and value
$registryPath = "HKLM:\SOFTWARE\<connect_org>\New_Outlook"
$valueName = "Installed"
# Create registry key if it doesn't exist
If (-not (Test-Path $registryPath)) {
New-Item -Path $registryPath -Force
}
# Identify if new outlook is installed and set registry value accordingly
$Apps = Get-AppxPackage -Name "Microsoft.OutlookForWindows" -AllUsers
if ($Apps) {
Set-ItemProperty -Path $registryPath -Name $valueName -Value 'True'
}
else {
Set-ItemProperty -Path $registryPath -Name $valueName -Value 'False'
}
When you’re done, click Save.
The idea of the script is simple. It checks to see if Outlook is installed, then creates a registry key and value to indicate the results. If Outlook is installed, it sets the value to true. If it’s not installed, the value is set to false. At this point, you can go ahead and deploy this package to any devices you want to monitor for new Outlook installs.
Next, we need to create a custom scanner to collect the Outlook registry entries.
In PDQ Connect, click More, then click Custom scanners.
Click Create scanner.
Give the scanner a name, set the Type to Registry, then set the hive to HKEY_LOCAL_MACHINE.
Set the path to SOFTWARE\<connect_org>\New_Outlook (replacing <connect_org> with the name of the entry you used in the PowerShell script.
Select Value, set Match type to Equals, then set the String to Installed.
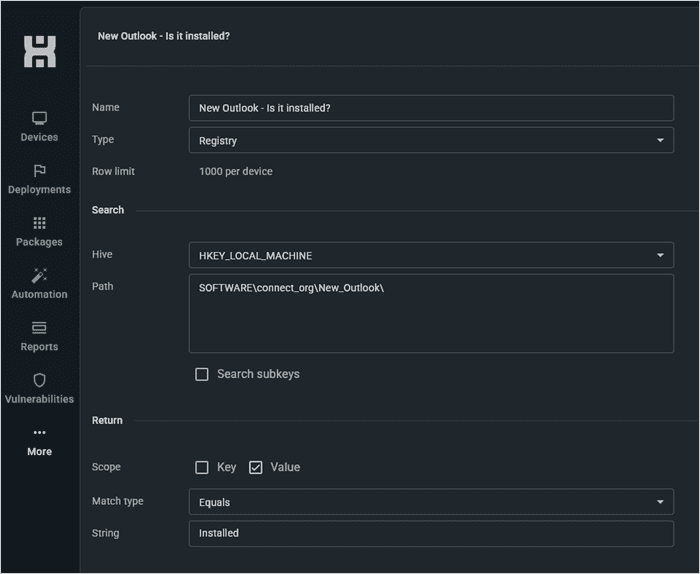
Click Save when you’re finished.

Alright, with the package and scanner done, we’re ready to scan our devices and create a group to track the installs.
In PDQ Connect, click on the Devices tab, then click the ellipsis button, then click Scan devices. This ensures the information is up to date.
Next, click the Create group button.
Enter a name for the group, like New Outlook (Installed), then set the type to Dynamic.
Add the following filters (replacing <name_of_scanner> with the name of the scanner you created in the previous step):
Where | Registry | Scanner | contains | <name_of_scanner>
AND | Registry | Value data | contains | True
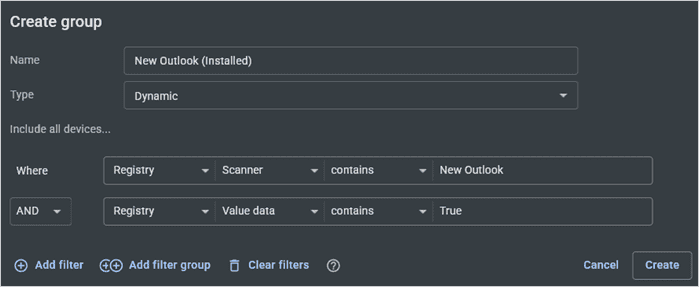
Click Create.

If you’ve deployed the package and scanned your devices, this new group should start populating with any computers that have the new Outlook installed.
Identify devices with the new Outlook installed with PDQ Inventory
We can also track which devices have the new Outlook installed using PDQ Inventory. But because Inventory has the PowerShell Scanner, we don’t need to create any registry entries on the target devices, making the process a bit easier.
In PDQ Inventory, click New Scanner > PowerShell.
Enter a name, then add this script to the scripting pane:
$Apps = Get-AppxPackage -Name "*Outlook*" -AllUsers
if($Apps){
ForEach ($app in $Apps){
[PSCustomObject]@{
'Name' = $app.Name
'Version' = $app.Version}
}
} else {
[PSCustomObject]@{
'Name' = $null
'Version' = $null
}
}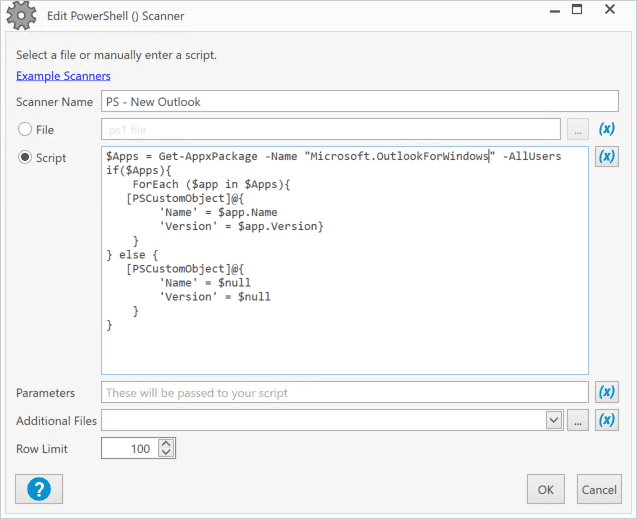
Click OK.
Enter a name for the scan profile, then click OK.


Now that we have our scanner saved, we can use it to scan our devices. Right-click on All Computers, then click Scan Collection and <New_Outlook_Scanner> (whatever you named your scanner). When a scan finishes, we’ll create a dynamic collection to track the installs.
Click the New Dynamic Collection button, then give the collection a name.
Set the collection filter to All | <New_Outlook_Scanner> | Name | Contains | Microsoft.OutlookForWindows
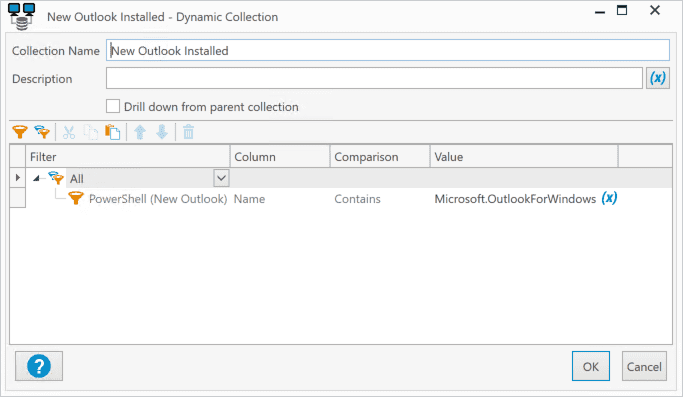

That’s all there is to it. Any devices that have the new Outlook installed should automatically populate into the collection. If the new Outlook gets added to a device in the future, it’ll automatically get added to the collection as long as you run the custom scanner you created on a regular basis. You can set the scanner to automatically run if you want to ensure you don’t let any installs slip through the cracks.
Uninstalling the new Outlook
Microsoft has provided some guidance on how to uninstall the new Outlook. Essentially, it recommends running this command:
Remove-AppxProvisionedPackage -AllUsers -Online -PackageName (Get-AppxPackage Microsoft.OutlookForWindows).PackageFullNameAdditionally, you can disable the “Try the new Outlook” toggle. Navigate to [HKEY_CURRENT_USER\Software\Microsoft\Office\16.0\Outlook\Options\General] in Registry Editor and set “HideNewOutlookToggle” to 0.
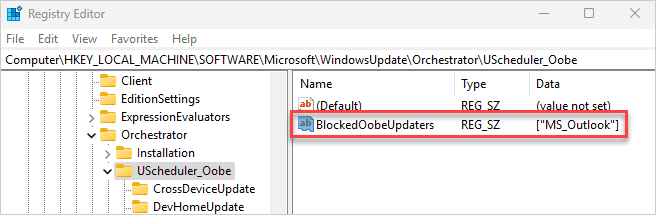
Lastly, you can prevent the new Outlook from installing by adding a registry value.
Open Registry Editor, then navigate to this registry key: HKEY_LOCAL_MACHINE\SOFTWARE\Microsoft\WindowsUpdate\Orchestrator\UScheduler_Oobe.
Create a new REG_SZ (string value) registry setting and name it BlockedOobeUpdaters.
Double-click on the new setting and add the value [“MS_Outlook”].

How to remove the new Outlook with PDQ Connect
Removing the new Outlook with PDQ Connect follows the general guidelines provided by Microsoft, primarily using PowerShell and registry keys to ensure the new Outlook doesn’t overstay its welcome. This method also accounts for users that may already be using the new Outlook and preventing migrations.
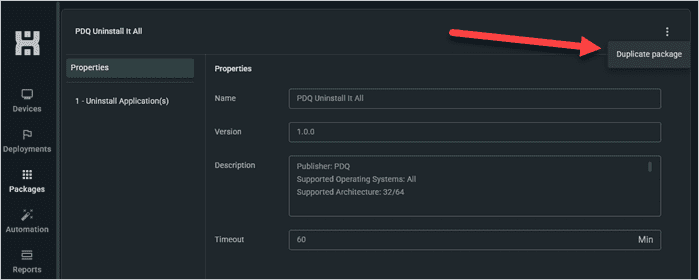
The first thing we’ll need to do is duplicate the “PDQ Uninstall It All” package.
In PDQ Connect, click on the Packages tab, then search for the “PDQ Uninstall It All” package.
Click on the package, then click on the 1.0.0 version released 10/1/2024.
Click on the ellipsis button, then click Duplicate package.
Click on the Packages tab, then locate and click on the duplicated package.
Give the package a name, then click on the Uninstall Application(s) step.
Replace -AuditOnly with "Microsoft.OutlookForWindows" in the Parameters field.
Click the drop-down arrow next to the Add install step button, then click Add script step.
Name this new step Throw error if new Outlook in use.
Add this script to the scripting pane, then move the step to the first position above the “Uninstall Application(s)” step.
# This is the path where New Outlook keeps logs
$targetFolder = "AppData\Local\Microsoft\Olk\Logs"
# Get all user profile directories
$userProfiles = Get-ChildItem "C:\Users" -Directory
# Loop through each user profile and check for files
foreach ($profile in $userProfiles) {
$logFolderPath = "C:\Users\$($profile.Name)\$targetFolder"
if (Test-Path $logFolderPath) {
$files = Get-ChildItem -Path $logFolderPath -File -ErrorAction SilentlyContinue
if ($files) {
$filesFound = $true
Write-Output "Files FOUND in: $logFolderPath"
$files | ForEach-Object { Write-Output " -> $($_.Name)" }
} else {
Write-Output "Folder exists but NO files found in: $logFolderPath"
}
} else {
Write-Output "Folder NOT found for user: $($profile.Name)"
}
}
# We need to stop this boat if the user uses New Outlook! Throw an errorrrrrr
if ($filesFound){
throw "Files were found! throwing error"
}
else {
Write-Output "No files found, all good!"
}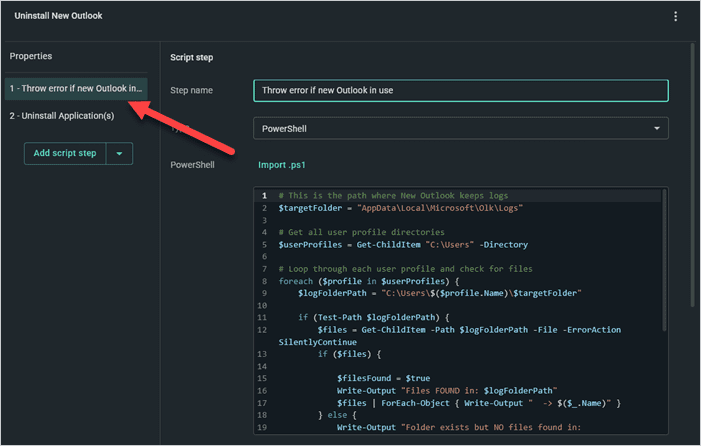
Click the Add script step button and name it Hide the try new Outlook toggle.
Add this script to the scripting pane:
# Define the registry path and value
$regPath = "HKCU:\Software\Microsoft\Office\16.0\Outlook\Options\General"
$regName = "HideNewOutlookToggle"
$regValue = 0
# Ensure the registry path exists
if (-not (Test-Path $regPath)) {
New-Item -Path $regPath -Force | Out-Null
}
# Set the registry value
Set-ItemProperty -Path $regPath -Name $regName -Value $regValue -Type DWord
Click the Add script step button and name it Block new Outlook preinstall on Windows.
Add this script to the scripting pane:
$os = Get-CimInstance Win32_OperatingSystem
$build = [int]($os.Version -split '\.')[2]
if ($os.Version -like "10.0.*" -and $build -ge 22000) {
Write-Output "Windows 11 detected: $($os.Caption) (Build $build)"
$regPath = "HKLM:\SOFTWARE\Microsoft\WindowsUpdate\Orchestrator\UScheduler_Oobe"
$regName = "OutlookUpdate"
# Check if the registry key exists
if (Test-Path $regPath) {
# Check if the registry value exists before attempting to remove it
if (Get-ItemProperty -Path $regPath -Name $regName -ErrorAction SilentlyContinue) {
Remove-ItemProperty -Path $regPath -Name $regName -Force
Write-Output "Registry value '$regName' removed successfully."
} else {
Write-Output "Registry value '$regName' does not exist."
}
} else {
Write-Output "Registry path '$regPath' does not exist."
}
}
if ($os.Version -like "10.0.*" -and $build -lt 22000){
Write-Output "$($os.Caption) (Build $build) detected"
# Define the registry path and value
$regPath = "HKLM:\SOFTWARE\Microsoft\WindowsUpdate\Orchestrator\UScheduler_Oobe"
$regName = "BlockedOobeUpdaters"
$regValue = '["MS_Outlook"]'
# Ensure the registry path exists
if (-not (Test-Path $regPath)) {
New-Item -Path $regPath -Force | Out-Null
}
# Set the registry value as a REG_SZ type
Set-ItemProperty -Path $regPath -Name $regName -Value $regValue -Type String
Write-Output "Registry value '$regName' set to '$regValue' successfully."
}
Click the Add script step button and name it Prevent automatic migration.
Add this script to the scripting pane:
# Define the registry path and value
$regPath = "HKCU:\Software\Policies\Microsoft\Office\16.0\Outlook\Preferences"
$regName = "NewOutlookMigrationUserSetting"
$regValue = 0
# Ensure the registry path exists
if (-not (Test-Path $regPath)) {
New-Item -Path $regPath -Force | Out-Null
}
Set-ItemProperty -Path $regPath -Name $regName -Value $regValue -Type DWord
Write-Output "Registry value '$regName' set to '$regValue' successfully."


This package is now ready to deploy. Keep in mind you want rerun the script we created to track the new Outlook occasionally to ensure the information is up to date. You could also add it as a last step to the uninstall package to ensure the registry keys that track the install get updated right after you uninstall the new Outlook.
How to remove the new Outlook with PDQ Deploy
Removing the new Outlook with PDQ Deploy follows the same approach as doing it in PDQ Connect. We’ll duplicate the “PDQ Uninstall It All” package from the Package Library, modify its parameters, then add four additional script steps.
In PDQ Deploy, click on the Package Library, then search for the “PDQ Uninstall It All” package.
Select the package, then click Download Selected.
Double-click on the package to open the package properties.
Change the name of the package to something like Uninstall New Outlook.
Click on the uninstall step.
Replace -AuditOnly with "Microsoft.OutlookForWindows" in the Parameters field.
Click New Step > PowerShell.
Name this step Throw error if new Outlook in use.
Add this script to the scripting pane:
# This is the path where New Outlook keeps logs
$targetFolder = "AppData\Local\Microsoft\Olk\Logs"
# Get all user profile directories
$userProfiles = Get-ChildItem "C:\Users" -Directory
# Loop through each user profile and check for files
foreach ($profile in $userProfiles) {
$logFolderPath = "C:\Users\$($profile.Name)\$targetFolder"
if (Test-Path $logFolderPath) {
$files = Get-ChildItem -Path $logFolderPath -File -ErrorAction SilentlyContinue
if ($files) {
$filesFound = $true
Write-Output "Files FOUND in: $logFolderPath"
$files | ForEach-Object { Write-Output " -> $($_.Name)" }
} else {
Write-Output "Folder exists but NO files found in: $logFolderPath"
}
} else {
Write-Output "Folder NOT found for user: $($profile.Name)"
}
}
# We need to stop this boat if the user uses New Outlook! Throw an errorrrrrr
if ($filesFound){
throw "Files were found! throwing error"
}
else {
Write-Output "No files found, all good!"
}
Drag this new step above the uninstall step.
Click New Step > PowerShell. Make sure this step comes after the uninstall step.
Name this step Hide the try new Outlook toggle.
Add this script to the scripting pane:
# Define the registry path and value
$regPath = "HKCU:\Software\Microsoft\Office\16.0\Outlook\Options\General"
$regName = "HideNewOutlookToggle"
$regValue = 0
# Ensure the registry path exists
if (-not (Test-Path $regPath)) {
New-Item -Path $regPath -Force | Out-Null
}
# Set the registry value
Set-ItemProperty -Path $regPath -Name $regName -Value $regValue -Type DWord
Click New Step > PowerShell.
Name this step Block the new Outlook preinstall on Windows.
Add this script to the scripting pane:
$os = Get-CimInstance Win32_OperatingSystem
$build = [int]($os.Version -split '\.')[2]
if ($os.Version -like "10.0.*" -and $build -ge 22000) {
Write-Output "Windows 11 detected: $($os.Caption) (Build $build)"
$regPath = "HKLM:\SOFTWARE\Microsoft\WindowsUpdate\Orchestrator\UScheduler_Oobe"
$regName = "OutlookUpdate"
# Check if the registry key exists
if (Test-Path $regPath) {
# Check if the registry value exists before attempting to remove it
if (Get-ItemProperty -Path $regPath -Name $regName -ErrorAction SilentlyContinue) {
Remove-ItemProperty -Path $regPath -Name $regName -Force
Write-Output "Registry value '$regName' removed successfully."
} else {
Write-Output "Registry value '$regName' does not exist."
}
} else {
Write-Output "Registry path '$regPath' does not exist."
}
}
if ($os.Version -like "10.0.*" -and $build -lt 22000){
Write-Output "$($os.Caption) (Build $build) detected"
# Define the registry path and value
$regPath = "HKLM:\SOFTWARE\Microsoft\WindowsUpdate\Orchestrator\UScheduler_Oobe"
$regName = "BlockedOobeUpdaters"
$regValue = '["MS_Outlook"]'
# Ensure the registry path exists
if (-not (Test-Path $regPath)) {
New-Item -Path $regPath -Force | Out-Null
}
# Set the registry value as a REG_SZ type
Set-ItemProperty -Path $regPath -Name $regName -Value $regValue -Type String
Write-Output "Registry value '$regName' set to '$regValue' successfully."
}
Click New Step > PowerShell.
Name this step Prevent automatic migration.
Add this script to the scripting pane:
# Define the registry path and value
$regPath = "HKCU:\Software\Policies\Microsoft\Office\16.0\Outlook\Preferences"
$regName = "NewOutlookMigrationUserSetting"
$regValue = 0
# Ensure the registry path exists
if (-not (Test-Path $regPath)) {
New-Item -Path $regPath -Force | Out-Null
}
Set-ItemProperty -Path $regPath -Name $regName -Value $regValue -Type DWord
Write-Output "Registry value '$regName' set to '$regValue' successfully."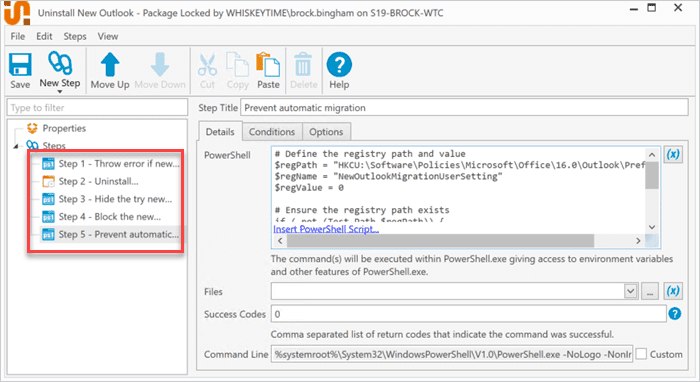

This package is ready to deploy, but make sure to test it first. There is a lot of PowerShell here and several registry changes. Test this package out on a variety of hardware and software configurations before you blast it out to your entire office. The parallel universe version of you that decided not to test is wishing they were you right now.
Loading...


