TL;DR: Where-Object lets you precisely control PowerShell output by filtering objects based on their properties, whether you are working with processes, services, or files. Using simple comparisons, script blocks, and filter-left techniques helps you write faster, more readable commands while avoiding unnecessary pipeline overhead and oversized result sets.
PowerShell’s Where-Object cmdlet command output so you only see the results you need. Instead of wading through thousands of objects, you can narrow results by name, size, date, or status. This guide shows how to use Where-Object effectively with practical, real-world examples.
The value of filtered data
Network environments generate more data than most PowerShell commands return in a usable form. IP addresses, usernames, services, applications, configurations, attributes, and more are all data points that sysadmins can leverage to make informed decisions, automate processes, and take action.
However, while PowerShell is great at retrieving information, it doesn’t always return it in the most usable format. In fact, PowerShell often returns much more data than is needed.
For example, if I was looking for a specific file, I could run Get-ChildItem -Recurse against my entire folder directory (please don’t do this), but that would return thousands of results, and I wouldn’t be any closer to locating the file I’m looking for. Instead, I can use the Where-Object cmdlet to filter against properties, such as the name, size, location, and date, significantly narrowing down the search results.
Easily run PowerShell scripts on remote devices
Need to run your awesome PowerShell scripts on remote devices? PDQ Connect can easily execute PowerShell scripts on any managed device with an active internet connection.
What is the Where-Object cmdlet in PowerShell?
The Where-Object cmdlet in PowerShell is a filtering mechanism. You can use Where-Object to filter collections from preceding commands using specific criteria. Objects that meet the conditions of the PowerShell filter then pass through the pipeline to the next cmdlet.
Loading...
Where-Object is often preceded by other commands, such as Get-ChildItem, Get-Process, and Get-AppxPackage, but can also be preceded by other arrays and hashtables.
How do I structure a Where-Object command?
Using the Where-Object cmdlet is pretty straightforward, but some nuances can trip up newcomers to the method.
As mentioned above, Where-Object is usually preceded by another command and followed by a qualifying filter, like this:
<cmdlet> | Where-Object -Property <property_name> <operator> <filter>
Here’s a real-world example that is probably a bit easier to follow:
Get-Process | Where-Object -Property Name -eq ‘Notepad’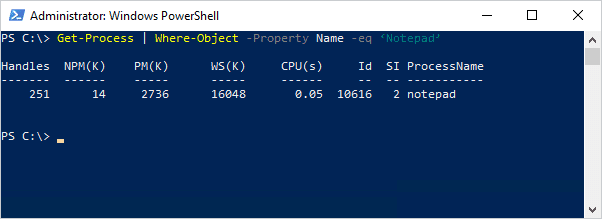
In this example, you can really start to see the structure of the command. It begins with the preceding cmdlet Get-Process. The results of Get-Process are piped to the Where-Object cmdlet. Where-Object is followed by the filter criteria. In this case, we have the -Property parameter followed by the specific property Name, the -eq equality operator, and the filter ‘Notepad.’
What are aliases and positional parameters in Where-Object?
Something to watch for that can change the look of a Where-Object command is the use of aliases and positional parameters.
There are two aliases for the Where-Object cmdlet: ? and Where. Additionally, the -Property parameter is positional, which means users don’t even have to include the parameter, just the parameter value. Here are a couple of examples of how the above command could be written and still return the same results.
Get-Process | Where Name -eq ‘Notepad’Get-Process | ? Name -eq ‘Notepad’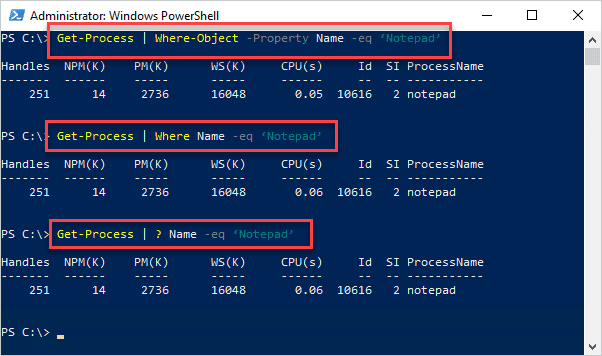
These examples are the same as the initial command, but they take advantage of aliases and positional parameters to shorten the overall command length. Aliases are great for reducing script length, but they can make it more difficult for beginners to understand what the script is doing.
How do I use script blocks for advanced filtering?
Script blocks are collections of PowerShell statements enclosed in braces that allow more advanced filtering logic without defining a function.
Script blocks can be used in conjunction with the Where-Object cmdlet. They are especially useful when you need more advanced filtering options. Script blocks allow users to add multiple filters to the same Where-Object statement.
Here is a basic example of a Where-Object statement using a script block.
Get-Service | Where-Object -FilterScript {$_.Status -eq 'Stopped' -and $_.StartType -eq 'Automatic'} | Select-Object Name, Status, StartType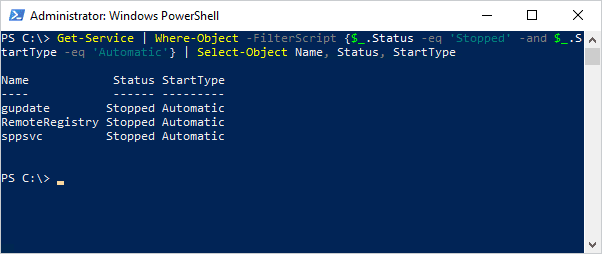
While this example is a bit longer than the first, there are only a few things I need to point out to help you understand what’s going on.
First off, pretend the whole section following the last pipe doesn’t exist. I added that to show the StartType property in the returned results because it’s not returned by default. It’s not necessary for the command to function.
Next, notice that we replaced the -Property parameter with the -FilterScript parameter. This ensures we use the correct parameter set to use a script block. However, -FilterScript is a positional parameter, and many users leave it off, just as we left off the -Property parameter in the first set of examples.
You may also wonder about the $_. symbols. These are automatic variables called $PSItems. They act as the variable for the current pipeline input item being processed. What’s important is the property following the symbol. $_.Status uses the Status property for the filter and $_.StartType uses the StartType property.
Lastly, we combined the two filters with the -and operator.
How do I find files with Where-Object?
Let’s look at an example where we utilize Where-Object to find files matching specific filter criteria. For this example, we’ll search for .jpg and .mov files that are larger than 10 MB and were modified within the last 10 days.
Get-ChildItem -Path 'C:\Users\' -Include '*.jpg', '*.mov' -Recurse | Where-Object -FilterScript {$_.Length -gt 10MB -and $_.LastWriteTime -gt (Get-Date).AddDays(-10)}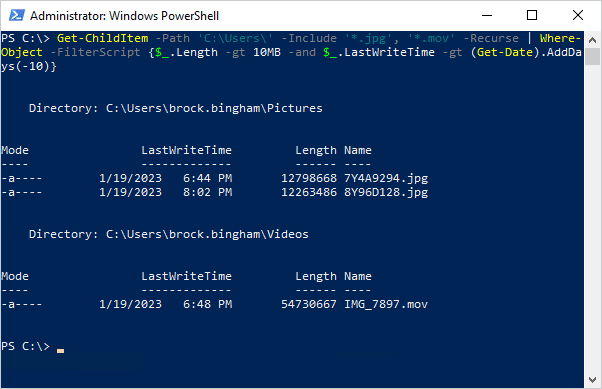
In this example, we utilize the -Path parameter to narrow down the search directories. We use the -Include parameter filter for files matching the .jpg and .mov string patterns. In the script block, we add the $_.Length property and set it to filter for files greater than (-gt) 10 MB. Lastly, we add the $_.LastWriteTime property and compare it to the current date minus 10 days.
What is filter left in PowerShell?
Filter left in PowerShell means applying filters as early as possible in a command so fewer objects are passed through the pipeline. By reducing the number of objects passed down the pipeline, scripts run faster and use fewer resources. While it’s not always possible to filter objects before the Where-Object cmdlet, many PowerShell commands provide filterable parameters. A common parameter used to filter at the beginning of the pipeline is the -Name parameter. Here’s an example:
Get-Service -Name 'Wi*' | Where-Object -FilterScript {$_.Status -eq 'Running'}vs.
Get-Service | Where-Object -FilterScript {$_.Status -eq 'Running' -and $_.Name -like 'Wi*'}These two scripts return the same results, but one is more efficient. The first script follows the principle of filter left and immediately filters for services that start with 'Wi*', piping only the results that meet the criteria to the Where-Object command to then be filtered by the status. The second example returns all the running services and then pipes the full list of services to the Where-Object command, where the results are then filtered based on the status and name.
Here are results of the two commands.
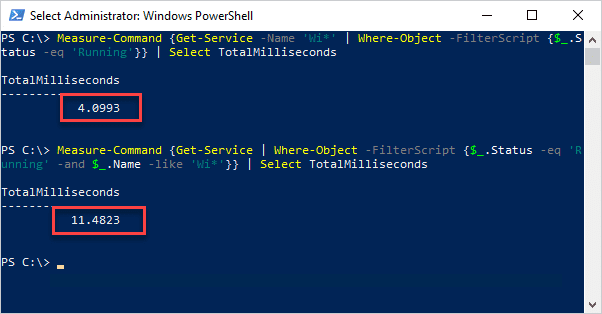
The difference between these two commands is almost a 65% increase in performance. While this is hardly noticeable on such a small-scale example, the increase in performance can make a significant difference on systems running numerous scripts against large datasets.
Once you learn the Where-Object cmdlet, you’ll never stop using it. Hopefully, this complete guide helps you on your path to PowerShell greatness.
If PowerShell isn’t your cup of tea, but you’d still love to get your hands on tons of useful filtered data, look no further than PDQ Inventory. PDQ Inventory automatically collects loads of information about your endpoints and makes that data easily accessible through a super simple user interface. Try it out for yourself with a 14-day free trial.


