PDQ Inventory 17 is now available for download. This version of PDQ Inventory comes with some smaller features that have unfortunately been on the back burner, but we figure it’s about time we tackle.
To enable alerts for new versions of PDQ products, click Options > Preferences > Alerts (or press Ctrl+Comma) and check Auto Update Check Enabled. Once saved, click A new version is available in the status bar to download and install the latest version.
Integration with PDQ Deploy
For those that might have been experiencing issues integrating with PDQ Deploy, you will also need to update to PDQ Deploy 17 Release 2. Once the Auto Update Check Enabled has been saved in Preferences, you can click A new version is available in the status bar to download and install the latest version. If you have not enabled the Auto Update, you can get the latest PDQ Deploy here.
Agent
As you may have already read in Shane’s previous blog, we have reclassified the Agent as “still in beta”. Sadly, our little Agent was just not up to the standards that we hold dear. As a result, we recommend limited use or just use within a test environment.
Additionally, the generic config file does not currently work for configuring the Agent. You will need to use the manual config file or install directly from the console using Computer > Install Agent (BETA).
New ability to prioritize queued scans
Have you ever kicked off a large number of scans only to be told that your boss needs information on one specific computer this. very. minute.? You can now prioritize queued scans, making you the hero in your boss’ eyes.
To prioritize scan(s) in the Main Console
1. On the Main Console window, select All Computers in the tree, or open a collection page.
2. Select one or more computers listed as Queued in the Scan Status column.
Only computers with the status of Queued can be prioritized. All other statuses indicate a scan is already running.
3. Right-click the highlighted computers and select Prioritize This Scan.
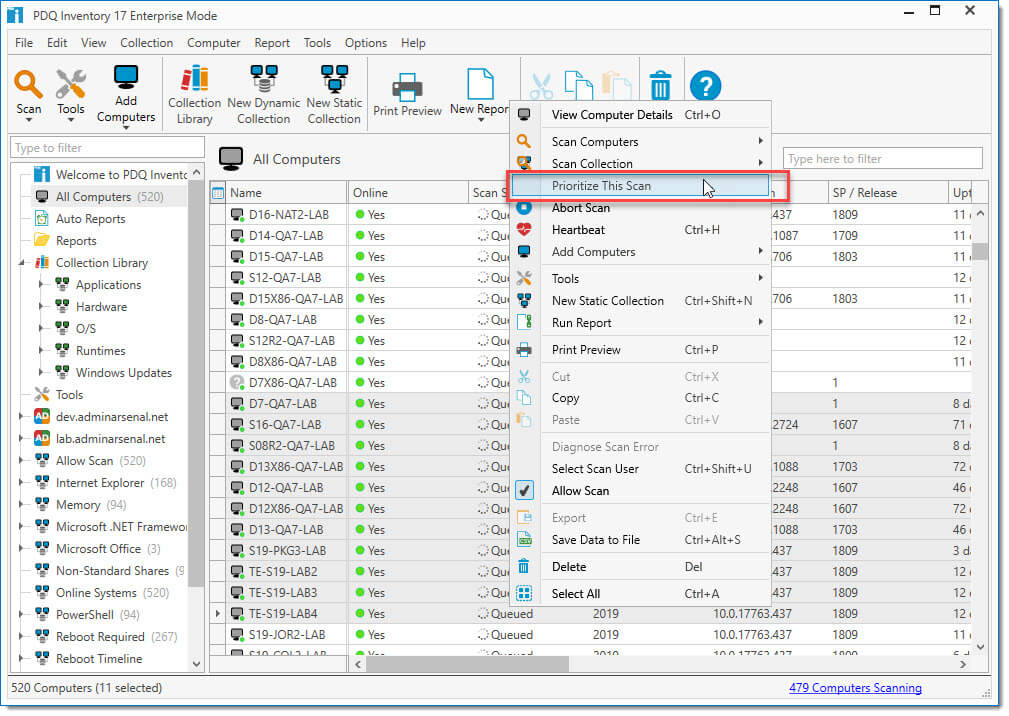
4. The Scan Status will display Queued (Priority) to indicate the scan has been prioritized.
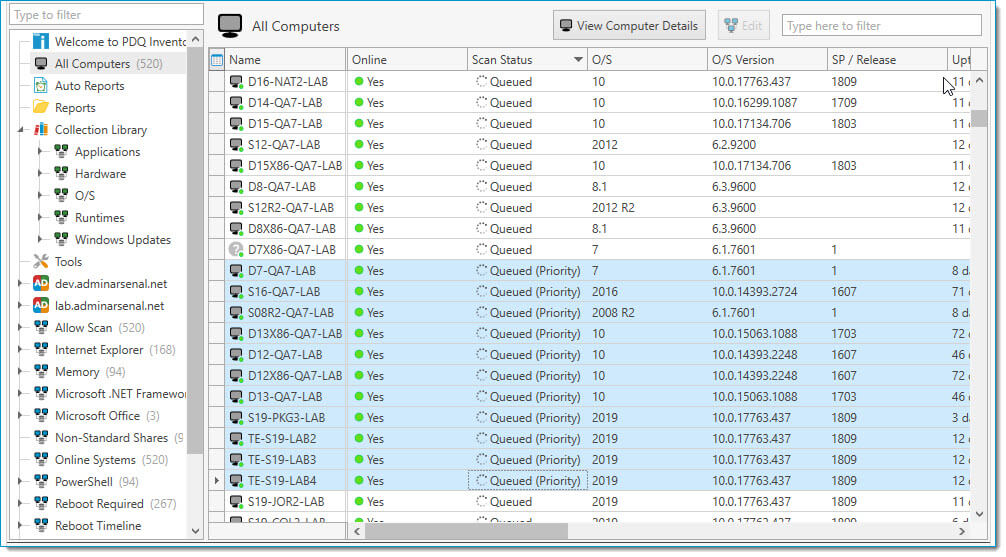
Once a computer has been prioritized, it does not lose its priority status. Scans occur in the order they were prioritized, with the most recent prioritization occurring first.
To prioritize scan(s) in the Scan Status window
1. In the Status bar of the Main Console window, click # Computers Scanning. The Scan Status window opens displaying all queued and running scans.
2. Select one or more computers listed as Queued in the Status column.
Only computers with the status of Queued can be prioritized. All other statuses indicate a scan is already running.
3. Click Prioritize This Scan or right-click the highlighted computers and select Prioritize This Scan.
4. The Scan Status will display Queued (Priority) to indicate the scan has been prioritized.
Once a computer has been prioritized, it does not lose its priority status. Scans occur in the order they were prioritized, with the most recent prioritization occurring first.
Create a Dynamic Collection from any installed application
Are you new to PDQ Inventory or maybe even a little intimidated by custom collections? No longer. We’ve now given you the ability to Create Collections from Applications and start creating your own collections like a boss.
The Collection Library and prebuilt collections are great resources for learning how to create your own collections. Additionally, we’ve provided a means to create a Dynamic Collection based on any installed application. This procedure explains how to create a custom dynamic collection from an application.
To create a collection from an application
1. On the Main Console, select the All Computers page in the tree, or open a collection page.
2. Select a computer, then click Computer> View Computer Details (or press Ctrl+O or double-click it).
This opens the Computer window.
3. Navigate to the Applications page.
4. Select the desired application from the list.
5. Click New Dynamic Collection (or right-click the highlighted application and select New Dynamic Collection).
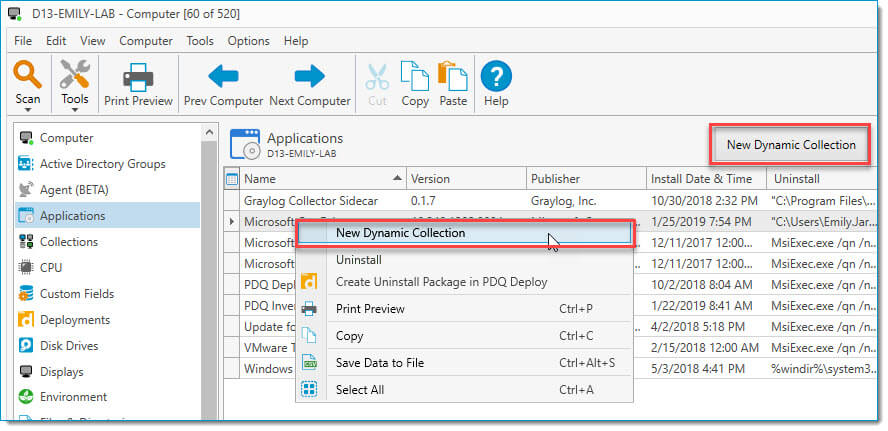
A new Dynamic Collection window opens using the same name and filter as the application.
6. (Optional) Edit the collection name, description, and filters as needed.
7. Click OK to save it at the top level of the main console tree.
8. For editing details, see Dynamic Collections.
Even more Additions
Ability to prioritize queued scans.
Create a Dynamic Collection of an installed application from the Applications page of the Computer window.
Needs Reboot now includes the reason why.
The Target Service preferences page is now easier to use.
Ability to move multiple columns at once and drag and drop in the Edit Columns window.
Client mode no longer needs to re-enter the license information when upgrading or renewing the license.
New Server host name variables.
Additional information displayed on the License window, including Technical Contact.
Distributed Wake-on-LAN now displays the name of the relay computer used.
Warning about Caps Lock when entering a password.
Fixes and other things of note
Occasional integration issues between PDQ Inventory and PDQ Deploy are no longer an issue.
Upgrade issues found in 16.6 with Log.db and InboundMessages.db have been fixed.
The Reboot/Shutdown tool now correctly distinguishes between computers rebooting or shutting down.
Reports and Print Preview no longer display memory in KBs.
Picking a filter value for the ‘Memory’ column on the Collection page no longer displays in bytes.
Typing a filter with Custom Field columns on the Collection page is much quicker.
Time zone is now reflected correctly.
A new window opens for each Run Command tool to prevent it from being run on previous computers.
Scans on Agent computers that would occasionally get stuck on Local Users & Groups are now working as intended.
Loading...


