Have you ever been asked to troubleshoot a slow computer only to discover that the computer is running slow because it ran out of disk space? It’s not fun, to say the least. What’s even less fun is asking the user to clean up their files and folders to free up space. I remember asking an older colleague to clean up some of their files on their computer for this exact reason. As they lowered their eyes, I could honestly see them calculating whether or not they could afford to retire right then and there. Thankfully, with the help of PDQ Inventory and WizTree, we can make this task a little less daunting.
Storage Scanning Made Easy
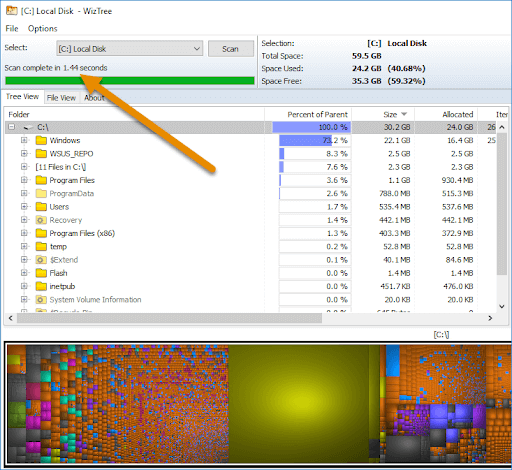
WizTree is a disk space analyzer that can quickly scan storage disks and return the results in an easy to read format so you can identify which files are hogging all your precious space. When I say it’s fast, I mean it. It can scan terabytes of data in seconds because WizTree reads the MFT (Master File Table) directly from the drive, bypassing the OS. Just look at how fast it scanned my 60GB drive. It only took 1.44 seconds. I know 60GB isn’t a large drive, but 1.44 seconds is faster than the time it takes me to sneeze.

As the late, great Billy Mays would say, “But wait! There’s more!” WizTree has another cool trick up its sleeve. You can call it from the command line! Do you know what that means? It means you can create super cool custom tools with it in PDQ Inventory! Let’s look at a few examples.
Creating Custom WizTree Scanning Tools
Before we dive in, make sure you have WizTree installed on your console computer. If you have PDQ Deploy, you can download the WizTree package from the Package Library and deploy it to yourself. If you don’t have PDQ Deploy because you don’t like to do things the easy way, you can download the WizTree installer here.
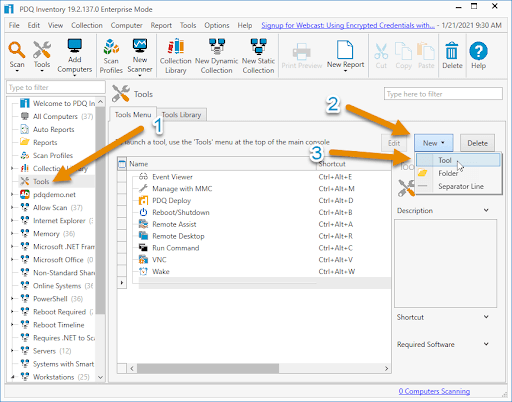
With WizTree installed, let’s open up a new tools window. To do this, click on Tools in the menu tree, and then click New > Tool.

Let’s start by creating a simple tool that will run WizTree tree against a target computer.
Name your new tool in the Name field
Select Local as the Run Type
You can leave the Run As field empty
Make sure Command (cmd) is set as the Command type
Add this command to the Command field:
"%programfiles%\wiztree\wiztree.exe" \\$(Computer:TARGETHOSTNAME)\c$\For the Shell, select No Shell - Ignore Output
Select (console user) for the Credentials field
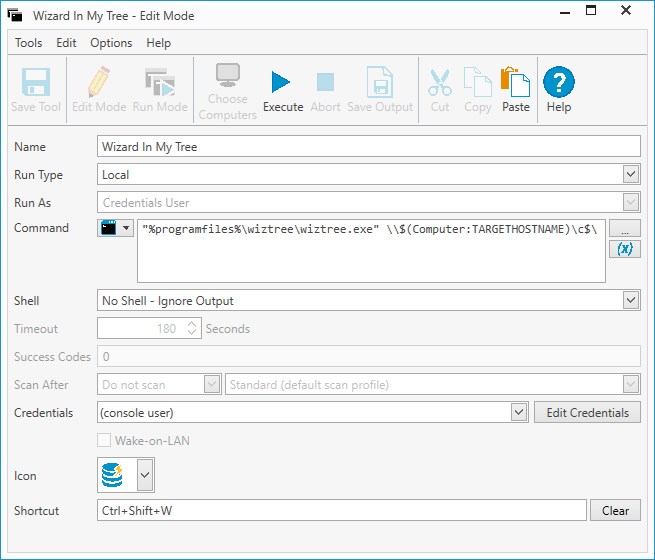
You can change the icon if you would like, and you can create a custom shortcut to launch the tool, which every self-respecting sysadmin should do. Save the tool with the Save Tool button at the top of the window, and you’re done. Here is my custom WizTree tool window for comparison.

This command is pretty basic. "%programfiles%\wiztree\wiztree.exe" is the path to the application to run. If you have WizTree installed in a different directory, modify this path to wherever your wiztree.exe instance is located. $(Computer:TARGETHOSTNAME) is a PDQ Inventory variable that indicates the target computer we’ve selected in PDQ Inventory. \\$(Computer:TARGETHOSTNAME)\c$\ is the full path to the drive or directory we want to scan. In this case, we will scan the C drive as indicated by the \c$\ at the end of the command.
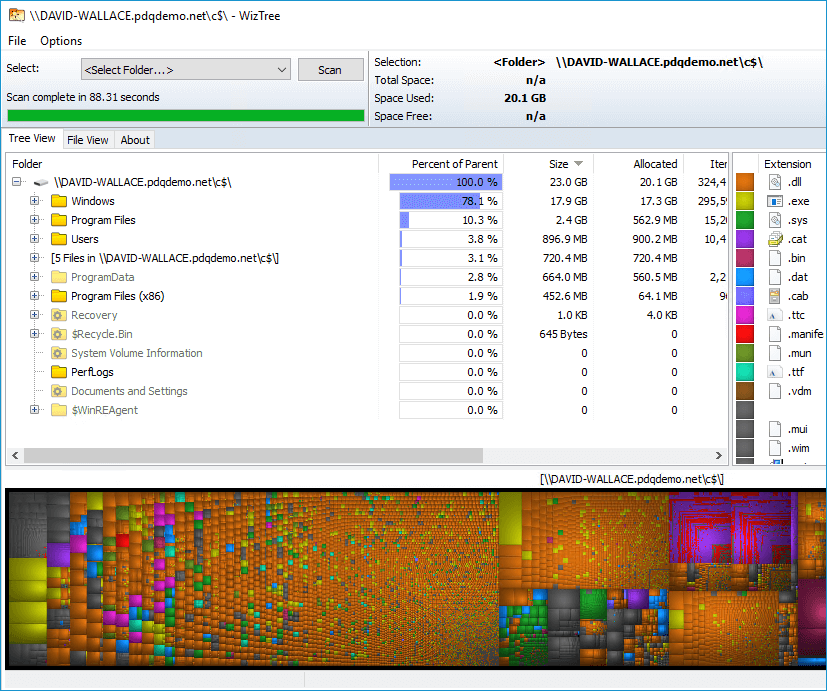
To run the tool, right-click on a computer in PDQ Inventory and select Tool > Your New Tool Name. Alternatively, if you’ve created a shortcut for your tool, you can just click on a computer in PDQ Inventory and use your shortcut. In my case, I’ll use my shortcut Ctrl+Shift+W. You should see the WizTree application launch and start scanning your target computer.

WizTree also has the ability to export scan results directly to a csv file. These csv files can then be sent to users, helping them free up their disk space by identifying which files take up the most space. Here’s an example command.
"%programfiles%\wiztree\wiztree.exe" \\$(Computer:TARGETHOSTNAME)\c$\ /export="c:\temp\$(Computer:TARGET)_WizTree_Export.csv"This command is similar to the first command we used, except this time, we are adding the /export parameter. The export parameter tells WizTree to export the scan results directly to a csv file. The path after the export parameter is where we want the csv file saved. In this example, we are telling WizTree to save a csv file in the c:\temp folder, and we want the file to be named with the target computer name $(Computer:TARGET) followed by _WizTree_Export.csv. Configure the rest of the tool settings to match the original tool we created. Here is the result after running a few scans.

Common culprits of disk space usage are mp3 and jpeg files. I’ve had users store entire music collections on their work computers, consuming hundreds of gigabytes of storage, and look at me with a confused stare when I told them they were out of space. With WizTree, we can scan for specific file types. We can also configure WizTree to scan a particular folder, which will help narrow down the results and allow the scan to run that much quicker. This command will scan for mp3 and jpeg files located in the c:\users\brock.bingham\ directory.
"%programfiles%\wiztree\wiztree.exe" \\$(Computer:TARGETHOSTNAME)\c$\users\brock.bingham\ /export="c:\temp\$(Computer:TARGET)_WizTree_MP3&JPEG.csv" /filter="*.mp3|*.jpeg|*.jpg"Again, you would set up this tool the same way as our other WizTree tools, just change the command. Here is what the resulting csv file would look like.

Wrapping Up
WizTree makes it incredibly fast and easy to audit disk space usage. When you combine WizTree with PDQ Inventory, it makes it even easier by giving you a centralized location to run the application against the computers in your environment.
If you want to see what other commands you can use with WizTree, check out their helpful guide here. If you want to learn more about custom tools in PDQ Inventory, check out our “How To Create Custom Tools In PDQ Inventory” blog post. If you think this all sounds awesome, but you don’t have PDQ Inventory, we’ve got you covered. Download our free trial and learn how PDQ Inventory can make your sysadmin life that much easier.


