Do you think it’s possible to both love and hate something at the same time? I believe it is. For example, I hate being audited, but I love the fact that we have audits. Could you imagine all the chaos that would ensue if companies weren’t required to adhere to specific standards? What if you found out that the grocery store you shop at stored all your personal details and credit card information in plain text on an external hard drive, and one day, that drive decided to go for a walk? This scenario, and many others like it, are the types of situations audits are designed to prevent.
Table of contents
What is PCI DSS
PCI DSS stands for Payment Card Industry Data Security Standard. It was developed by the Payment Card Industry Security Standards Council and is mandated by the card brands, such as Visa and Discover. PCI DSS applies to any entity that processes card payment transactions and those handling cardholder data. The goal of PCI DSS is to safeguard cardholder data and prevent credit card fraud. To that end, there are twelve requirements companies need to follow to maintain compliance with PCI DSS.
Install and maintain a firewall configuration to protect cardholder data
Do not use vendor-supplied defaults for system passwords and other security parameters
Protect stored cardholder data
Encrypt transmission of cardholder data across open, public networks
Use and regularly update anti-virus software or programs
Develop and maintain secure system and applications
Restrict access to cardholder data by business need to know
Assign a unique ID to each person with computer access
Restrict physical access to cardholder data
Track and monitor all access to network resources and cardholder data
Regularly test security system and processes
Maintain a policy that addresses information security for all personnel
How PDQ Inventory and PDQ Deploy can help
While PDQ Inventory and PDQ Deploy can’t help you write or maintain your security policies, there are several areas of the PCI DSS audit where we can help. Specifically, we’ll show you how you can use PDQ Inventory’s collections and reports to gather useful PCI DSS information. We’ll also show you how to target collections with PDQ Deploy’s auto download and scheduling to ensure all of your devices stay up to date. If you don’t have PDQ Inventory and Deploy, you can download a free trial.
Check firewall configurations with scan profiles
Requirement 1 of the PCI DSS audit requires systems to be protected with properly configured firewalls. Firewalls protect systems by restricting network traffic based on rules configured by an organization. PDQ Inventory makes it easy to scan devices and return their firewall configuration settings by including a firewall scan profile. To use the built-in Windows Firewall Configuration scanner, right-click on any computer in PDQ Inventory and click Scan Computers > Windows Firewall Configuration. If you want to scan the entire collection of computers, choose Scan Collection instead of Scan Computers.
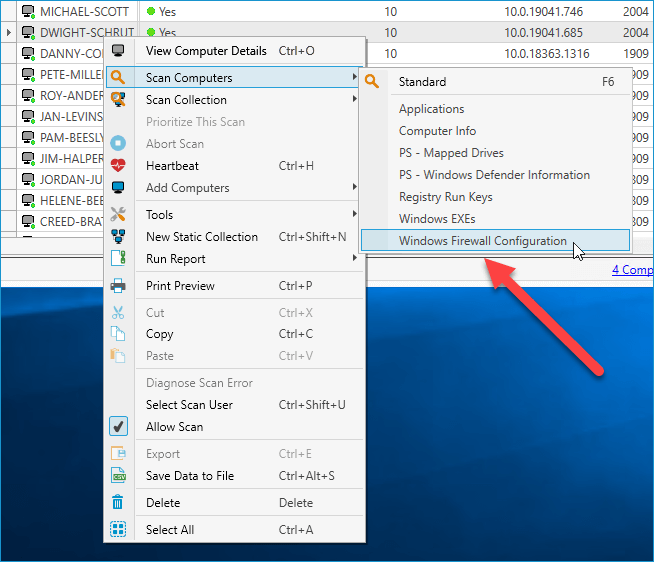
To view the results, double-click on any computer that ran the scan and click on Registry. The results of the scan will be displayed.
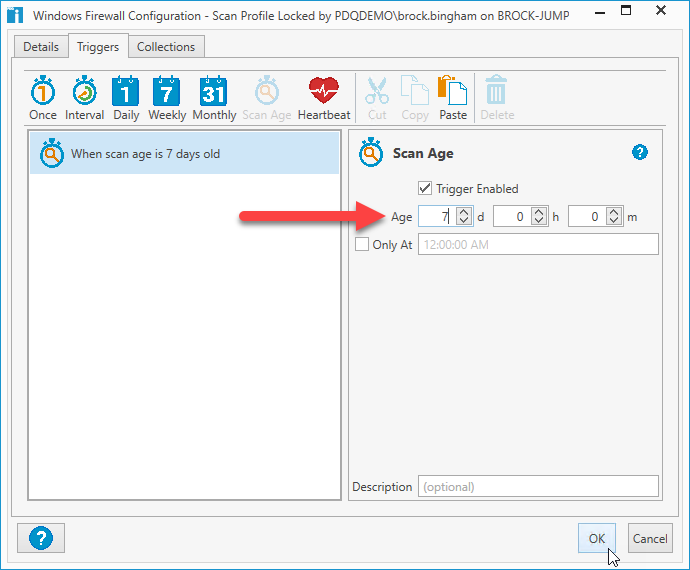
If you would like to return more information than what is provided by the default Windows Firewall Configuration scanner, you can edit the scanner to include more data. Let’s add a few more registries to the scanner and configure the scanner to run after seven days since the last scan automatically.
In PDQ Inventory, click Options > Scan Profiles
Double-click the scan profile Windows Firewall Configuration
Select the registry scanner and click Edit
Add the following three registry values. These values check to see if the firewall is enabled on the domain, standard, and public profile
SYSTEM\CurrentControlSet\services\SharedAccess\Parameters\FirewallPolicy\DomainProfile\EnableFirewall
SYSTEM\CurrentControlSet\services\SharedAccess\Parameters\FirewallPolicy\StandardProfile\EnableFirewall
SYSTEM\CurrentControlSet\services\SharedAccess\Parameters\FirewallPolicy\PublicProfile\EnableFirewall
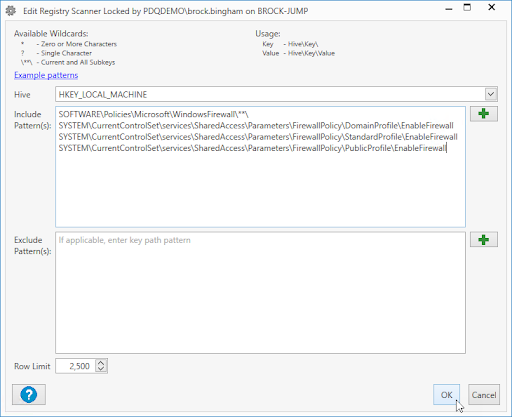
After you’ve added those registries, click OK
Click on the Triggers tab
Click Scan Age
Change the scan age to 7 days and click OK
You can manually rerun the scan to return the new results, or you can wait for the scan profile to run automatically again after seven days.
With this data, you can create collections and reports to identify which systems are compliant or not.
Detect missing or out of date antivirus with PDQ Inventory
Auditors have a way of finding devices that haven’t been touched in years, and they always choose those devices to audit. Often the result is a non-compliant workstation because of out of date software, including antivirus. With PDQ Inventory, we can create a collection to show us which machines have the latest antivirus software installed, which machines have an old version of antivirus installed, and which machines have no antivirus installed. For this example, we’ll use Avast antivirus software.
With PDQ Inventory open, click New Dynamic Collection
For the name, enter Antivirus
Change the filter to Application > Name > Contains > avast and click OK
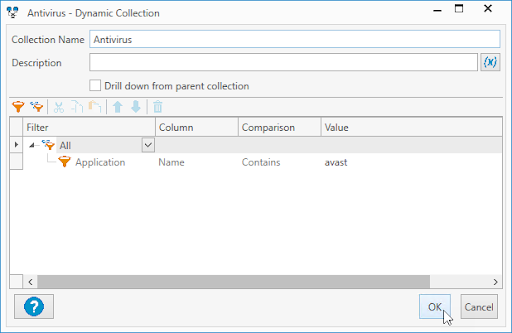
This dynamic collection should return all of the computers with Avast installed. While this information is nice, we still don’t know which computers don’t have antivirus software installed and which ones have old antivirus versions installed. Let’s create a few more dynamic collections to give us the rest of the information we’re looking for.
Right-click on the Antivirus collection and click New > Dynamic Collection
Name this new collection Antivirus Latest
Add the filter Application > Name > Contains > avast
Add the filter Application > Version > Version Equals > 21.1.2444 (which is currently the latest version of Avast) and click OK

This new collection will return only computers with the latest version of antivirus installed.
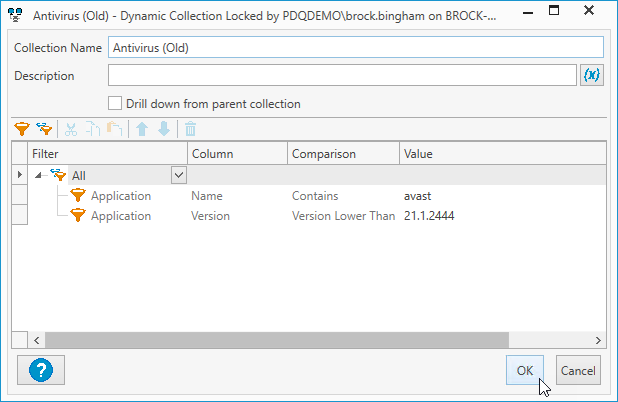
Now let’s create a collection that returns computers with old versions of antivirus installed.
Right-click on the Antivirus (Latest) collection and select Duplicate
Double-click on the duplicated collection to open it up
Rename the collection Antivirus (Old)
Change the comparison value from Version Equals to Version Lower Than and click OK
For our last collection, we’ll create one that only returns computers that don’t have antivirus software installed.
Right-click on the Antivirus collection and click New > Dynamic Collection
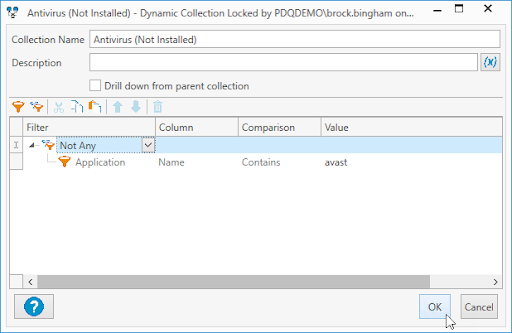
Name it Antivirus (Not Installed)
Change the filter to Not Any > Application > Name > Contains > avast and click OK
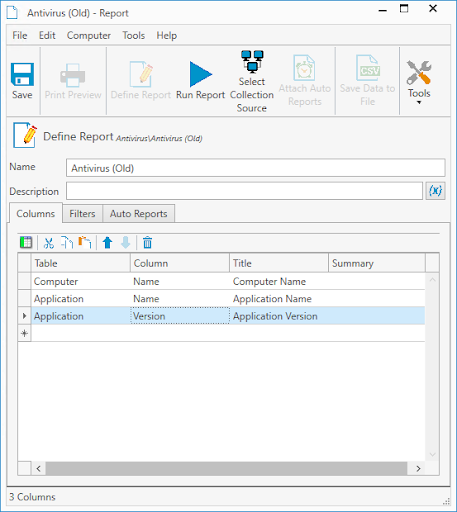
With these dynamic collections created, we know which computers have antivirus installed, which don’t, which have the latest versions, and which have an old version. If we want to create a report with any of these collections, we can simply right-click on the collection and select New > Report From Collection. This will copy the collection filter into a new report. Now you just need to add any columns you want the report to show. For example, we can add the application name and application version to the report. Click Save, and you’re all done. Your boss will think you’ve spent hours creating a custom report.
Keeping Up To Date
In addition to antivirus, auditors will check to ensure the operating systems and other applications installed on machines that qualify for the PCI audit are patched and up to date. Luckily, keeping systems patched and up to date is the bread and butter of PDQ Inventory and PDQ Deploy. PDQ Inventory comes out of the gate with dynamic collections for tons of commonly used applications and several useful reports. The package library in PDQ Deploy includes Windows updates and hundreds of pre-packaged applications, all ready to be deployed to your workstations with just a few clicks.
Since PCI auditors only need to audit computers that fall under the PCI scope, I recommend creating a collection for your PCI computers in PDQ Inventory. To do this, we can either create a static collection or a dynamic collection. These collections will allow us to target reports and deployments to this specific collection of computers.
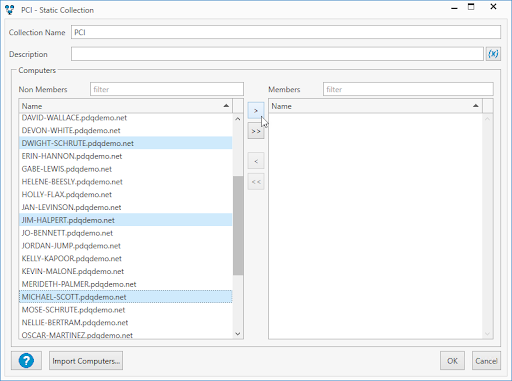
To create a static collection:
Click the New Static Collection button
Name the collection PCI
Holding the ctrl key on your keyboard, click on each computer that needs to be added to the collection, and click the arrow > button
Click OK
To create a dynamic collection, we first need to add a custom field.
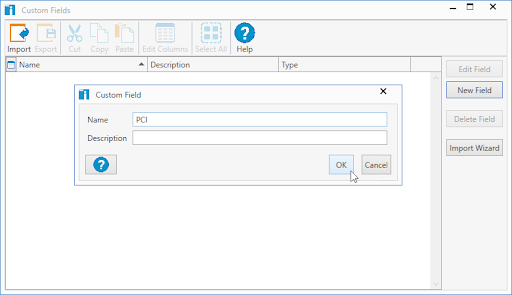
In the top menu, click Options > Custom Fields
Click New Field > True/False
Enter PCI for the name and click OK
Now we need to assign this custom field to our PCI computers.
Double-click on a computer you want to assign the PCI field to
Click the Custom Fields menu option in the menu tree
You should see PCI as a custom field option and a check box in the Value column. Select the check box
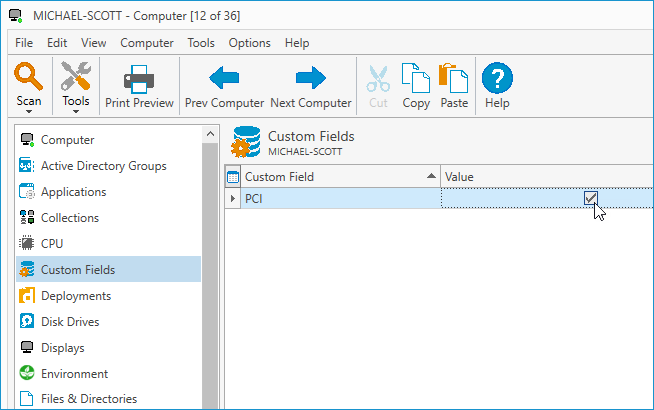
Repeat steps 1 - 3 for any remaining computers you need to add to the PCI collection
With our custom fields assigned, we can now create a dynamic collection.
Click the New Dynamic Collection button
Name the collection PCI
Select All for the group filter
For the value filter, select Computer > PCI > Is True and click OK
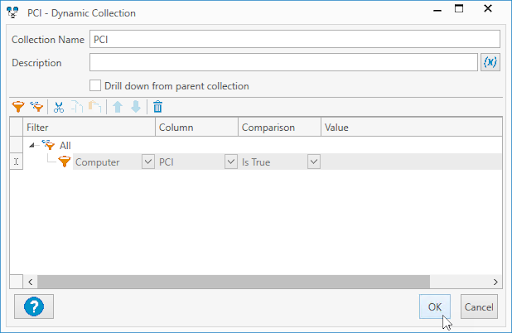
With our collection created, we can now automate reports and deployments and target this specific computer collection. Let’s first look at how to configure auto reports because manually generating reports is beneath us.
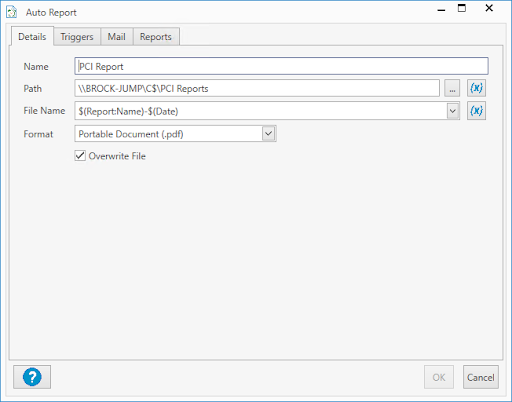
Right-click on Auto Reports and click on New > Auto Report
Enter PCI Report for the report name
Enter the unc path where you would like to save the report
Configure the file naming convention. I’ve used $(Report:Name)-$(Date)
Choose your preferred format. I’ve chosen Portable Document (.pdf)
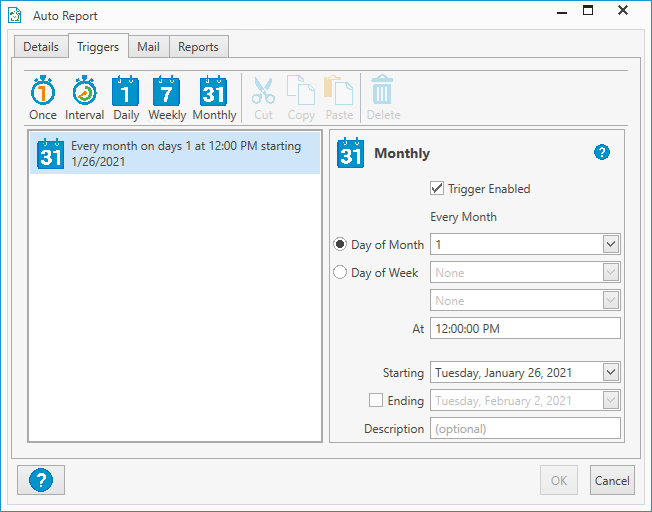
Select the Triggers tab
Configure the schedule that works best for you. I’ve chosen to automatically run the report on the 1st day of every month
If you set up your mail server information in the mail server preferences, you can configure the report to be mailed out in the Mail tab
Select the Reports tab
Click on the Attach button and click on the reports you want to add
Once you added your reports, select them all by clicking on one and hitting CTRL+A
Click the Change Collection button
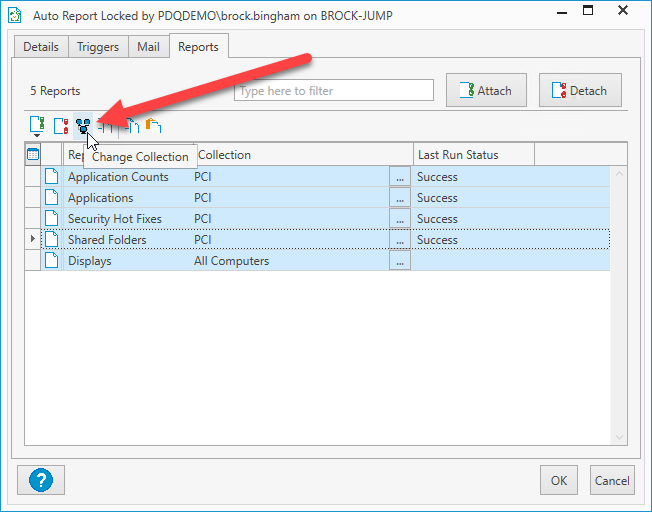
Click on the PCI collection and click OK
These reports will now run on the first of each month and only target the PCI collection. We can do the same with our deployments to make sure these computers stay up to date. Since more than 60% of users use Chrome, let’s configure Chrome to automatically deploy to our PCI workstations when a new version is released.
Launch PDQ Deploy
Click on Package Library
In the filter field, type in Chrome
Select the Google Chrome Enterprise package
Click Download Selected (As Auto Download)
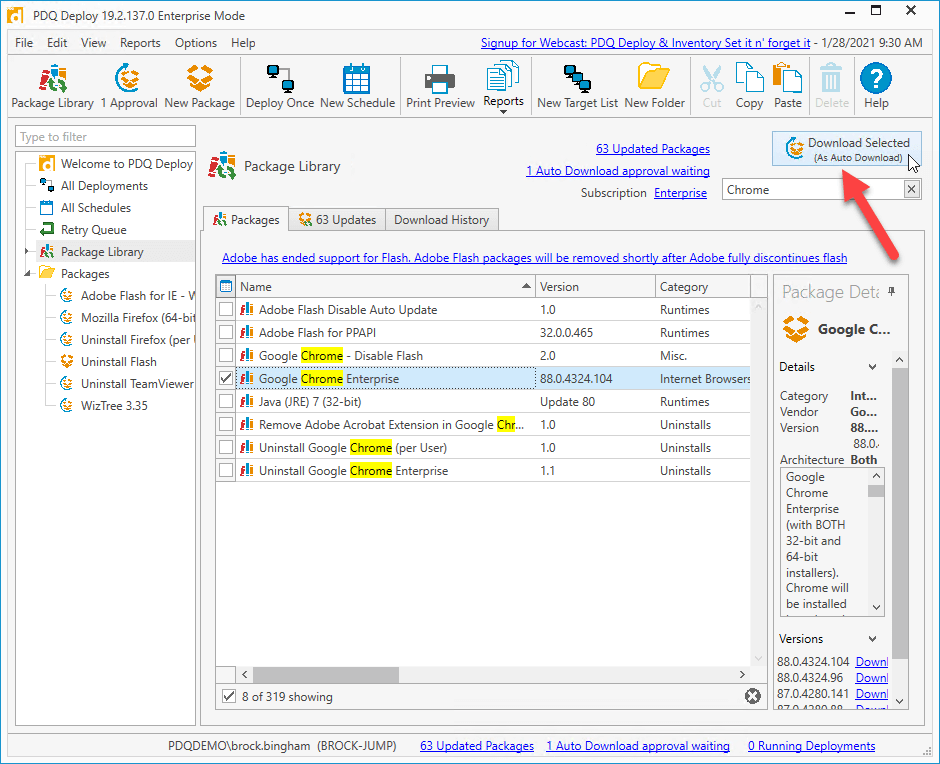
Click on the package once it finished downloading
Click on the New Schedule button
Name your schedule
Configure the schedule to meet your needs. I’m going to configure it to run weekly by clicking on the Weekly button
I’ve chosen to run the deployment every Friday at 4 pm
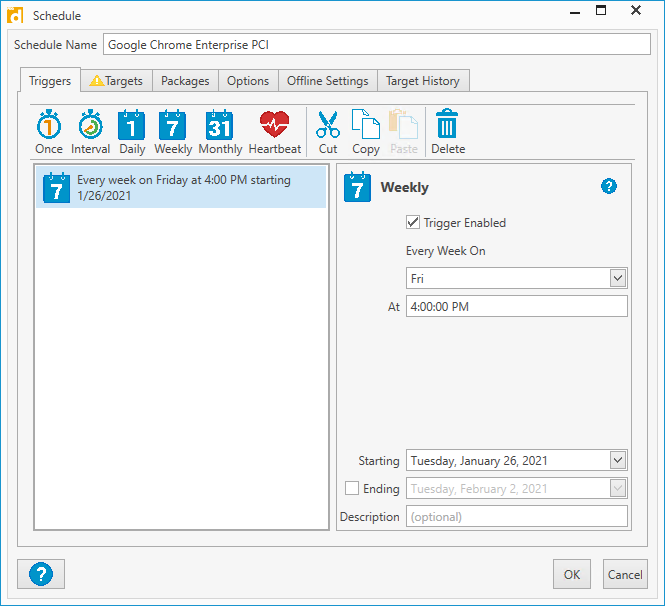
Once the schedule is configured, click on the Targets tab
Click Choose Targets > PDQ Inventory > Collection
Select your PCI collection and click OK
Click the Options tab
Make sure Stop deploying to targets once they succeed is selected on click OK to finish
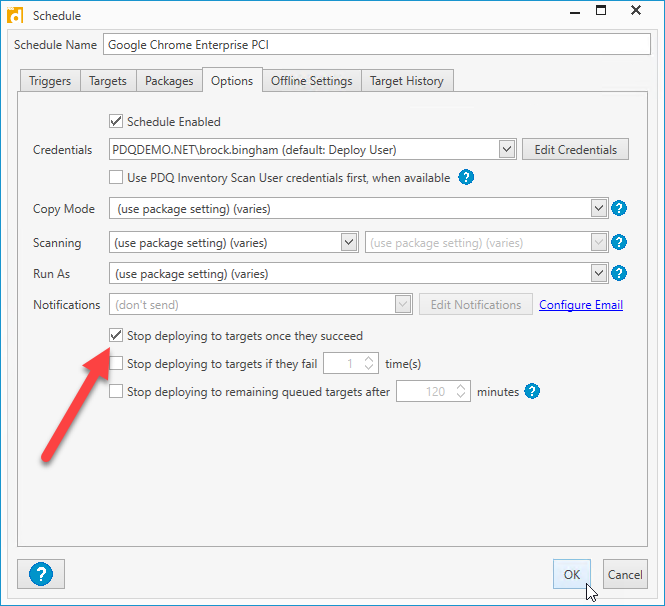
Now we have Chrome configured to deploy every Friday at 4 pm automatically. This is just one example of what’s possible with PDQ Inventory and PDQ Deploy. You can configure Windows updates and other applications just as easy to make sure you’re never caught with an out of date application or OS on your PCI workstations.
Audit user access to PCI devices
Requirement 7 of the PCI DSS list requires access to PCI devices to be limited to business need to know. Basically, if you don’t need access to a PCI device, you shouldn’t have access to a PCI device. Requirement 8 restricts PCI devices from having shared or generic accounts and requires all user accounts to be unique. This data is easy to collect and report on in PDQ Inventory.
PDQ Inventory comes with a built-in scanner to return local accounts on workstations. If the standard scan profile has scanned a machine, you can see the local user accounts by double-clicking on a computer and selecting Local Users from the menu tree. We can take this a step further by using a WMI scanner to return all user profiles on a workstation, not just the local accounts.
To create a new WMI scanner:
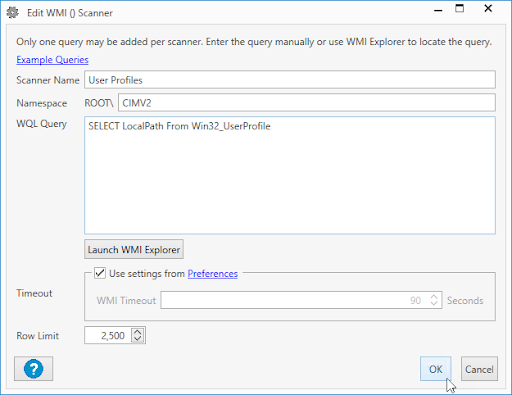
In PDQ Inventory, click on Options > New Scanner > WMI
Name your scanner User Profiles
For the Namespace, use CIMV2
Enter SELECT LocalPath From Win32_UserProfile for our WQL Query and click OK
The New Scan Profile window will open
Enter User Profiles for the name
Since I want user profiles and local accounts, we’ll add the Users & Groups scanner also by clicking on Add and selecting Users & Groups
If you want this scan to run on a schedule, click the Triggers
With the Triggers tab open, create your schedule. I’ve configured mine to scan when the scan age is 3 days old
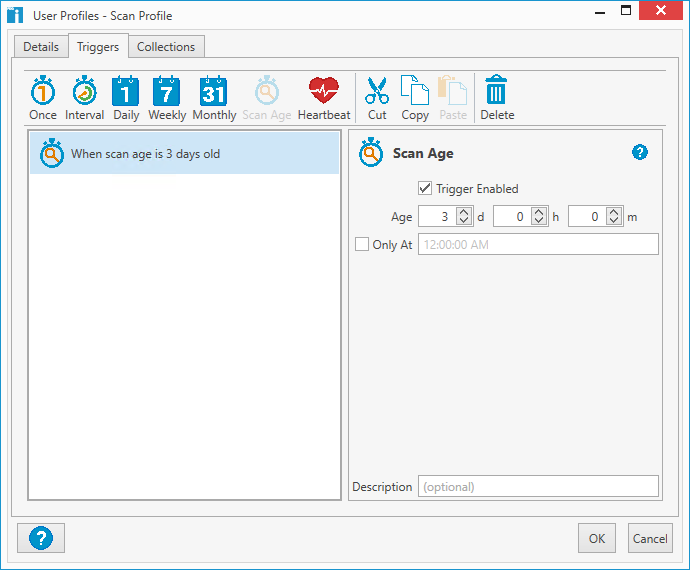
Now let’s attach the scan profile to our collection by clicking on the Collections tab
Click Link To Collection(s)
Select the PCI collection and click OK twice
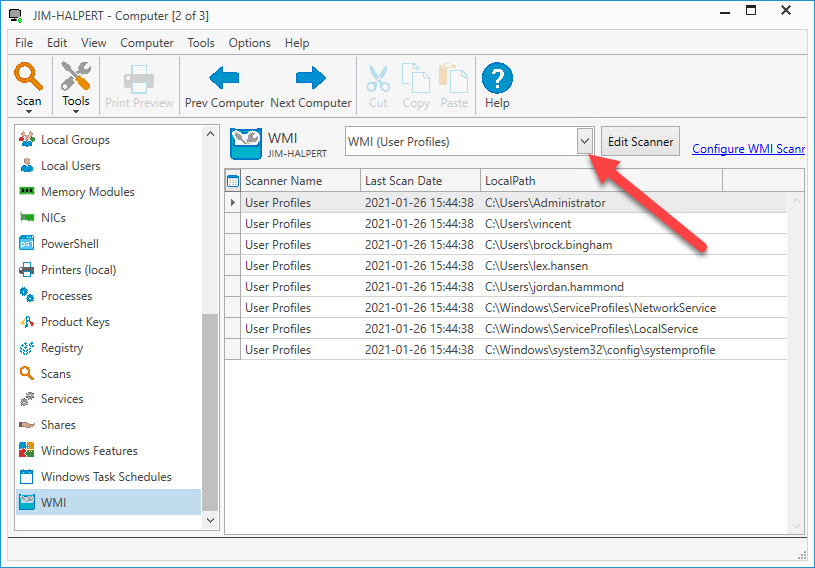
If you don’t want to wait for the new scanner to run to ensure it’s working, you can right-click on the PCI collection and select Scan Collection > User Profiles. To view the results, double-click on any computer in the collection and click on the WMI option in the menu tree. If you have more than one WMI scanner, make sure you are viewing the correct one from the drop-down menu.
Remember, you can add this data to a report and include it in the auto report we created earlier. Auditors love reports, but more importantly, having these reports ready to go makes your life that much easier. To add this data to a report
Click on Report > New Report > Basic Report
Name your report User Profiles
Click the Add Column button
Change the table value to WMI (User Profiles)
Click Save
Click Run Report if you want to view the resulting data
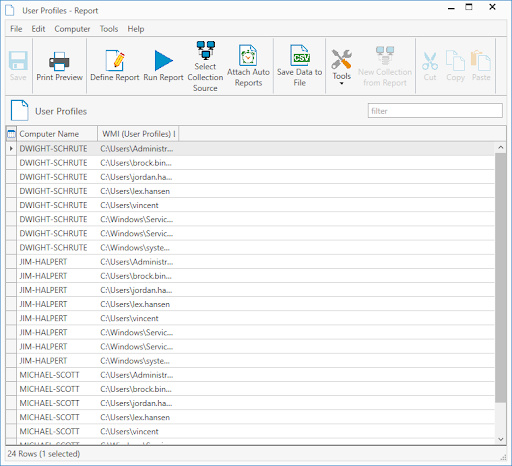
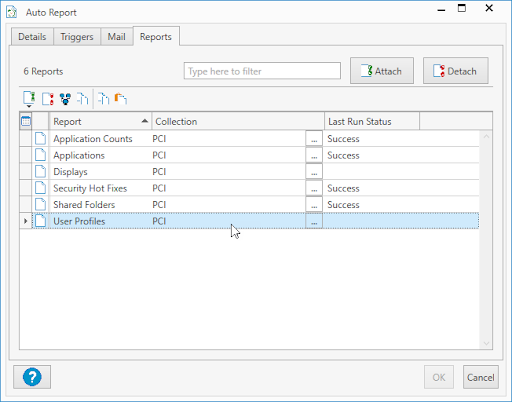
You can add this report to the auto report we created earlier by clicking Auto Reports and double-clicking our PCI Report. Click Attach > User Profiles. Right-click the User Profiles report and select Change Collection. Select the PCI collection and click OK twice.
Wrapping up
While I may not enjoy being audited, it gives me peace of mind knowing that when I shop for some new pauldrons to complete my LARPing outfit, the LARP store must comply with these standards and keep my data safe. Shopping, in general, wouldn’t be what it is today without these standards.
If you can’t get enough PDQ and PCI, you can head over to our YouTube channel and watch Shane and Lex go into detail about creating reports and collections specifically for PCI in this helpful video.

