Windows 11 is right around the corner, and with it, a slew of new minimum system requirements. One of the requirements for Windows 11 is having a Trusted Platform Module (TPM) version 2.0. Do your computers meet this requirement? You can find out with PDQ Inventory and a custom PowerShell scanner.
As always, if you don't have PDQ Inventory but would like to follow along with the article, you can download a free 14-day trial on the house. Setup is super easy, but if you get stuck, we've got you, fam. Check out our user-friendly startup guide, which will guide you through the process.
Windows 11 minimum system requirements
Almost every new OS release comes with a new set of minimum system requirements. It's a natural part of the evolution of technology.
Some OS releases, like Windows 10, are pretty welcoming to older devices. With Windows 10, one of Microsoft's main objectives was to ensure it could support as many devices as possible. Windows 11, on the other hand, seems pretty strict with its requirements, which could leave many devices unable to upgrade.
Here's the list of system requirements that Microsoft published for Windows 11 compatible devices.
Processor: 1 gigahertz (GHz)or faster with 2 or more cores on a compatible 64-bit processor or System on a Chip (SoC)
RAM: 4 gigabyte (GB)
Storage: 64 GB or larger storage device
System firmware: UEFI, Secure Boot capable
TPM: Trusted Platform Module (TPM) version 2.0
Graphics card: Compatible with DirectX 12 or later with WDDM 2.0 driver
Display: High definition (720p) display that is greater than 9" diagonally, 8 bits per color channel
If you're thinking this list isn't too bad, you'd be right — for the most part. Once you dive a little deeper into the processor and TPM requirements, you may find they restrict more devices from upgrading than you think.
Microsoft recently published several lists of processors supported by Windows 11. Many processors, including AMD's popular Zen 1 series released in 2017, are not supported in Windows 11. A 1 GHz 64-bit processor with 2 cores doesn't seem like a strict requirement, but the actual list of supported processors may prove otherwise.
Here are the published lists provided by Microsoft.
In addition to the pretty rigorous processor restrictions is the TPM 2.0 requirement. The standards for TPM version 2.0 weren't even released until 2014, and mass adoption by hardware manufacturers of this new standard didn't really begin for another year or so after that.
With this information in mind, you can start to see why some users are beginning to worry if they'll need a new computer in order to run Windows 11.
What is a Trusted Platform Module (TPM)
A TPM is a security device that adds another layer of protection to computers. TPMs specialize in storing secrets such as cryptographic keys and biometric data. Because TPMs are a separate component from the OS, they are not susceptible to OS vulnerabilities or software attacks. TPMs can also identify if they've been tampered with, making them largely invulnerable to physical attacks as well.
TPMs predominantly come in two forms: discrete TPMs (dTPMs) and firmware TPMs (fTPMs). Discrete TPMs are dedicated physical chips that are socketed onto a computer's motherboard. Firmware TPMs are a firmware-based TPM solution that is emulated by a computer's CPU. Intel, AMD, and Qualcomm all provide their own fTPM solutions. While there is a case to be made that a dedicated discrete TPM provides a more secure solution, the overall functionality between the two forms is essentially identical.
Many users have interacted with TPMs without realizing it. If you've ever used Bitlocker or Windows Hello functionality in Windows 10, you've used TPM. In fact, that is one of the reasons why TPMs are so great. They provide increased protection while not requiring additional user interaction. They work silently in the background, unlike other security protocols such as 2FA, which often require users to have a second device on hand. Don't get me wrong, 2FA is a great security protocol, but the less user interaction required, the less chance of human error.
TPM PowerShell Scanner
Now that we know what a TPM is let's create a PowerShell scanner in PDQ Inventory to return our computer's TPM information.
With PDQ Inventory open, click the Scan Profiles button.
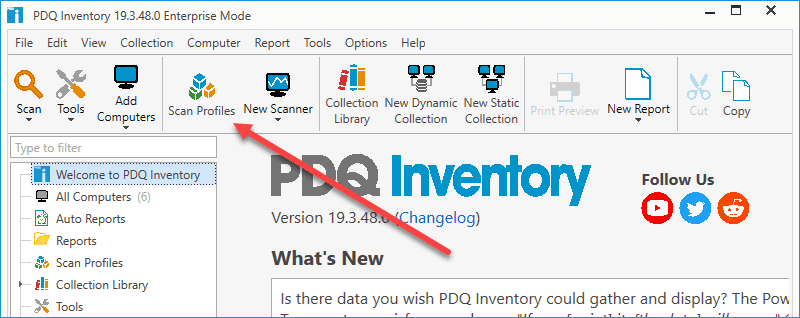
At the Scan Profiles windows, click New.
Give the scan profile a name. I've named mine TPM Scanner.
Click Add > PowerShell.
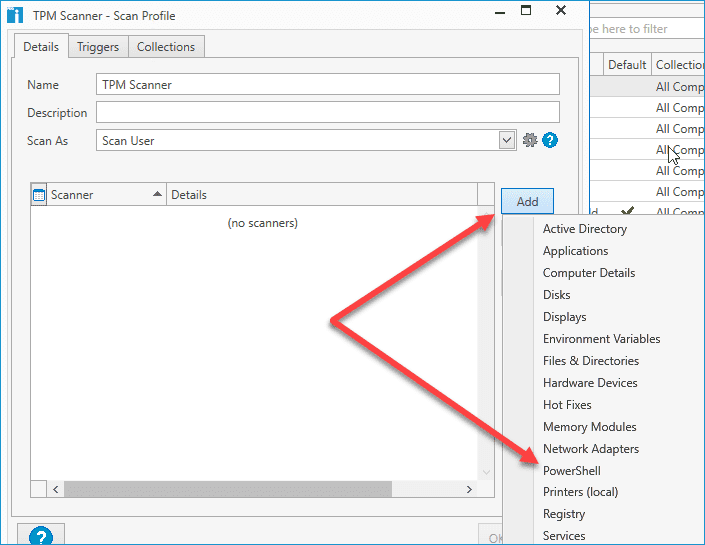
Name the scanner. I've reused TPM Scanner.
Select Script.
Enter the following PowerShell command into the script window.
Get-CimInstance -Namespace ROOT/CIMV2/Security/MicrosoftTpm -ClassName Win32_Tpm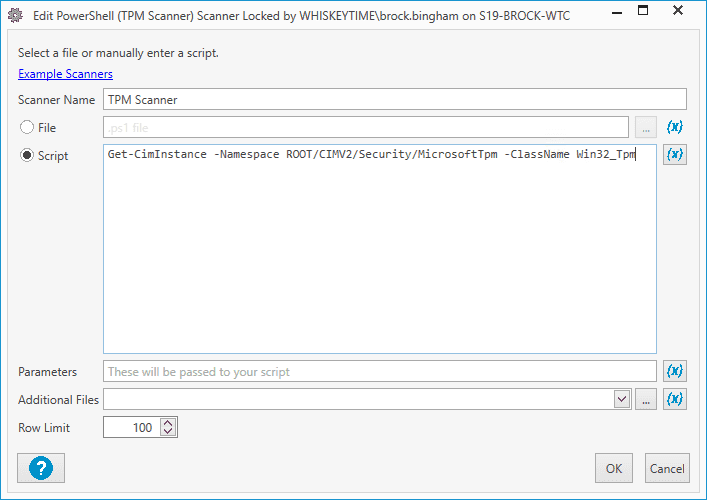
Click OK twice.
Now that we have our scanner, we can run it against our computers by right-clicking on All Computers then clicking Scan Collection > TPM Scanner (or whatever you named your scanner).
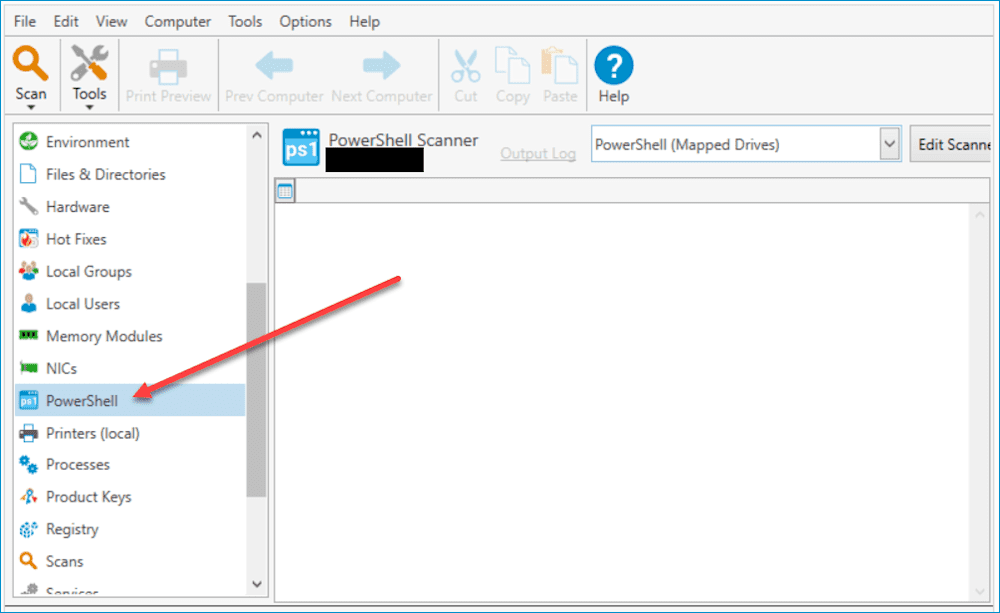
After the scanner finishes, we can open up the computer details windows to view the results. Double-click on a computer in PDQ Inventory, then click on the PowerShell menu option.
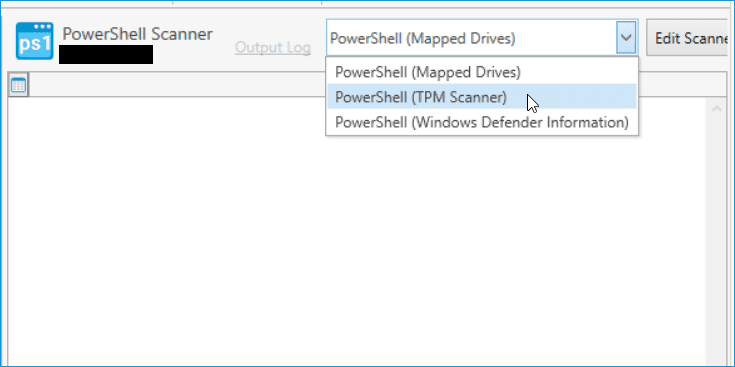
Next, click on the drop-down menu and select the TPM Scanner.
You should now see the data returned from the scanner. Keep in mind that virtual machines won't return any data because they don't have TPM components.
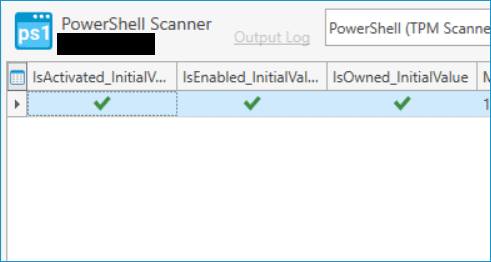
Now that we have our data, we can build a collection containing computers with a TPM 2.0 that is enabled.
Click on New Dynamic Collection.

Enter a descriptive name for the collection. I've named mine TPM 2.0 and Enabled.
Use the following filters.
Loading...
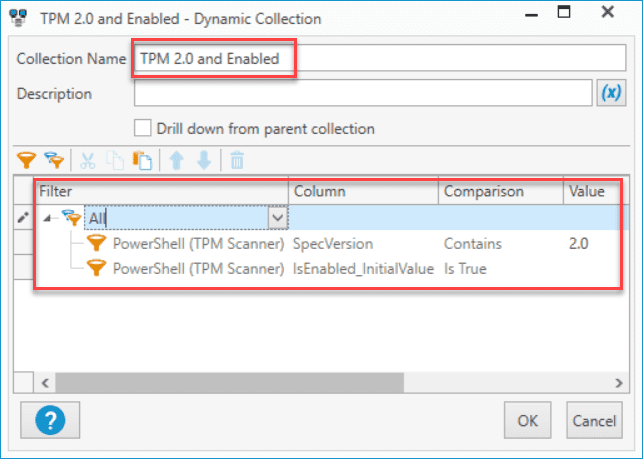
Click OK when you are finished.
Your new collection should appear in the menu tree in PDQ Inventory. If you feel like you may have devices with TPM 2.0 but don't have it enabled, you can easily create a collection to distinguish the machines with that configuration by changing the IsEnabled_InitialValue comparison to Is False.
Wrapping up
These new Windows 11 system requirements do seem a bit strict, but it makes sense why Microsoft has added them. Every other day there seems to be a new data breach, hack, vulnerability, ransomware attack, etc. With our reliance on technology continuously growing, Microsoft bears an incredible burden to help keep its customers safe from cyber threats. Let's just hope that all these new requirements aren't circumvented by cybercriminals shortly after Windows 11 is released.

