If you’ve never used PowerShell commands in Microsoft Office 365, you’re missing out on a laundry list of neat scripts that save time. For example, with the right PowerShell modules installed, you can track down who never deletes their emails and share your calendar but not your mail.
In this blog, we’ll cover how to choose and install the right PowerShell modules. We’ll also dig into some neat scripts we can run with various modules installed.
And good news if you use Windows PowerShell ... or PowerShell! These modules and cmdlets should work on both Windows PowerShell and PowerShell. (Seriously, Microsoft, what is up with your naming conventions?) And before we get started, feel free to learn a bit about the differences between Windows PowerShell and PowerShell. (TL;DR: You’re likely running Windows PowerShell unless you’re on an ancient operating system or have manually sought out PowerShell.)
Hearing “PowerShell,” you might think, “Why venture into this new terrain when my trusty GUI has my back?” Some might even say it's like trying to decipher some mysterious codex in a cryptic RPG! But wait — I get it. You're a "GUI girl in a GUI world.” Life's been plastic and quite fantastic, right? Not the forum for that song, but moving on...
You also may be thinking why I, Tara, am writing a blog about PowerShell. Great question. PDQ’s own Andrew Pla, host of The PowerShell Podcast, is along for the ride. He has written all the code here, and he has personally dragged me (kicking and screaming) into the world of APIs.
I may be a novice to PowerShell, but when it comes to O365, I have been around a while. And I’ll admit it: There are some things you just can’t do in the GUI. The goal of this article is to show you how you can leverage the power of PowerShell (see what I did there?) to do more with less inside of Office 365.
Shall we begin?
Choose the right PowerShell module for the job
You’re probably wondering how the heck you’re supposed to know which module(s) you need. Well ... you most likely don’t. That’s normal. 😬 But we can turn to trusty old Google to help us figure it out.
Think about what you want to do with PowerShell. For instance, say you want to run a bunch of commands that involve mailbox rights. Chances are, the module best suited to help out would be the ExchangeOnlineManagement module, but I recommend a quick Google search to confirm that assumption.
And if you’re a total nerd like I am, head over to the PowerShell Gallery and browse the more than 13,000 unique packages available for download.
Looking for an impressive gallery of go-to PowerShell cmdlets?
Prepare to be amazed. The nerdiest nerds here at PDQ rounded up the best PowerShell cmdlets around. Check out our gallery of PowerShell commands.
Once you’ve chosen some PowerShell modules for our science experiment, we can install them.
Install each PowerShell module
To get PowerShell to connect to Office 365 and do things “under the hood,” we have to install a few select PowerShell modules. Here’s how to install each PowerShell module.
1. Open PowerShell as an administrator.
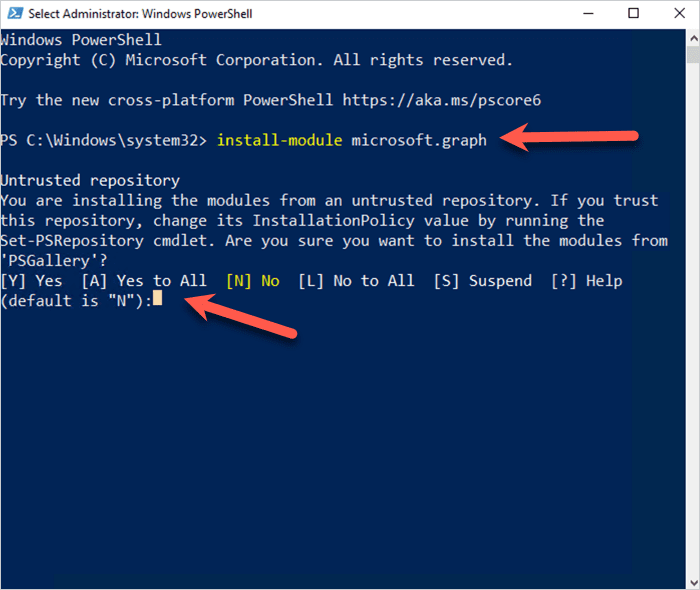
2. Use the install-module cmdlet to fetch the module using the PowerShell script below.
install-module MODULE NAME HERE
For example, if we wanted to install the microsoft.graph module, the PowerShell command would be Install-Module microsoft.graph.
3. You might get a warning about installing a module from an untrusted repository. If you do, type Y to agree to install that module, or type A to agree to install any module from this repository.

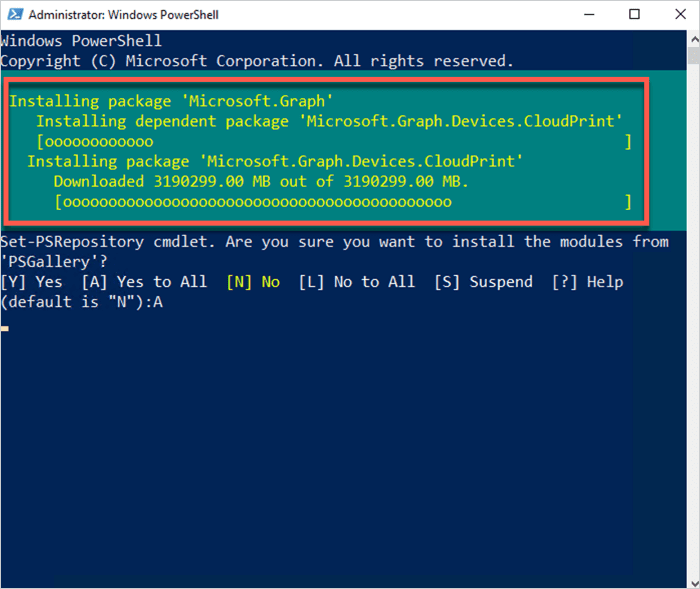
4. You will see some ✨shenanigans ✨ happening in the PowerShell window — they should look like the screenshot below. This is essentially a progress bar and means the things we requested to happen are happening!

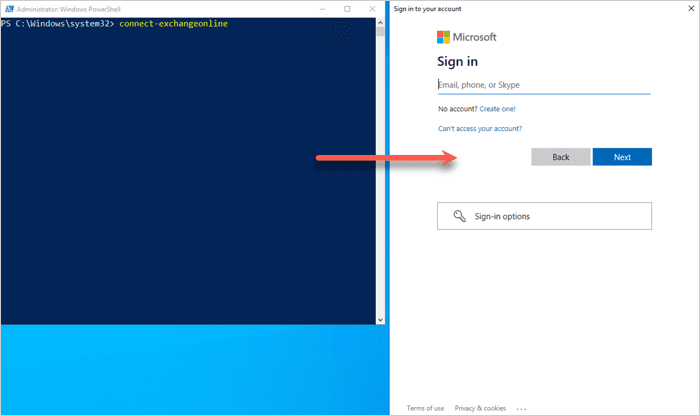
5. Connect the installed modules in PowerShell by running the cmdlet below:
Connect-ExchangeOnline
This launches a window for you to log in to your Microsoft account.

Recommended PowerShell modules
Asking me to choose my favorite PowerShell modules is like asking me to choose my favorite outfit to wear each day. Impossible! So, I turned to the expert in the room — Andrew Pla, host of The PowerShell Podcast — for an assist.
He called out two modules: ExchangeOnlineManagement and microsoft.graph. (There’s a reason why we used them in the install examples above! 😉)
If you’ve followed along, these modules should be installed and ready to go on your device. Let’s dig in and see what they can do.
ExchangeOnlineManagement
This module provides the necessary cmdlets for you to manage Exchange Online directly from PowerShell. Once installed, it enables seamless interaction with your Exchange Online data, including accessing mailboxes, configuring policies, and managing permissions.
The biggest power and timesaver of the ExchangeOnlineManagement module is its capacity to automate redundant and time-consuming tasks. With the Exchange Online Management PowerShell cmdlets, you can write scripts for repetitive tasks such as creating users, assigning licenses, or changing permissions — all without leaving the CLI. This can save a considerable amount of time, especially in large-scale deployments, and ensures a level of consistency that is hard to achieve with manual operations.
Plus, there are certain things you simply cannot do in the GUI, such as assigning rights to a calendar and not a mailbox. We've all had people with so many delegated mailboxes that when they launch Outlook, it takes nine years to load, and over time, the profile becomes corrupt. By adding the calendar only, you can avoid this major headache.
Make sure you installed the ExchangeOnlineManagement module
Paranoid like me and want to double check that the ExchangeOnlineManagement module was installed successfully? Let’s run the install script again with one slight change: the -force parameter. That parameter will force the module to try and install again, even if it’s already installed. (Already installed? Neat! Not yet installed? Well, it will be now with the -force parameter!)
install-module ExchangeOnlineManagement -force
Fun fact before we get too far into this PowerShell stuff: Before you start looking at Sir Andrew of Pla’s scripts, any line that is preceded by a # isn’t doing anything. That’s called “commenting out.” He is simply telling you what he is doing. That part of the script isn’t doing anything, per se; it is instructing you.
Here's a PowerShell script for adding only the calendar and not the mailbox. This script calls on the users in the $users variable and gives delegate calendar access to each delegate stored in $delegates.
# Uses the ExchangeOnlineManagement module found here
# Install-Module ExchangeOnlineManagement
# Email address formatted (ex. First.last@pdq.com)
$users = 'andrewpla@sdeploy.onmicrosoft.com', ‘BillyBob.Thornton@sdeploy.onmicrosoft.com'

# accounts that should have access
$delegates = 'tara.sinquefield@sdeploy.onmicrosoft.com', ‘Calendar.Afficianado@pdq.com’
foreach ($user in $users){
foreach ($delegate in $delegates){

#-Identity is the user's calendar and -User is the person getting the permissions to the calendar

#If the delegate already has permission to the user's stuff you'll need to use the Set-MailboxFolderPermission cmdlet instead

#Access rights and sharing permissions flags can be found here https://docs.microsoft.com/en-us/powershell/module/exchange/add-mailboxfolderpermission

Add-MailboxFolderPermission -Identity $($user + ':\Calendar') -User $delegate -AccessRights Editor -SharingPermissionFlags Delegate

}

}
The real key to the script is the following line, which you can run ad hoc to set up calendar access:
Add-MailboxFolderPermission -Identity 'first.last@company.com:\Calendar' -User ‘calendar.lover@pdq.com’ -AccessRights Editor -SharingPermissionFlags Delegate And don’t forget you can run help Add-MailboxFolderPermission -Online if you need help or more examples.
While we are on the topic of calendars, they are annoying, right? It can be really difficult to manage them en masse in the GUI. PowerShell can make this easier.
Maybe you want to hide calendar events for certain employees, like HR? Perhaps you want to display free/busy only and provide no other details org-wide. Say no more! Andrew has a script for you.
For this next script, you need to install the AzureAD module.
# Install-Module AzureAD, ExchangeOnlineManagement
Connect-AzureAD
Connect-ExchangeOnline

#Gets all users from the 'all users' dynamic group in AzureAD
$users = Get-AzureADGroupMember -ObjectID 'objectidgoeshere' -All $true

#lists of users whose calendars should not be publically visible to everyone else
$noshare = 'tara.sinquefield@sdeploy.onmicrosoft.com'
foreach ($user in $users){
$user = $($User.UserPrincipalName)
if ($noshare -contains $user){
Write-Output "$user is on no-share list, skipping"
continue
}
Write-Output "$user is not in list, performing action."
#remove the what-if after verification
Set-MailboxFolderPermission -Identity $($user + ':\Calendar') -User Default -AccessRights Reviewer -WhatIf
}
Disconnect-AzureAD -Confirm:$false
Disconnect-ExchangeOnline -Confirm:$false
Microsoft Graph PowerShell module
Let’s move on to the microsoft.graph module. This module is recognized as the grand successor to the Microsoft Azure AD PowerShell module (AKA, the MSOnline module) and the AzureAD module.
Here’s the script to install microsoft.graph:
/Users/tara> install-module microsoft.graph -force
The module uses the Microsoft Graph API to interact with the data in Microsoft 365 across a broad range of services, such as Azure Active Directory, Office 365, OneDrive, Teams, and many more. By using this module, IT administrations can script and automate numerous organization-level processes, streamline data integration, and build rich relationship-based data models — all in compliance with secure and unified access and authorization.
This module pairs well with AzureAD for tasks related to Azure Active Directory such as users, groups, and permissions management. (We’ll get into AzureAD in a moment.)
You can also use microsoft.graph in combination with ExchangeOnlineManagement for specific email-related tasks.
Now that we’ve got these modules installed, we can run some neat scripts. Off we go!
PowerShell cmdlets for Office 365
Alright, we’ve got some fun modules installed. Let’s see what these things can do with the right scripts!
See who never deletes their emails
# Return all mailboxes (careful in huge environments)
Get-Mailbox -ResultSize Unlimited

# Return individual user and list all properties
Get-Mailbox -Identity Andrewpla@sdeploy.onmicrosoft.com | Select-Object *

# Get Statistics
Get-MailboxStatistics -Identity andrewpla@sdeploy.onmicrosoft.com
Those three scripts together make this handy command:
# Get Size
Get-MailboxStatistics -Identity User@Domain.com | Select-Object TotalItemSize, ItemCount, displayname
See who has delegate rights to certain mailboxes — and why
# Who has delegate rights to mailboxes
# No creepers plz
Get-MailboxPermission -Identity 'andrewpla@sdeploy.onmicrosoft.com'

# Return all permissions. Careful in large environments!
Get-Mailbox -ResultSize Unlimited | Get-MailboxPermission
See who has litigation hold enabled
# Who has litigation hold enabled
Get-Mailbox -ResultSize Unlimited | Where-Object LitigationHoldEnabled -eq $true
See who's sharing their stuff ... and shouldn't be 😅
# View Calendars with access given on all mailboxes
$calendarPermissions = Get-Mailbox -ResultSize Unlimited | Foreach-Object {
Get-MailboxFolderPermission -Identity "$($_.PrimarySmtpAddress):\Calendar"
}

# Filter out default and empty access rights
$calendarPermissions |
Where-Object {$_.User.UserType.Value -ne 'Default'} |
Where-Object {$_.AccessRights -NE 'None'} |
Select-Object *
Share mail, but not calendars
# Grant Access to Calendars
Add-MailboxFolderPermission -Identity "tara.sinquefield:\Calendar" -User "andrewpla@sdeploy.onmicrosoft.com" -AccessRights Editor
Learn who can see your calendar
# Check Tara's Calendar Permission
# Don't forget to query :\Calendar
Get-MailboxFolderPermission -Identity "tara.sinquefield:\Calendar"
Make your calendar private by default
(For those with snooping coworkers.)
# Make Calendar Private by default
New-OwaMailboxPolicy -Name "SensitiveCalendarPolicy" -DefaultFolderType Calendar -DefaultFolderItemType All -RetentionPolicy TagDefault -DefaultFolderSensitivity Private

# create a shared Mailbox
New-Mailbox –Shared –Name “Shared Mailbox” -DisplayName “Shared mailbox for sharing stuffs” -Alias “TheSharedMailbox”

# Grant permissions on the mailbox
Set-Mailbox -Identity “TheSharedMailbox” -GrantSendOnBehalfTo AllCompany

# Grant Access to the shared mailbox to the security group specified
Add-MailboxPermission -Identity TheSharedMailbox -User “Mail-enabled security group” -AccessRights FullAccess -InheritanceType All
Share a calendar but not a mailbox
# Shared Mailboxes
$sharedMailbox = Get-Mailbox ‘TheSharedMailbox’ -RecipientTypeDetails SharedMailbox

# Add a shared Calendar, but not the entire mailbox
Add-MailboxFolderPermission -Identity "$($sharedMailbox.Identity):\Calendar" -User andrewpla@sdeploy.onmicrosoft.com -AccessRights Editor
Get-MailboxFolderStatistics -Identity $sharedMailbox | Where-Object { $_.FolderType -eq "Calendar" }

# Sharing Free/Busy information
Add-AvailabilityAddressSpace
Check permissions
So, let’s look at using the Microsoft.Graph module to do some stuff in our environment. One thing to know about the Microsoft.Graph is that you need to select the right scope/permissions to use when connecting. How do you know what scope you need? Great question.
In this example, we will see what’s needed to run the Get-MgUser command, then we can run Connect-MgGraph and specify the proper scope.
# Return scopes for whatever command you need to run
Find-MgGraphCommand -Command "Get-MgUser" |
Select-Object -ExpandProperty Permissions |
Select-Object -Unique Name
First, we have to authorize the app if this is your first time using Microsoft.Graph:
# first time you connect you will need to authorize the app
Connect-MgGraph -Scopes 'User.Read.All'

# Return information about context/Scopes
Get-MgContext

# return all users
Get-MgUser -All

# By username
Get-MgUser -UserId 'andrewpla@sdeploy.onmicrosoft.com'

# Get enabled accounts
Get-MgUser -Filter 'accountEnabled eq true' -All

# Update Display Name
Connect-MgGraph -Scopes 'User.ReadWrite.All'
Update-MgUser -UserId 'andrewpla@sdeploy.onmicrosoft.com' -DisplayName "Andrew PlawerShell" -JobTitle "PowerShell Lover <3"

Get-MgUser -UserId 'andrewpla@sdeploy.onmicrosoft.com' | Select-Object DisplayName, JobTitle
Why did I, Tara, a self-proclaimed "GUI girl in a GUI world," finally leave my comfort zone for PowerShell? Because one day, Andrew looked me straight in the eye and said, "Tara, stop being such a baby and learn PowerShell." With a gulp, I dove into the deep end of PowerShell.
At first, it felt like swapping my cozy GUI home for a tent and bed made of straw. But soon, I discovered just how much I hated PowerShell, and then I went crawling back to the comfort of my GUI home. Now, I'm riding Andrew's coattails with a few of his cleverly written cmdlets. And let me tell you, folks, it feels good to be Andrew-ish! (I kid, I kid.)
I wish I had known these commands when I first started in O365 a decade ago. They are such time savers. And like I’ve said before, there are still some things you just can’t do in the GUI. (I’m looking at you, shared mailbox!)
Maybe you won’t ever be a “script kiddie.” That's ok. If you can learn a few of these commands and put them in your toolbox to make your workflow easier and more efficient, it's a win.
And if you want to make your device management workflow easier and more efficient, give PDQ Deploy & Inventory or PDQ Connect a spin.


