If you’re looking for an easier way to scan the registry of your computers, you are at the right place. There are just a few steps to take to set up a Scan Profile with a registry scanner to find what you are looking for. Watch a video tutorial, or follow the steps below.
Loading...
Setting up your registry scanner
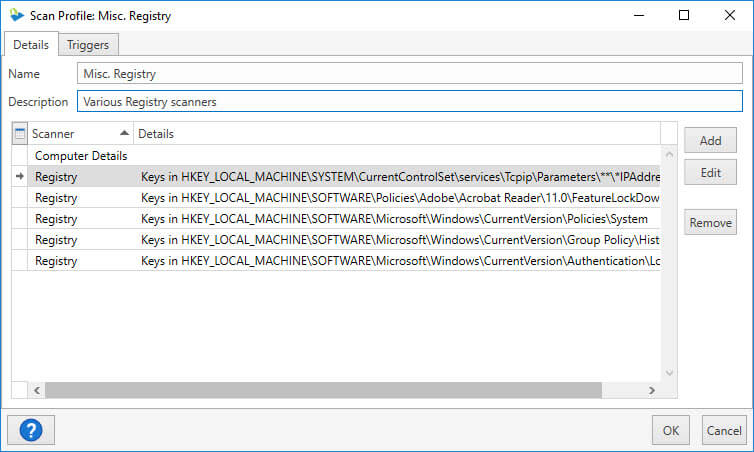
Go to Options> Scan Profile. Here you can create a new Scan Profile (Click New), or alternatively, you can add a registry scanner to an existing profile (Highlight a Scan Profile and click Edit).
Click Add > Registry to begin building your registry scanner. Note the available wildcards you can use to narrow down your search.
Click OK to add the registry scanner to your selected profile. If you’re done adding scanners click OK again to return to the Preferences screen.

Now you’re ready to use your newly updated or created Scan Profile. After exiting out of Preferences, in the main window click the Scan icon and select your Scan Profile to run against your selected computers. (In this example, a new Scan Profile was created and named Misc. Registry. Remember you can add a registry scanner to any existing Scan Profile or build a Scan Profile with multiple scanners in it.)
Viewing your registry scanner results
Now that you’ve got your Scan Profile set up and have run it against your computers, now it’s time to create a report. In the top toolbar you’ll see a drop down that allows you to create a new report. The example below shows the filters for a report that shows computers that have a 32-bit version of Chrome. Obviously, depending on what you are looking for in the registry your report will look quite different and require different filters. To master using filters in reports, we highly recommend you watch this playlist on using filters or you can also watch our recent webcast on Advanced Reporting in PDQ Inventory.


