PowerShell commands (called cmdlets) are the building blocks of automation in Windows and cross-platform environments. But jumping into a new scripting language can be challenging. To help, here are the top 10 PowerShell commands you should become familiar with: Get-Help, Get-Command, Get-Member, Out-File, Export-Csv, Get-ChildItem, Out-GridView, Invoke-Item, Foreach, and if statements. These cmdlets make scripting, automation, and troubleshooting in PowerShell faster and easier.
Commands in PowerShell are actually called cmdlets. While commands and cmdlets function similarly, cmdlets are unique in that they are .NET classes and typically deliver objects as output. Throughout this article, the terms are used interchangeably.
Easily run PowerShell scripts on remote devices
Need to run your awesome PowerShell scripts on remote devices? PDQ Connect can easily execute PowerShell scripts on any managed device with an active internet connection.
1. Get-Help
Get-Help displays detailed documentation for any PowerShell cmdlet, including syntax, parameters, and examples. It also provides helpful examples to get you started. Get-Help serves as the primary built-in help system for PowerShell.
The Get-Help PowerShell command is used to interact with PowerShell’s integrated help system. It’s basically the self-help guide to PowerShell and the very first cmdlet you should familiarize yourself with. In fact, chapter 3 of Learn PowerShell in a Month of Lunches is dedicated to the Get-Help cmdlet and covers it in detail across 17 pages!
Here’s the syntax to use Get-Help:
Get-Help <cmdlet_name>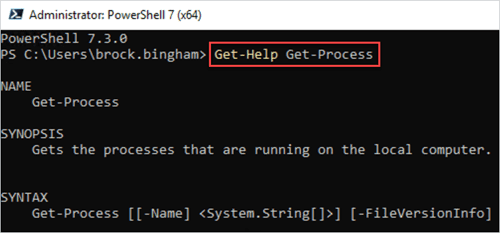
By default, Get-Help limits the information returned by the command. Add the -Full parameter to view the entire help documentation about a given cmdlet, including descriptions, examples, and additional notes.
If you’re new to PowerShell, you may need to update your local help files using the Update-Help cmdlet. This ensures you have the latest help documentation available. It’s a good idea to update your PowerShell help files every couple of months.
Get-Help <cmdlet_name> -Full2. Get-Command
Without additional parameters, the Get-Command cmdlet lists all available cmdlets, functions, and aliases on the computer.
Get-Command
Get-Command is a great way to see what commands you can run. However, by default, this command returns over a thousand results, which can be overwhelming. Thankfully, you can narrow down the results with filters. For example, if I wanted to see which commands deal with certificates, I could filter for that specifically.
Get-Command -Name *certificate*
Most cmdlets use common sense names, so filtering is an intuitive way to track down the cmdlet you’re looking for.
3. Get-Member
The Get-Member cmdlet in PowerShell lists the properties and methods of an object. It’s used to inspect what actions and data are available for a given command’s output. One quality that makes PowerShell so versatile is that almost everything in PowerShell is an object consisting of a name, methods, and properties.
<cmdlet_name> | Get-Member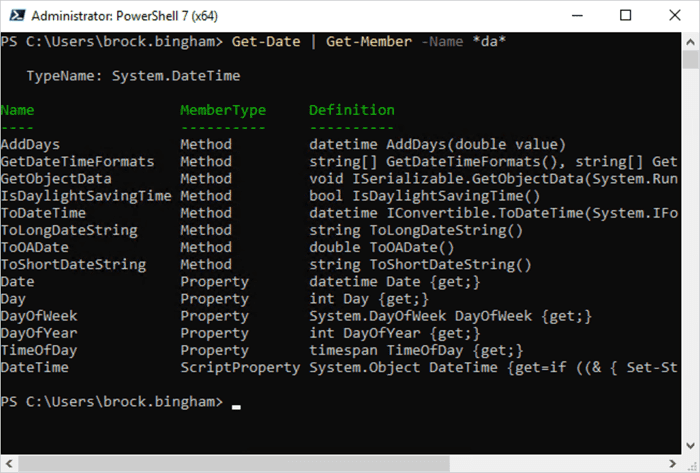
In this example, I’ve piped the Get-Date cmdlet to the Get-Member cmdlet, which returns the object’s attributes. I’ve also added the -Name *da* filter to narrow down the results, but you can ignore that for now. Let’s break down what’s happening in this example.
First, notice the usage of the pipeline operator.

The pipeline operator sends the results of the preceding command to the following command. In this example, the results from the Get-Date cmdlet are passed to the Get-Member cmdlet.
Next, pay attention to the TypeName.

The TypeName is the type of object that the command returns. In this case, the object type is System.DateTime.
Lastly, notice the MemberTypes returned for the object.

MemberTypes is where you’ll identify the methods and properties of an object. Methods are actions you can perform against the object, and properties are the object’s attributes.
Get-Member is an excellent cmdlet, especially for PowerShell beginners, to quickly identify the methods and properties of an object.
Throughout this article, I’m using PowerShell version 7.x. However, all the commands should function the same whether you’re using Windows PowerShell or PowerShell 7.x.
4. Out-File
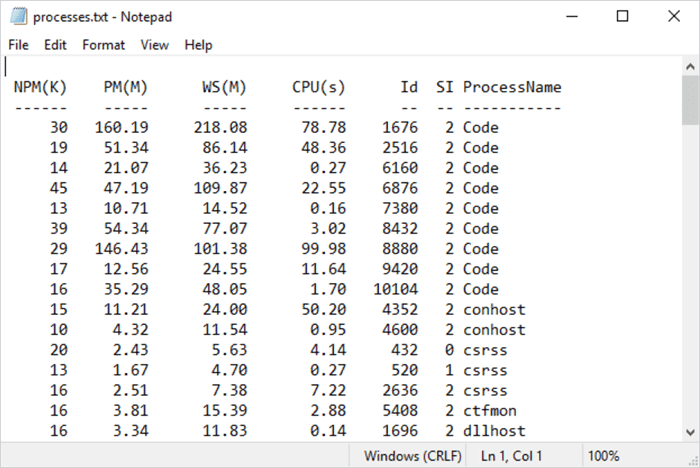
Out-File is an essential PowerShell cmdlet that lets you output data to a raw text file. This feature is great, especially for tasks that require any kind of logging or auditing.
To use the Out-File cmdlet, you can either use the piping operator to pass output to it or the -InputObject parameter to specify the objects to be written to the file.
Get-Process | Out-File C:\Temp\processes.txtOr:
$proc = Get-Process
Out-File C:\Temp\processes.txt -InputObject $proc
These commands provide the same results, creating a text file containing the output of the Get-Process cmdlet. It’s important to note that the information in the text file will be formatted as if sent to the terminal window.
5. Export-Csv
Managing large datasets is both common and easy with PowerShell. Whether you’re working with Active Directory objects, computer processes, or event logs, exporting large amounts of data with the Export-Csv is trivial.
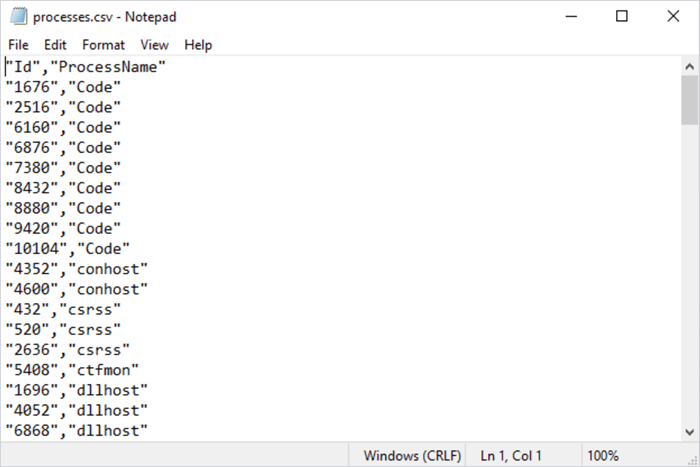
Export-Csv does what its name implies and exports output to a CSV file. However, it’s important to point out that Export-Csv exports all object property values by default, so you’ll want to filter the properties using the Select-Object cmdlet.
Get-Process | Select-Object -Property ID, ProcessName | Export-Csv C:\CSV\processes.csvHere is the resulting CSV file:
6. Get-ChildItem
In PowerShell, you'll often need to work with items in containers, such as files, certificates, or registries. Get-ChildItem returns all the items in one or more containers. If you only want to return specific items, you can use filtering to narrow down the results. You can also return items in subdirectories by using the -Recurse parameter. To limit the depth of the subdirectory search, use the -Depth parameter.
Get-ChildItem <folder_name>This example returns all items located in the specified directory.

This example is a bit more complex and returns all TXT files containing the word “taco” in the specified directory and subdirectories.
Get-ChildItem C:\Temp\* -Recurse -Include *taco*.txt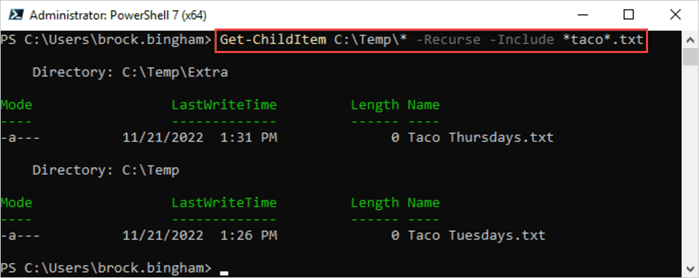
This command returned two results, one located in the C:\Temp\Extra subdirectory and one in the C:\Temp directory.
7. Out-GridView
Most of the time, PowerShell output returns to the console window. However, if you need to interact with the output, you can use the Out-GridView cmdlet. Out-GridView sends output to a grid view GUI window.
Here’s the syntax to use Out-GridView:
<command> | Out-GridView
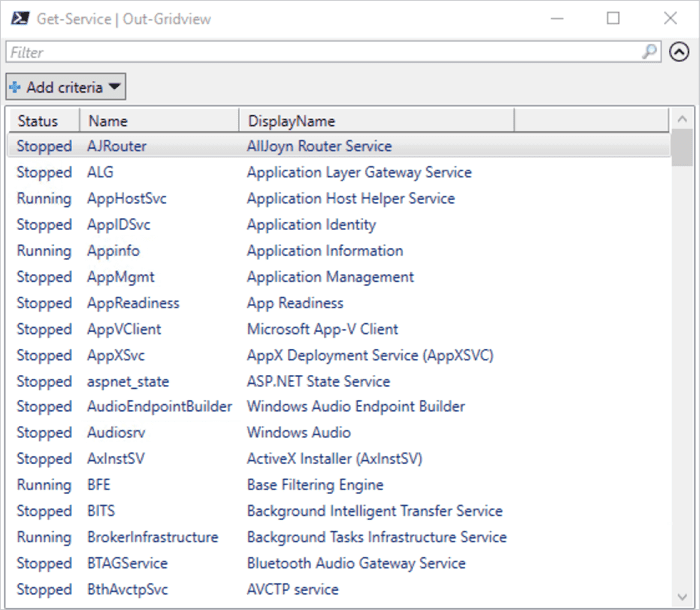
In this example, I’ve piped the Get-Service cmdlet to the Out-GridView cmdlet. The Out-GridView window automatically opened, containing the Get-Service command output, allowing me to interact with it.
If we want to take this example even further, we can use the -PassThru parameter to send multiple items down the pipeline, essentially letting you pick what output you want to pass on. Let’s update this example with the -PassThru parameter, and we’ll send our selected output to a TXT file.
Get-Service | Out-GridView -PassThru | Out-File C:\Files\services.txtWhen we run this command, the Out-GridView window opens as usual. However, because we used the -PassThru parameter, we can select the output we want to pipe to the next command.
Tip: Hold the Shift key to highlight multiple items, and hold the Ctrl key to select individual items. Click OK when you’ve finished selecting items.
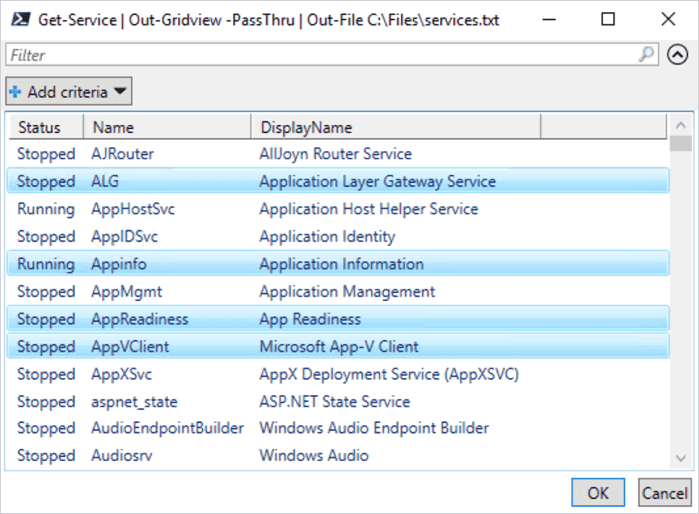
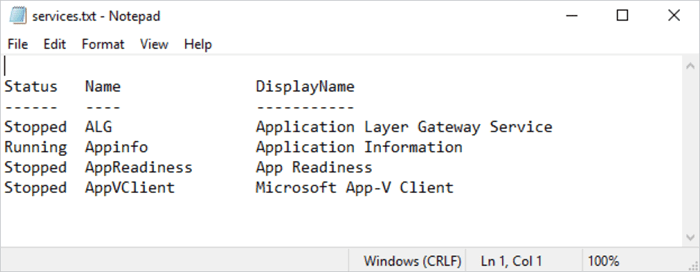
Once we’ve made our selection and clicked OK, the output is sent to a text file. We can open the text file to ensure it contains the items we selected.
8. Invoke-Item
The Invoke-Item cmdlet launches items, including files, pictures, executables, etc. It can also launch more than one item at a time. Invoke-Item uses the default file association to determine the application to launch with the corresponding file type.
Here is the basic structure of an Invoke-Item command:
Invoke-Item <item_path>
This example launches the indicated TXT file in Notepad.exe because of the default application assignment on my computer.

As mentioned above, Invoke-Item can also be used to open several files at once. This command opens all TXT files in the C:\Temp folder at once.
Invoke-Item “C:\Temp\*.txt”9. Foreach
Foreach loops iterate through a collection of items, performing actions against them. Foreach loops are a little more complex than the other commands we’ve covered so far. However, foreach loops become increasingly crucial as you dive into more advanced PowerShell tasks.
Here is the basic format of a foreach command in PowerShell:
foreach ($<item> in $<collection>){<statement list>}Here’s a simple example of a foreach command that identifies files in a specified folder that are 0 KB in size.
$files = Get-ChildItem -Path C:\Files\
foreach ($file in $files){
	if ($file.Length -eq 0kb){
		Write-Host $file
	}
}
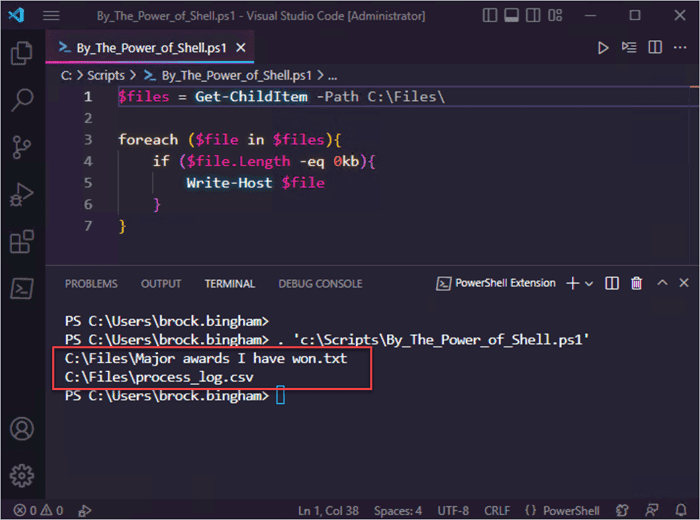
In this example, we assign the items located at C:\Files\ to the $files variable. Then, we use the foreach command to loop through each item in the variable. Next, we’re using an if statement to determine if the file is equal to 0 KB. If the file is equal to 0 KB, the file is output to the console. The loop repeats until it has processed each item in the collection assigned to the variable $files.
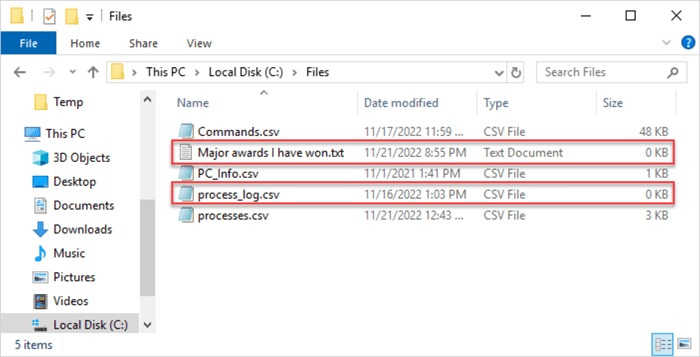
We can check the folder for ourselves to ensure the data returned was accurate.
Oh, and if you’re wondering what code editor I’m using in this example and how I got it to look so rad, I’ve covered how to customize VS Code with PowerShell.
10. If statements
Capping off our top 10 list is another slightly more advanced PowerShell command. Don’t worry. You were already exposed to it in the previous example and probably didn’t even realize it.
If statements are another extremely useful command in PowerShell. If statements execute logic based on conditions being met, similar to how people make decisions. For example, if I won the lottery, I would enjoy an early retirement. If not, then I would continue to upload amazing content to the internet. PowerShell can use the same kind of logic.
Here’s what the structure of an if statement looks like in PowerShell.
if ($<condition>){
<function to perform if the condition is true>
}
When a condition is true, the function executes. If the condition returns false, it bypasses the function and proceeds to process the remainder of the script. For example:
$var = 42
If ($var -eq 42){
	Write-Host “Congratulations. 42 is the meaning of life, the universe, and everything.”
}
In this example, since the variable $var equals 42 and the condition is met, the Write-Host command executes and the message displays. If the variable equaled something different, like 24, the condition would return false, and the Write-Host command would not execute.
Here’s one more example of an if statement in use. This time, we’ll use the Get-Date cmdlet and format it to return the month and day. If the date is equal to 12/25, a message displays saying, “Merry Christmas, ya filthy animal.”
$date = Get-Date -Format “MM/dd”
if ($date -eq "12/25"){
    Write-Host “Merry Christmas, ya filthy animal.”
}
If statements are really handy to utilize in your PowerShell scripts. If you’d like to know more, we have an entire article dedicated to if statements.
On the path to PowerShell stardom
PowerShell scripting can take a bit of getting used to. But Microsoft and the PowerShell team have worked hard to ensure that cmdlets and functionality make sense, especially once you start utilizing PowerShell (formerly PowerShell Core) or Windows PowerShell regularly.
Starting with these essential PowerShell commands will help you quickly progress into using more advanced commands. Then one day, you’ll become a PowerShell ace and may even be invited as a guest onto the The PowerShell Podcast, the most prestigious of all PowerShell podcasts.


