At PDQ.com, we are always looking for ways that we can drive the creation, testing, and support of our applications to be as efficient and effective as possible. To that end, I’ve recently been diving into experimenting with Docker, specifically using Windows Containers. I have received several warnings from the internet-at-large along the lines of “Beware, adventurer! Down this path lies only chaos!” However, as being a little mad is nearly a prerequisite for working here, that warning is rendered a bit less effective. Join me as we delve into exploring this new, exciting area of technology!
Before We Get Started
Some points that I’d like to make you aware of before we get into the meat of this article:
The intent of this article is not to give you a thorough understanding of how Docker operates or the terminology that it uses. I’ll try to stick with common terminology throughout this article, so if you do have any questions on what I’m discussing, you should be able to find it pretty easily with a rudimentary search. Let me know in the comments if I’ve failed to make something clear, or if I’m diving into some obscure area that you’re having problems finding information about, and I’ll do my best to either get back to you or post a follow-up to this blog that addresses these issues.
This article will cover utilizing PowerShell, specifically with the STUPS module and its wonderful UIAutomation tools (link to the STUPS repository is included in the “Testing Tools” section), to test a WPF application’s UI from within a Windows container running on Docker. I’ve made mention of some other C# tools you can use to do similar testing. We’ll also go over concerns and considerations for trying to access control elements for the application within a container.
Also, please note that this blog is specific to UI testing a desktop application running the Windows Presentation Framework. Testing web applications (or even desktop-client based PWAs) is certainly possible in a container but will be covered in a separate blog post. Also, it is quite a bit easier, and there are several blogs around the web covering the concept with Linux containers, and it honestly isn’t that different doing the same tests using a Windows container. Just, you know, different technologies and all that.
One final note: Throughout the document, I refer to an automation command returning a “UIAutomation.IUiElement” object. This is just lazy shorthand for me to say that the cmdlet returns an object that implements the IUiElement interface as defined in the UIAutomation.dll classes. The actual objects returned will be varying types (largely, they will be defined as various Castle.Proxy# objects), but they will all implement this interface, which means there will be certain properties and methods we know the objects will support.
Identifying the Shoulders of the Giants We’re Standing on
Docker Engine/Stack
Of course, this blog would be completely pointless without mentioning the Open Container Initiative-compliant containerization engine that we’re employing, Docker. For more reading on this wonderful technology, and for their own recommended tutorials and methods of getting started, I can’t recommend reviewing their site enough.
Windows Containers
The Windows image we’re going to be using for this test is the third base OS image type that Microsoft has made available for us to use. To pull this image, the image path is “mcr.microsoft.com/windows:1809”. This image has been advertised by Microsoft as being useful for automated UI testing, as it contains many more of the components required by UI applications.
Testing Tools
The tool that we use internally for UI testing is the UIAutomation module provided in the aptervskiy/STUPS github repo. This is a PowerShell module written in C# that encapsulates the .NET UI Automation concepts and exposed Classes. A great way to learn this module is to review the samples that are part of the repo.
There are other frameworks and libraries that are built upon this same .NET framework but allow for tests to be written in C#, the most popular options that I’m aware of being FlaUI and TestStack.White.
Speaking of UI Automation…
.NET UI Automation Framework
Microsoft has provided a fairly impressive framework for use in testing WPF applications. The UI Automation framework provides many tools for interacting with distinct controls in a WPF application, like windows, data grids, tree view items, buttons... Yeah, there’s a lot to it. Fair warning: there is a ton of depth you can get into with this documentation. I definitely recommend diving into it, but if you’re starting with one of the above libraries, I’d recommend handling it on more of an “as needed” basis, and slowly easing your way in as you find things you have questions on.
Inspecting UI Elements
There are a plethora of tools for viewing UI elements, but the ones I’m most familiar with using are:
UISpy.exe. This is included in the AutoHotKey default installation.
Inspect.exe. This is included in the Windows 10 SDK.
VisualUIAVerifyNative.exe. This is also included in the Windows 10 SDK.
FlauInspect.exe. This is a separate package from FlaUI’s github.
Snoop. This is not a tool that I have used before, but I have heard it mentioned in several blogs and articles while researching this topic. It seems to be quite popular!
Normally, one of these tools is just as good as another, but there have been occasions where I can get a bit more information from one tool that is not made visible in another, for whatever reason. Mainly, just find a tool that you like and stick with it.
Warnings to be Aware of
To start, a note: When I say “does not work” in the notes below, I inherently mean “I was unable to get these things to work." I just enjoy how it makes me sound like I actually know what I’m talking about when I use absolutes in warnings, so here we are.
Containers do not provide RDP access.
While others have reported some success in getting screenshots from inside of the container, I have only been able to produce black screens or transparent images.
The biggest warning: There are some aspects of the UIAutomation framework that do not appear to be fully supported at this time. These range from the inconvenient to potential show stoppers, depending on which paths you have to access certain elements within the UI.
Toggle buttons that produce a menu page (for instance, in PDQ Deploy, the New Step button in a New Package window) will cause the page to appear as a new root window, rather than a child window of the parent window that hosted the control from which the menu was called. You can get around this by calling a command to get all child windows from the desktop element. Inside of a container, there are few enough windows that this command will respond rapidly. Outside of a container, trying this may result in a stack overflow / recursive call depth exception, depending on how many windows are available in that session.
Actual menu items, such as the context menu that should appear when you right-click on an element or the menu that appears from invoking a Click() action on a menu item, do not appear at all. In fact, menu items that support the .NET do not appear to work correctly inside of the container.
Using functions and methods that provide keyboard or mouse input directly (i.e., using the $<object>.Mouse.LeftButtonClick() method on a UIAutomation.IUiElement object) do not appear to produce any actions inside of a container. On the host machine, running the above command usually returns an updated instance of the object that was interacted with. However, in a container, it does not put anything into the pipeline, and no activities seem to take place as a result of the method being called. You’ll need to use the appropriate Invoke/Set/Expand cmdlet calls to perform operations on controls.
The image
First things first: no matter how magical containers may be, they’re not going to run well on a poorly configured host. So, you should know that the testing I have been performing with containers in order to arrive at my proof-of-concept has been using Docker Enterprise edition, on a Windows 10 1809 desktop host. You will also need to switch the Docker Desktop client to use Windows containers, which is easily managed via the taskbar icon. The test has also run successfully on several of our Server 2019 hosts that comprise our internal Windows Docker Swarm. Additionally, if you’re running an application that has some higher resource requirements, you will need to set the memory constraints and the CPU constraints in the build steps; the flags that provide those on the “docker run” command do not appear to be applying to the container that it spawns for Windows containers at this time.
With Docker installed, you’re ready to get started building the image. If you’re trying to pull the Windows 1809 image and you get errors that a manifest file can’t be found, this means that you’re not running on a build of Windows 10 that can support the 1809 image. I believe the only builds that can support running the 1809 image are an 1809 desktop build, or a Server 2019 server build but refer to Microsoft’s compatibility chart for confirmation.
Depending on your use case, you may want to install the application that you’ll be testing using the silent flags in the build steps. For other uses, you will want to install the application as part of the test script running in the container, rather than as part of the image. This is largely going to depend on how many images you’re comfortable storing at any one time and how aggressive your image cleanup strategy is for your hosts. For the application we’re referencing in this blog, installation is not needed, so we’ll just copy the exe into the image as seen in the Dockerfile steps.
Clone the test repo
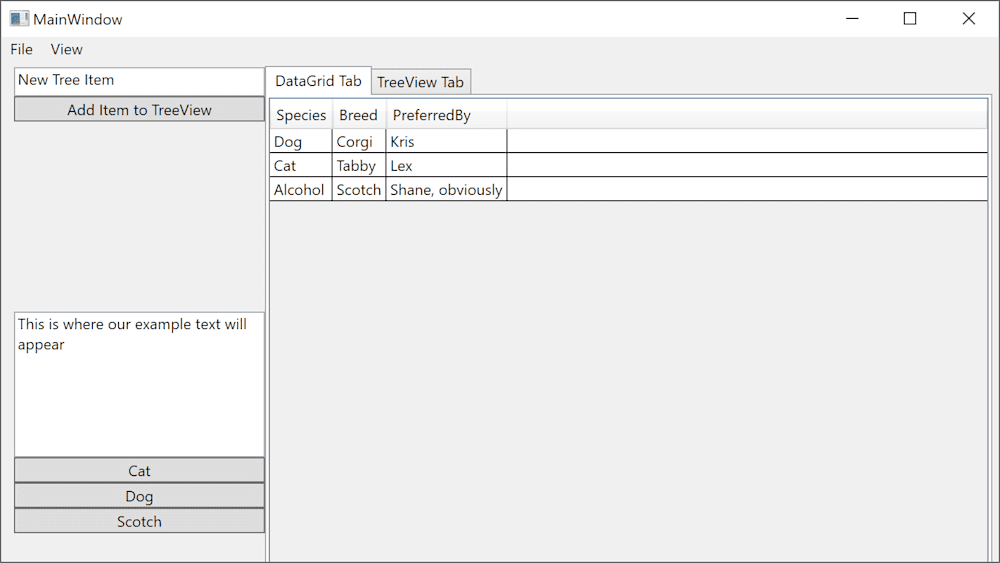
I’ve created a pretty simple WPF app that we can play with, both inside and outside of a container. You can find the project here at my Github repo. It is a very small project: The UIAutomation folder (technically we just need the DLL, but some of the other files can be required depending on your use case), our BlogTestApp.exe application, the Test-App.ps1 script that houses our UI Test logic, and finally a simple Dockerfile that we’ll use to build our image.
You should clone this repo to a location on a docker host that supports pulling the windows:1809 image if you’re going to follow along with the test. To get rolling, let’s examine the contents of Test-Script.ps1.
Our WPF app’s UI
UI test script
The test script is pretty straightforward, I hope. The UIA cmdlets may not be familiar to you, but they tend to be well named and verbose enough that I hope I won’t need to explain much about them as we go. I’m not going to post the full script here as it is close to 100 lines with comments, but I’ll post snippets of the relevant bits as we move along. The full script is included in this blog if you would rather combine all of the pieces and copy/paste them, but it would honestly be easier just to grab the file out of the provided repository.
First, we handle some brief setup and some housekeeping:
$ErrorActionPreference = "Stop"
# Lazy $PSScriptRoot shortcut so it works while debugging in a VS Code session if (-not $PSScriptRoot) {  $PSScriptRoot = $PWD
}

# Import the UIAutomation framework
Import-Module $PSScriptRoot\UIAutomation

# Hides the highlighter (this is just annoying most of the time, but can be # pretty useful when you're trying to troubleshoot where an action is occurring.) [UIAutomation.Preferences]::Highlight = $false
We’ll set the $ErrorActionPreference variable to “Stop” since the main chance of errors we’ll be encountering in this script are from attempting to obtain or invoke functionality on an element that is unavailable or unresponsive. When that occurs, we don’t want the script to continue processing, normally. There’s a quick check to see if the $PSScriptRoot variable exists, and if not we set it to the current directory. This is just me being lazy, so I can use the same variable while manually running the script in VS Code.
We import the UIAutomation module and then disable the UIAutomation highlighting preference. This is more for our convenience when testing outside of the container, as obviously we won’t be able to see the highlights inside of the container. This setting just shows a border around elements as we interact with them.
For our first actual actions inside this test, we run the following:
# Start the demo application
Start-Process $PSScriptRoot\BlogDemoApp.exe

# Get the main window for our application
$MainWindow = Get-UiaWindow -Name "MainWindow" -Win32
We call Start-Process to launch our app, and then make our first UIA call, to get the main window of this application. There’s also a very important container-specific requirement hidden in this command. Outside of containers, I don’t think I’ve ever used the -Win32 flag in a test. It can occasionally make cmdlets return faster but doesn’t seem to provide any consistent benefits, so I largely ignore it. However, if we don’t include that flag when obtaining windows inside of a container, we run into some really weird behavior. The window object will be returned, which when you’re trying to create a proof-of-concept for moving your testing into containers is a super exciting moment! It quickly turns into dismay when you can’t access any child items under this window. In fact, trying to enumerate all of the descendant controls of this main window inside of a container returns only a single toolbar item, which is largely useless for me.
Side note: The -Win32 flag, from what I recall in previous searches on the topic, is largely intended to handle differences in the .NET UI Automation framework between UIA v2 and UIA v3. I would recommend referring to the FlaUI repository for further reading on the differences between those versions, as that is largely why that repo was forked off of the TestStack.White one.
I didn’t provide any examples of this in my test script, because I had forgotten it was a thing until I started typing this paragraph out, but the UIA framework supports partial string matches for properties like the Name property. This is actually an improvement in using the UIAutomation tools instead of the base .NET UI Automation classes. If you don’t use the -Win32 flag, trying to do something like “Get-MainWindow -Name ‘Test*’” will fail to return within the timeout.
Now that we have the main window, let’s do some work:
# Start with obtaining the OutputText textbox
$OutputTextbox = $MainWindow | Get-UiaTextBox -Name "OutputText"
"OutputText's value is $($OutputTextbox.Value)"

# Click the cat button, and see what it changes the text to
$CatButton = $MainWindow | Get-UiaButton -Name "CatButton"
$null = $CatButton | Wait-UiaButtonIsEnabled -Timeout 5000 -PassThru | Invoke-UiaButtonClick
"OutputText's updated value is $($OutputTextbox.Value)"
Due to the fact that I am a master of application development, I was easily able to add some functionality into the application to have the desired text change depending on which button has been pressed, without even needing to google phrases like “change textbox value when button is pressed." To test this operation, we get the current value of the output text box, press the button, and then verify that this text has changed.
To determine how to do this (for instance, what are the actual Name or AutomationId properties of the controls) I’ll use Inspect.exe. There’s an option in the toolbar to “watch cursor” which will have Inspect pick up the automation information of objects under the mouse if you hover over them for a brief time. Hovering over our “Cat” button provides us with:
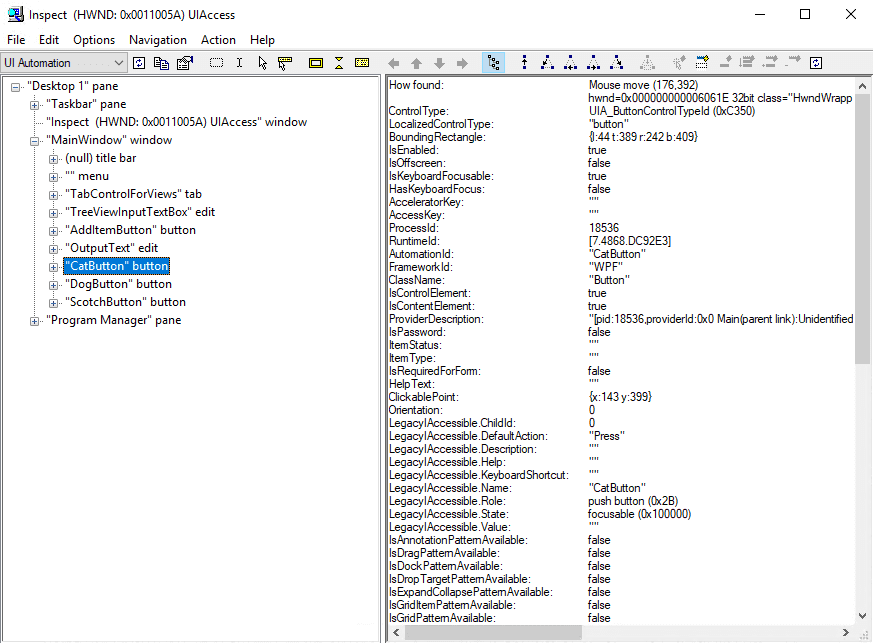
In the left column, the highlighted item shows the Name property as well as the LocalizedControlType (“CatButton” button, in our case). On the details pane to the right, you can see more information, including the AutomationId, IsOffscreen property, control patterns that this object supports (look for <PatternName>: true in order to see which patterns this control supports), etc. By using Inspect or a similar tool, we’re easily able to find unique information about each control so that we can interact with them.
Next, let’s move on to an area that doesn’t play nicely inside of containers: expanding menu items.
# Verify that we can get and interact with menu items
$FileMenuItem = $MainWindow | Get-UiaMenuItem -Name "File"
$null = $FileMenuItem | Invoke-UiaMenuItemExpand

"File menu item's expandCollapseState is... $($FileMenuItem.ExpandCollapseState)"
if ($FileMenuItem.ExpandCollapseState -eq "expanded") {
 $OpenMenuItem = $MainWindow | Get-UiaMenuItem -Name "Open"
 $null = $OpenMenuItem | Invoke-UiaMenuItemSelectItem
} else {
 "Unable to expand menu item, skipping"
}
We’ll just get the menu item, attempt to expand it, and then get another menu item from the expanded menu page (after checking that the menu item is actually expanded.) The reason for the if logic around the checks is that I’m expecting this to fail due to past experience, so I’d rather present something more friendly than the giant block of error text we’d run into when we fail to get the child item after the five-second timeout. Also, that would stop the test due to our error action preference that you all didn’t want me to set in the first place, but pointing out my many failures isn’t why we’re here.
Not done yet
Up next, we’re gonna get a single cell from the data grid, just to show that we can. In this case, “get” means that I’m calling the Select method on it, but… I didn’t provide any code for things to happen when a cell is selected, so it just kind of boringly exists in a state of “hypothetically selected."
# Who likes Corgis? Oh, that's right...
# Make sure we're on the GridViewTab
$GridViewTab = $MainWindow | Get-UiaTabItem -Name "GridViewTab"
$null = $GridViewTab | Invoke-UiaTabItemSelectItem
# Select the data cell that Kris is in
$null = $MainWindow | Get-UiaCustom -Name "Kris" | Invoke-UiaCustomSelectItem
Pretty straightforward, just make sure that we have the grid view tab selected (so we can see the panel that has the grid view because LOGIC!) and then we just get the cell with a Name of “Kris."
Let’s switch to the Tree View tab for the next part of this test:
# Switch to the tree view tab
$TreeViewTab = $MainWindow | Get-UiaTabItem -Name "TreeViewTab"
$null = $TreeViewTab | Invoke-UiaTabItemSelectItem

# Get the TreeViewItem and expand it
$TreeViewRoot = $MainWindow | Get-UiaTreeItem -Name "Menu"
$null = $TreeViewRoot | Invoke-UiaTreeItemExpand

# Verify that we can get the first child tree view item
if ($TreeViewRoot.ExpandCollapseState -eq "expanded") {
 $ChildTreeItem = $TreeViewRoot | Get-UiaTreeItem -Name "Child Item 2"
 "Child item is offscreen: $($ChildTreeItem.Current.IsOffscreen)"
} else {
 "Unable to expand parent item, so skipping search for child item"
}
Same as the Grid View tab, we’ll switch to the Tree View tab. We then get the root Menu item, expand it, and then assuming it is expanded, try to grab a child item. I included the if logic around the verification again because I was initially writing this with the assumption that any control which supports the UI Automation framework's ExpandControlPattern was not working in containers. I attempted this test to verify that behavior, and was surprised to see that the tree view items expanded just fine, and thankfully didn’t insult me in the slightest, but merely continued to observe my peculiarities with looks of mild disapproval.
Our final test!
For our final test, we’re gonna see if we can obtain a dynamically added item to our tree view:
# Verify that we can add a new tree view item, and it appears
$AddTreeItemTextBox = $MainWindow | Get-UiaEdit -Name "TreeViewInputTextBox"
$AddTreeItemButton = $MainWindow | Get-UiaButton -Name "AddItemButton"
$null = $AddTreeItemTextBox | Set-UiaEditText -Text "NewItem"
# We're gonna use an explicit wait here, just to show that you can. This button is never actually disabled
$null = $AddTreeItemButton | Wait-UiaButtonIsEnabled -Timeout 5000 -PassThru | Invoke-
UiaButtonClick

try {
  $NewItem = $MainWindow | Get-UiaTreeItem -Name "NewItem"
} catch {
  "Unable to find NewItem"
}

if (-not $NewItem) {
  # let's see if switching tabs and then switching back refreshes the context
  $null = $GridViewTab | Invoke-UiaTabItemSelectItem
  $null = $TreeViewTab | Invoke-UiaTabItemSelectItem

  try {
    $NewItem = $MainWindow | Get-UiaTreeItem -Name "NewItem"
  } catch {
    "Still unable to find NewItem"
    throw
  }
}

if ($NewItem) {
  "Our new TreeItem appeared in the list!"
}
$null = $MainWindow | Get-UiaButton -Name "Close" | Invoke-UiaButtonClick
So, we’ll grab the edit box where we can define the name of the new item and the button which will add the item when it is invoked. We’ll set the edit box to have the text we want the new item to show up as. Give it a click, wait a tick, and then you’ll see that I didn’t plan this rhyme in the slightest and don’t have a final word to continue this with. I’ve included some logic that I usually only utilize on buttons that are conditionally disabled, where we pipe together the button, an explicit wait to make sure that it is enabled (for instance, on buttons that don’t become enabled until an edit box’s contents meet certain criteria), and then using the -Pass Thru flag on that wait to hand the item over to the invoke call once it is enabled.
We then try to get the new item that we created in the tree. I’ve done a bit of extra logic here, to show some examples of workarounds that I’ve had to implement in the past to get around inabilities to obtain dynamically allocated controls. In my UI tests against PDQ Deploy, doing things like obtaining the tree view item for a newly created package was one of the pain points I ran into when trying to create my proof-of-concept. Many times, just switching the page where the item should appear to another tab, or closing the parent window and reopening it, will cause the UI tree to populate the item correctly on subsequent attempts.
Oh, also we close the window when we’re done because I kept forgetting to do that between test runs. One of the fun caveats that I always forget to expect with the UIAutomation cmdlets is that they all return multiple objects if multiple elements that match the search conditions are found. This can often lead to unexpected behavior where elements that you’re not intending to modify are being interacted with.
And that’s it! That is the entirety of our script. Let’s move on to building the image!
Building our Windows:1809 image
FROM mcr.microsoft.com/windows:1809

# Set the PowerShell execution policy
RUN [ "powershell", "-command \"Set-ExecutionPolicy -ExecutionPolicy Bypass -Force\""]
COPY UIAutomation C:/UIAutomation/
COPY BlogDemoApp.exe C:/BlogDemoApp.exe
COPY Test-App.ps1 C:/Test-App.ps1

WORKDIR "C:/"

ENTRYPOINT [ "powershell", "C:/Test-App.ps1" ]
Ready for some more peculiarities? This time, it is specific to Windows images, and not randomness of running in a container, in general, at least! If so, peep this docker build command below. I actually hate myself more for saying “peep this”...
Docker build -t blogtest -c 2 -m 2g .
We call “docker build," pass the -t flag and name the image “blogtest” (you can name it however you would like). We also, because of the “peculiarities” mentioned above, specify the CPU and memory constraints for the image while we’re building it. Normally, we can just specify these constraints as needed when running a container off of the image, but Windows containers don’t adhere to our silly expectations.
A quick rundown of what we do here: we specify that the base image is the Windows:1809 image (which is quite large, so you’ll need upwards of 11GB of storage space available to pull it), set the PowerShell execution policy inside the image, copy over our required files lazily just to the C:\ directory in the container, set the working directory (the location where the container will start) to C:\, and set the entry point (the command that our image will run, by default) to run our Test-App.ps1 script in PowerShell. Note that the build script will accept either a backslash or a forward-slash, but occasionally treats a backslash as an escape character depending on the context.
Once the image finishes building, we’re good to call our test by running this beautiful containerized bean footage!
Docker run blogtest
Well, that was anticlimactically simple… but, still productive! After a brief pause, while the writable layer is created for our container and the file system is linked up (this usually takes about 14 seconds for me), the container is up and running and starts spitting test data back out at us!
The only difference that we should see in the output is that the test failed to obtain the menu item in the expanded sub-menu test, due to the oddities with ExpandCollapsePattern controls on Menu items that I mentioned earlier. All of our other tests worked! I did not include an example of interacting with a toggle button that produces a child menu page since that is actually a custom control and not one that is provided with WPF by default.
Wrapping up
So, approximately 8,907 hours later, I think I’ve managed to say all that I have to say on this subject, for now. Hopefully, this blog has helped at least spark some ideas on how you may employ this technology for your own needs. If you’ve run into similar issues yourself, please let me know what solutions you’ve found to them. I’d love to get more discussion going around this topic, as providing more information on this is probably the best way to help the idea of UI automation via containers move forward.


