Patch management can be tricky business. While tools like PDQ Deploy and Inventory can drastically simplify and even automate the process, many users still struggle to create a patching schedule that works for their organization. In this guide, we’ll cover some ways to help get your patching schedule on track, so you can spend less time working and more time focusing on what matters most — like wondering why Sauron didn’t have anybody guarding the entrance to Mount Doom.
Disclaimer: Every network and every organization is unique. A patching schedule that works for one organization most likely won’t work for another. Use this guide as a blueprint to develop a custom patching schedule that meets the needs of your users and organization.
Know your network
If you’ve worked for an organization long enough, then you probably already have a good understanding of your network, users, and devices. If you’re new, then it’s time to start taking notes.
Knowing your network is essential before creating a patching schedule. Without this information, deploying patches at inconvenient times can wreak havoc on your users and devices. Here are some of the most crucial pieces of information you should know before configuring a patching schedule:
Hours of operation: Knowing your hours of operation can allow you to identify when devices should be coming online and going offline. This information can help you structure effective maintenance windows.
Peak operating hours: Peak operating hours are your organization’s busiest time of the day. Avoid any type of patching or maintenance during these times.
User needs: Some users are super easygoing, while others have specific requirements to stay effective. You may need a different deployment timeframe for users with special requirements.
Critical systems: Critical systems are systems your organization depends on to function. These systems often require a unique patching schedule and may require that you delay or altogether skip some updates.
Network resources: Understanding your available network resources, such as network bandwidth, helps guide your patching decisions, such as how many devices can be targeted in a single deployment.
Hardware makes and models: This information allows you to identify which hardware-specific updates and firmware you should track.
Operating systems and applications: Knowing your network’s operating systems and applications is critical when tracking update releases. Software solutions, such as PDQ Inventory, can simplify this process.
Divide and conquer
With all that sleuthing out of the way, it’s time to divide your devices into groups. A common practice is to group devices into three designations:
Pilot groups
These devices and users are your test subjects. You should deploy patches to this group promptly after release. Pilot groups are often reserved for IT staff and other power users. Ensure your pilot group includes a collection of systems that is representative of your organization on a smaller scale.
Productions groups
This is the primary group that most devices should belong to. This group should receive updates once the pilot group has had enough time to test the latest updates thoroughly. Typical deployment schedules for this group range from a few days to a week after updates are released. Again, this may differ to meet the needs of your organization.
Critical groups
The critical group is for devices that must remain online to provide essential business functions and services. This group should be the last to receive updates, and you may need to patch after regular business hours. While rare, this group may also omit specific patches that may be detrimental to the system’s functionality. Take proper security measures to secure these devices as much as possible.
These groupings are pretty standard. However, they may not be suitable for your network. You may need more groups that follow different guidelines, and that’s fine. You can have as many groups as necessary to ensure your devices get patched and up to date in a timeframe that works for your organization.
How to create patching groups
There are several viable ways to categorize computers into patching groups. Some users heavily rely on Active Directory for their groupings, while others utilize PDQ Inventory. Some use a combination of both systems. Here are some potential options for you to consider.
PDQ Inventory collections
Static and dynamic collections in PDQ Inventory are a great way to organize your patching groups if you manage a limited number of devices. Building out and maintaining collections is easy. But when your fleet of endpoints grows, managing collections manually may become too time consuming.
Active Directory organizational units (OUs)
Grouping your machines into Active Directory OUs based on their patching needs is a simple and effective way to categorize your devices. The advantage of this method is that you can use schedules in PDQ Deploy to target specific OUs in Active Directory, allowing you to set up your patching schedules quickly.
Active Directory groups
Active Directory security groups provide sysadmins with a great deal of control and flexibility. Combining AD security groups with dynamic collections in PDQ Inventory gives you uncompromised control while also being scalable.
Which method should you choose? It really comes down to what works best for your environment. I recommend testing some of these methods to determine what might work for you in the long run. However, most organizations would likely benefit from a combination of Active Directory and PDQ Inventory. Let’s look at how to create a pilot group for Windows updates using PDQ Inventory and Active Directory security groups.
Ensure your devices are members of the correct patching groups in Active Directory and that you’ve recently scanned your computers in PDQ Inventory to maintain current data.
In PDQ Inventory, Click Collection > New Dynamic Collection.
Name the collection something descriptive, like Windows Updates Pilot Group.
Filter for computers that are members of the AD pilot group and not members of the latest Windows cumulative update for the version of Windows you are running.
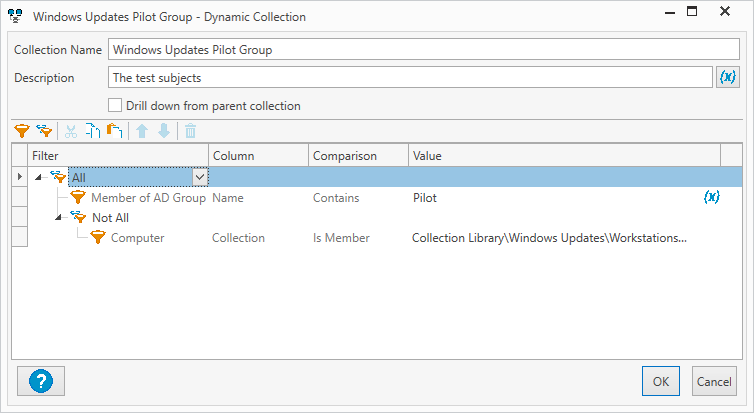
Click OK to close and save the filter.
In my environment, I have two members of the pilot group in AD, but one of them already has the latest update, so it is not currently a member of the collection we just created. However, the computer will automatically be added to the collection when the next cumulative Windows update is released.
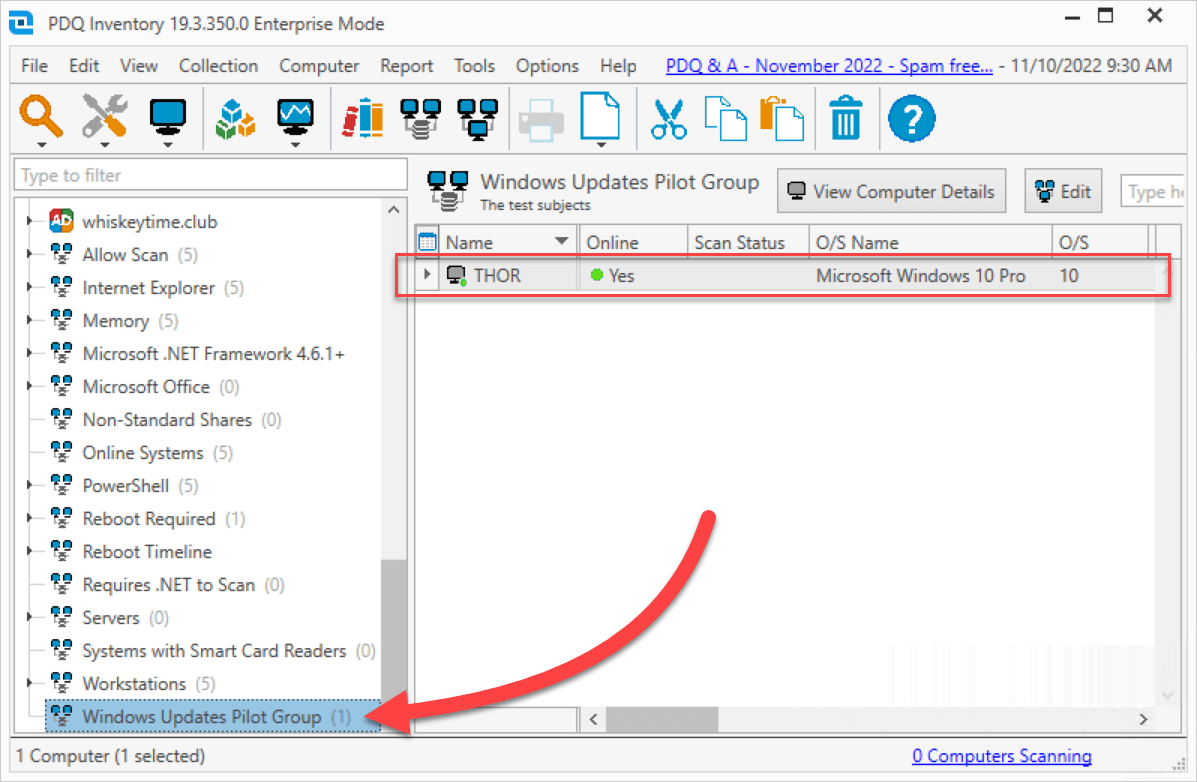
Repeat this process as many times as necessary to encompass all your patching groups and applications.
Scheduling patch deployments
PDQ Deploy makes downloading and deploying packages almost effortless. Packages from the Package Library automatically update when a new package version is available. However, when associating a deployment with a specific patch group, it’s important to have your Auto Download settings configured correctly.
By default, Auto Download packages automatically update to the newest version seven days after release. You can view this setting in PDQ Deploy by clicking on Options > Preferences, then clicking Auto Download. This setting is also configurable at the package level. Seven days is a good baseline for most situations, but it’s not quick enough for a pilot group. Packages for pilot groups should be configured to download and approve immediately upon release. The easiest way to accomplish this is to download multiple versions of the same package and assign each its own Auto Download setting. Here’s how we can configure the Windows 10 cumulative updates package for a pilot group.
In PDQ Deploy, click on Package Library.
Scroll through the list of available packages, and select the Windows cumulative update for your version of Windows.
Click Download Selected (As Auto Download).
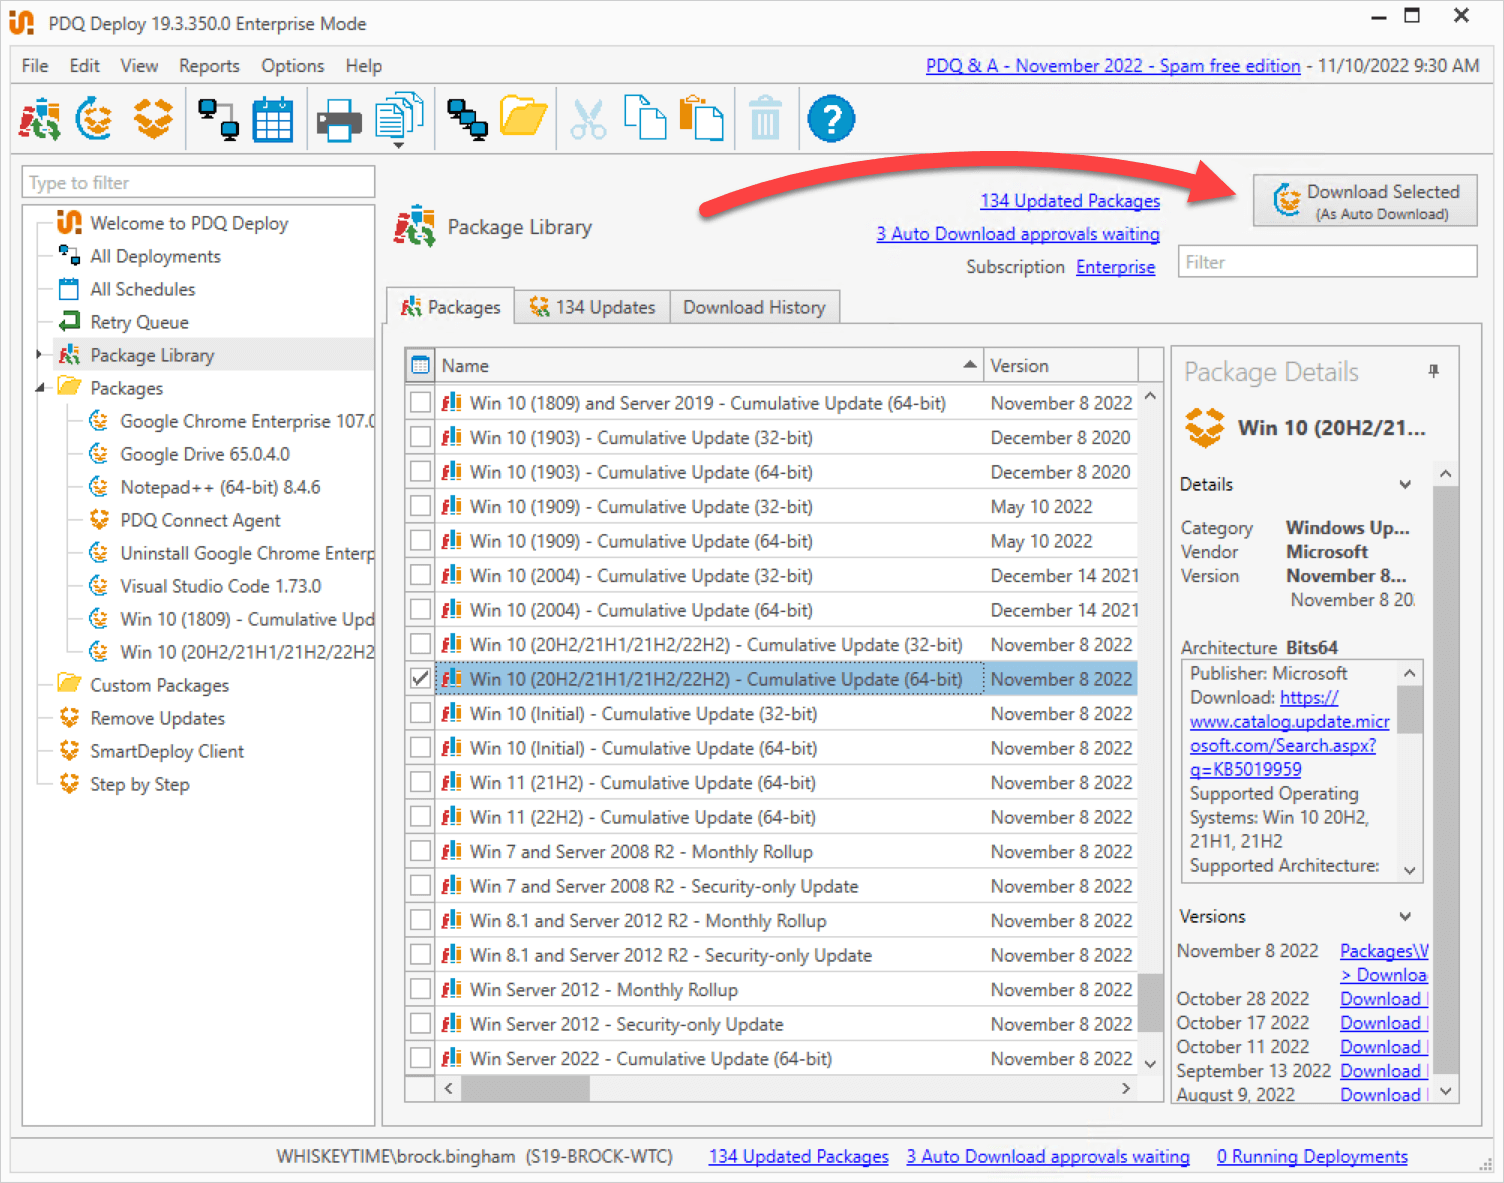
Right-click on the package, and click Rename.
Add Pilot to the end of the package name. Some users also use folders to organize their packages into different deployment groups.
Double-click on the package to open the package settings.
Click the Options tab.
Unselect Auto Download Use settings from Preferences.
Select Immediate.
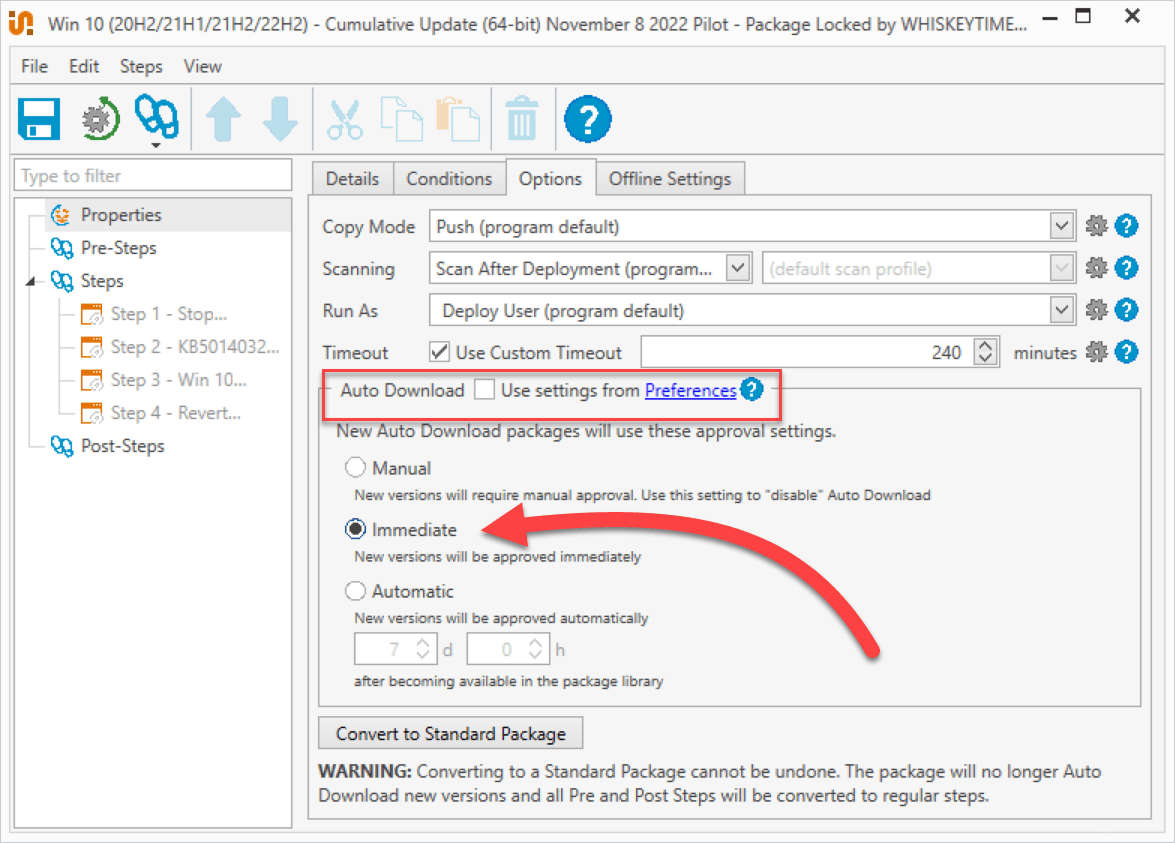
Click the Save button, then close the package.
I have two versions of this package now: one for my pilot group, which downloads the latest version immediately, and one that won’t download the newest version for the default seven days. The last thing we need to do is attach a deployment schedule to the package and target our collection in PDQ Inventory.
Click on the New Schedule button in PDQ Deploy.
Give the schedule a descriptive name, like Win 10 Cumulative Pilot Schedule.
Click the Triggers tab.
Add a Heartbeat trigger to the schedule.
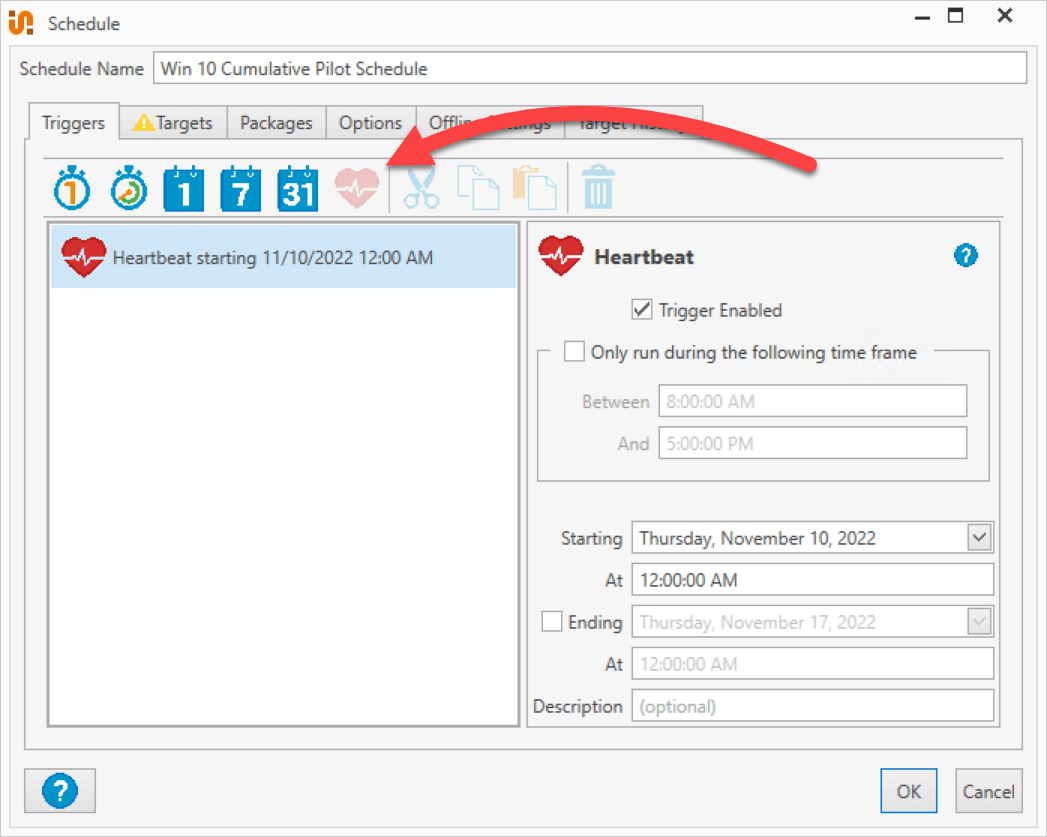
Click the Targets tab.
Click Choose Targets > PDQ Inventory > Collection.
Select the Windows Updates Pilot Group collection we created earlier, then click OK.
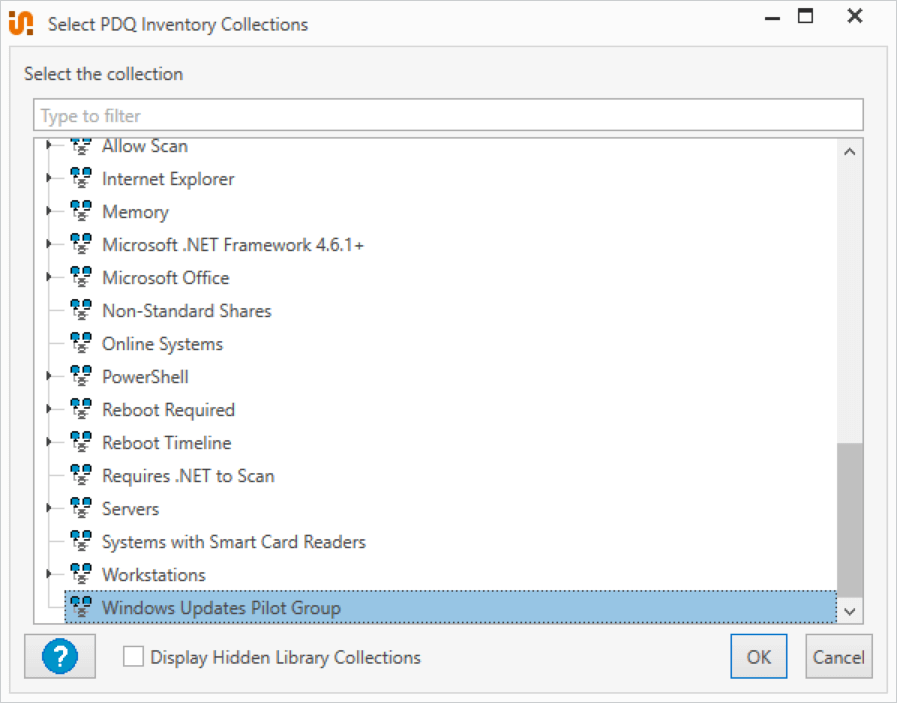
Click the Packages tab, then click Attach Packages.
Select the Win 10 cumulative update pilot package we configured in the previous section, then click the right arrow button to add it to the schedule, then click OK.
Click OK to save and close the schedule.
With the schedule configured, this package is ready to deploy to members of the pilot collection. When a new package version is released, it will download immediately and be ready for the next pilot deployment.
While we only covered the pilot group, you can replicate this process for the remainder of your patching groups. Ensure your AD group assignments are correct, build the collection in PDQ Inventory, download the package, configure the Auto Download settings, then create the appropriate schedule. Rinse and repeat.
Patching made easy
If you’re struggling to keep your endpoints patched, PDQ can help. PDQ Deploy and Inventory simplify patch and inventory management. Download a free trial of PDQ Deploy and Inventory today so that you can spend more time doing more important things, like petitioning for Henry Cavill to come back as Geralt in The Witcher series.


