Need to set a static IP or enable DHCP on a Windows device? Or maybe you’re looking for a quick way to PowerShell reset IP settings? PowerShell lets you do all while being fast, repeatable, and scriptable.
Configuring network settings on a Windows device, like enabling DHCP or setting static IP addresses, is basically the second thing you learn as a sysadmin (right behind rebooting a computer that’s misbehaving). It’s easy enough, but gets tedious fast. So, what do we do with tedious Windows tasks? We script them into oblivion with PowerShell!
In this guide, we’ll walk through several essential PowerShell cmdlets you can use to manage your network configurations. You’ll also get script examples to set a static IP address, enable DHCP on your Windows endpoints, or reset IP settings with PowerShell, all without clicking through endless UI menus.
Manage network settings with these PowerShell cmdlets
PowerShell has hundreds of cmdlets that let you control everything from services to registry settings, and that includes network configuration. Here are the core cmdlets you’ll use manage your network configuration.
Get-NetAdapter: The Get-NetAdapter cmdlet returns your network adapter information. This could be something like an ethernet, Wi-Fi, or Bluetooth adapter.

If you have multiple network adapters, you need to identify which network adapter you wish to view or modify by name, interface index, status, etc. For systems with one adapter, you can typically get this by using only Get-NetAdapter with no extra parameters. Please adjust this to suit your environment.
As an example, on one of my test systems, I have two network adapters. One is active, and one is inactive. I can grab only the active network adapter by using the command Get-NetAdapter | ? {$_.Status -eq “up”}.
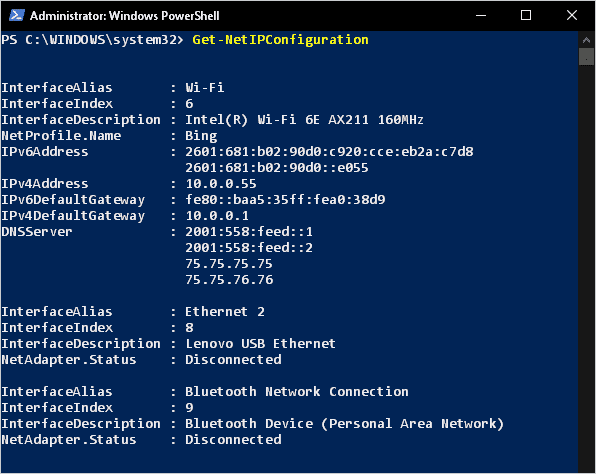
Get-NetIPConfiguration: This cmdlet returns the network configuration (interfaces, IP addresses, and DNS servers).

Get-NetIPInterface: The Get-NetIPInterface cmdlet returns the internet protocol (IP) interfaces, which can include both IPv4 and IPv6 addresses and their associated configurations.

Set-NetIPInterface: The Set-NetIPInterface allows you to modify your IP interface settings, such as enabling or disabling DHCP.
Set-DnsClientServerAddress: The Set-DnsClientServerAddress cmdlet lets you set the DNS servers associated with a particular network interface.
Remove-NetRoute: The Remove-NetRoute cmdlet lets you modify IP routes in the routing table, including wiping out all routes.
New-NetIPAddress: The New-NetIPAddress allows you to create and configure an IPv4 and IPv6 addresses on a network adapter.
Configure DHCP and static IP addresses with these PowerShell scripts
Before setting new values, these scripts reset your adapter’s current IP configuration — an effective way to PowerShell reset IP settings.
Now with the boring precursor requirements out of the way, let’s actually take a look at a few PowerShell scripts that get the job done.
Set a static IP address
This first PowerShell script sets a static IP address on a network adapter.
$IP = "10.10.10.10"
$MaskBits = 24 # This means subnet mask = 255.255.255.0
$Gateway = "10.10.10.1"
$Dns = "10.10.10.100"
$IPType = "IPv4"
# Retrieve the network adapter that you want to configure
$adapter = Get-NetAdapter | ? {$_.Status -eq "up"}
# Remove any existing IP, gateway from our ipv4 adapter
If (($adapter | Get-NetIPConfiguration).IPv4Address.IPAddress) {
 $adapter | Remove-NetIPAddress -AddressFamily $IPType -Confirm:$false
}
If (($adapter | Get-NetIPConfiguration).Ipv4DefaultGateway) {
 $adapter | Remove-NetRoute -AddressFamily $IPType -Confirm:$false
}
 # Configure the IP address and default gateway
$adapter | New-NetIPAddress `
 -AddressFamily $IPType `
 -IPAddress $IP `
 -PrefixLength $MaskBits `
 -DefaultGateway $Gateway
# Configure the DNS client server IP addresses
$adapter | Set-DnsClientServerAddress -ServerAddresses $DNS
Set an address with DHCP
This PowerShell script enables DHCP on a network adapter.
$IPType = "IPv4"
$adapter = Get-NetAdapter | ? {$_.Status -eq "up"}
$interface = $adapter | Get-NetIPInterface -AddressFamily $IPType
If ($interface.Dhcp -eq "Disabled") {
 # Remove existing gateway
 If (($interface | Get-NetIPConfiguration).Ipv4DefaultGateway) {
 $interface | Remove-NetRoute -Confirm:$false
 }
 # Enable DHCP
 $interface | Set-NetIPInterface -DHCP Enabled
 # Configure the DNS Servers automatically
 $interface | Set-DnsClientServerAddress -ResetServerAddresses
}
How to disable static/DHCP IP addresses with PowerShell
In PowerShell, you can manage network adapter settings to disable or enable static (manually assigned) and DHCP (automatically assigned) IP addresses using the Set-NetIPInterface cmdlet. The specific command depends on whether you want to disable static or DHCP addresses. Here are the PowerShell commands for each scenario.
Disable a static IP address with PowerShell
To disable a static IP address on a network adapter, you can set the interface to obtain an IP address automatically (DHCP).
$interface | Set-NetIPInterface -InterfaceAlias "YourNetworkAdapterName" -Dhcp Enabled Replace "YourNetworkAdapterName" with the actual name or alias of your network adapter. This command configures the interface to obtain an IP address automatically from a DHCP server.
Disable DHCP and enable a static IP address with PowerShell
To disable DHCP and set a static IP address on a network adapter, you can use the following PowerShell commands:
$interface | Set-NetIPInterface -InterfaceAlias "YourNetworkAdapterName" -Dhcp Disabled
$adapter | New-NetIPAddress -InterfaceAlias "YourNetworkAdapterName" -IPAddress "YourStaticIPAddress" -PrefixLength "YourSubnetPrefixLength" -DefaultGateway "YourDefaultGatewayIP"
Replace "YourNetworkAdapterName" with the actual name or alias of your network adapter, "YourStaticIPAddress" with the desired static IP address you want to assign, "YourSubnetPrefixLength" with the subnet prefix length (e.g., 24 for a typical subnet mask of 255.255.255.0), and "YourDefaultGatewayIP" with the IP address of your default gateway.
Final thoughts on configuring IP addresses with PowerShell
PowerShell provides a powerful and efficient way to manage network configurations, allowing you to automate tasks and reduce manual effort. Whether you're setting static IP addresses, enabling DHCP, or resetting network settings, these cmdlets and scripts can streamline your workflow.
This is still just scratching the surface of what’s available. Remember to check out what properties and methods are available for Win32_NetworkAdapterConfiguration, and you’ll be able to customize all the settings for your particular environment. For a more complete list of cmdlets you can use to set network and TCP/IP settings, check out our PowerShell Commands Library.
And this goes without saying — consider exploring PDQ's suite of tools, including PDQ Deploy & Inventory and PDQ Connect, to further enhance your system administration capabilities.


