Do you have a favorite computer component? Is it that expensive graphics card pumping out 500 FPS in Minecraft? Is it the CPU processing and executing all of those instructions it's given? Is it the 64GB of RAM allowing you to open at least three tabs in Chrome? What if I asked you what component was the most important? -Would your answer change? -
While this may not be a popular opinion, I would argue that the storage drive, whether HDD or SSD, is the most crucial computer component.
While it's true that a storage drive won't help you hit those 360 no scopes, it will hold onto all of your valuable data like its life depends on it. Think of it. All of those pictures of your kids, your wedding video, and most importantly, and your epic meme collection depend on your storage drive not kicking the bucket. And even though storage drives have come a long, long way in terms of speed and reliability, they are still very vulnerable to failure. So, you should most definitely have this irreplaceable data backed up if you don't already. Of course, the other thing you should be doing is making sure that your drives are healthy.
While there are many tools available to help us manage storage drives, including built-in SMART systems. One of the most well-known and widely used tools among sysadmins is the chkdsk command.
Here, we’ll break down chkdsk, how to use it, and even cover a few examples that you can reference going forward.
What Is Chkdsk?
Chkdsk (pronounced check disk) is a system utility that checks the file system integrity of your drives and can fix logical file system errors. Chkdsk will also scan for bad sectors on your drive and attempt to repair them. If a bad sector cannot be repaired, chkdsk will mark the bad sector, restricting it from being used again. Essentially, the function of chkdsk is to make sure that your files and metadata associated with those files are accurate and in good health.
Using Chkdsk
Using chkdsk is pretty straightforward. From an elevated command prompt, type in the following command:
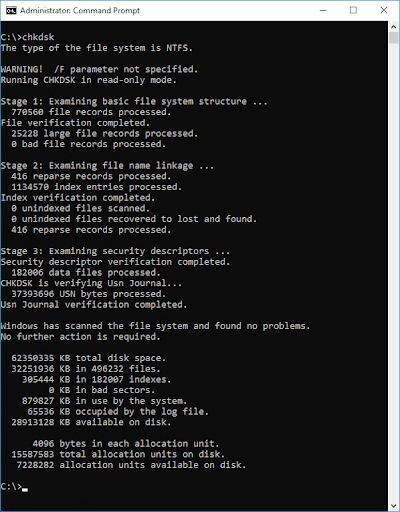
chkdskIf you are unfamiliar with or nervous about running commands, you don't need to worry too much about this one. This command is essentially a read-only command. It will return information about the drive it scanned, but no changes will be made.

Here are the results of the chkdsk scan of my drive. As you can see, my drive is looking pretty healthy as no issues were detected. However, if the scan did return any issues, I could add the /f switch, which will attempt to fix any errors it detects. If you wanted to fully scan the drive, including searching for and potentially repairing bad sectors, you could add the /r switch, which expands upon the /f switch functionality. Be aware that both the /f and /r switch will require the computer to be restarted and offline for a bit while the command runs.
With all that said, while chkdsk has been around longer than I have, and it's pretty great at what it does, we're in the era of PowerShell, so it's time to start acting like it. So, grab your power tools, power converters, and power supplies, and let's dive into PowerShell.
The PowerShell Equivalent Of Chkdsk Is Repair-Volume
New to PowerShell? Check out our guide to writing your first PowerShell script.
NAME
    Repair-Volume

SYNOPSIS
    Performs repairs on a volume.


SYNTAX
    Repair-Volume [-DriveLetter] <Char[]> [-CimSession <CimSession[]>] [-OfflineScanAndFix] [-Scan] [-SpotFix]
    [-ThrottleLimit <Int32>] [-Confirm] [-WhatIf] [<CommonParameters>]

    Repair-Volume [-CimSession <CimSession[]>] [-OfflineScanAndFix] [-Scan] [-SpotFix] [-ThrottleLimit <Int32>]
    [-Confirm] [-WhatIf] [<CommonParameters>]

    Repair-Volume [-CimSession <CimSession[]>] [-OfflineScanAndFix] [-Scan] [-SpotFix] [-ThrottleLimit <Int32>] -Path
    <String[]> [-Confirm] [-WhatIf] [<CommonParameters>]

    Repair-Volume [-CimSession <CimSession[]>] [-OfflineScanAndFix] [-Scan] [-SpotFix] [-ThrottleLimit <Int32>]
    -FileSystemLabel <String[]> [-Confirm] [-WhatIf] [<CommonParameters>]

    Repair-Volume [-CimSession <CimSession[]>] [-OfflineScanAndFix] [-Scan] [-SpotFix] [-ThrottleLimit <Int32>]
    -ObjectId <String[]> [-Confirm] [-WhatIf] [<CommonParameters>]


DESCRIPTION
    The Repair-Volume cmdlet performs repairs on a volume. The following repair actions are available:

    OfflineScanAndFix: Takes the volume offline to scan the volume and fix any errors found (equivalent to chkdsk /f).

    Scan: Scans the volume without attempting to repair it; all detected corruptions are added to the $corrupt system
    file (equivalent to chkdsk /scan).

    SpotFix: Takes the volume briefly offline and then fixes only issues that are logged in the $corrupt file
    (equivalent to chkdsk /spotfix).


RELATED LINKS
    Online Version: http://go.microsoft.com/fwlink/?LinkId=816470
    Format-Volume
    Get-Volume
    Optimize-Volume
    Set-Volume

REMARKS
    To see the examples, type: "get-help Repair-Volume -examples".
    For more information, type: "get-help Repair-Volume -detailed".
    For technical information, type: "get-help Repair-Volume -full".
    For online help, type: "get-help Repair-Volume -online"
The Repair-Volume is a newer PowerShell cmdlet introduced with Server 2012 and Windows 8. It allows much of the same functionality as chkdsk but provides users with greater control and added functionality. Just as with the chkdsk command, this command must also be run with elevated privileges. Let's look at a few examples to help us get familiar with the command.
Repair-Volume Example 1
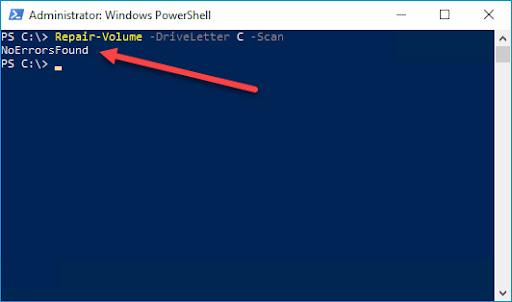
Repair-Volume -DriveLetter C -Scan
This first example is similar to just running chkdsk by itself. It will scan the drive you provided and return the results of the scan. I've included the -DriveLetter parameter because if you don't, you will be prompted to provide it before the command runs. The -Scan parameter indicates that we only want to scan and not repair anything. You'll notice that the data return is significantly less than what chkdsk provides by default. Let's see if we can change that.
Repair-Volume Example 2
I'm breaking this example into two examples because they do similar things, just differently.
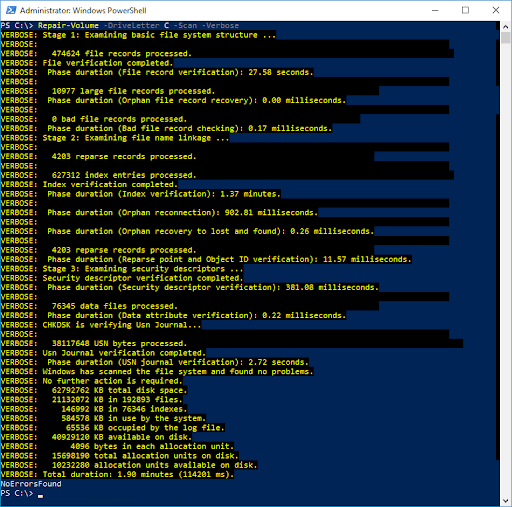
Repair-Volume -DriveLetter C -Scan -Verbose
This command more closely resembles the chkdsk command as it actually returns the scan results, not just "NoErrorsFound." The following command is similar, but instead of displaying the results in the console, we are sending the results to a log file.
Repair-Volume -DriveLetter C -Scan -Verbose 4>&1 | Out-File C:\logs\volume_info.txtThis command is helpful if you need to save the scan results for later review. If you're wondering what 4>&1 does, it has to do with PowerShell streams. Essentially, it takes the verbose information from stream 4 and sends it to stream 1, which is the output/success stream.
Repair-Volume Example 3
Again, I'm going to break this example into two examples. The first example is similar to the log file example above, except that we are running the command against a remote computer, and we are scanning an additional "D" drive. Make sure you have Windows Remote Management (WinRM) configured before trying to run this command against a remote computer. We've covered this topic in a recent blog and YouTube video if you need help.
Repair-Volume -DriveLetter CD -Scan -CimSession THOR -Verbose 4>&1 | Out-File C:\logs\volume_info.txt
This last example is what you would run if the scan returned some errors with the drive. You can either use the -SpotFix command or the -OfflineScanAndFix command. -SpotFix is beneficial if you've already run a scan and now just need to try to fix errors. It will not run another scan, speeding up the repair process. -OfflineScanAndFix will run a scan and attempt to repair the drive taking longer than -SpotFix.
Repair-Volume -DriveLetter CD -SpotFix -CimSession THORBe aware that, unlike chkdsk, Repair-Volume doesn't give you a prompt asking if you want to perform the repair the next time the system reboots. Instead, it automatically assumes that if you are running the -SpotFix or -OfflineScanAndFix commands, you understand that the repair will be attempted at the next reboot.
Wrapping Up
As always with PowerShell, the limit is really your creativity and understanding of the language. For example, this simple command could be expanded upon to scan hundreds of computers and drives, logging all the results, or reporting systems that need to have a repair run. That's the beauty of PowerShell. The possibilities are limitless.


