NSLookup is a widely used command-line tool for querying DNS records and troubleshooting network issues — but what if you want to achieve the same results using PowerShell? In this guide, I'll show you how to replace NSLookup with PowerShell commands like Resolve-DnsName, offering more flexibility and modern functionality for sysadmins and IT pros making the switch from CMD to PowerShell.
What is NSLookup?
NSLookup is a popular CMD utility commonly used to troubleshoot DNS issues. Remember, DNS is basically the phonebook of the internet. Instead of resolving people’s names to phone numbers, DNS resolves a host or domain name to an IP address. IP addresses are how network devices find and connect to one another. With literally billions of people using the internet and company networks, it’s no wonder that a utility that helps us troubleshoot DNS issues is popular.
In its simplest form, NSLookup takes a host or domain name and queries the DNS server to return an IP address. Here’s an example.
nslookup "computer_or_domain_name"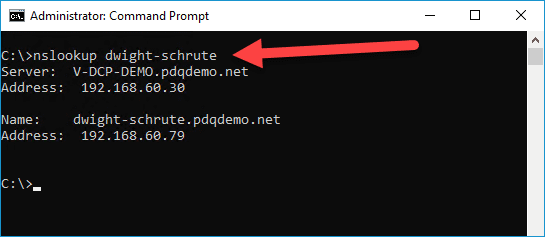
As you can see in this very basic example, I used NSLookup to query the DNS server for the hostname “dwight-schrute,” which returned the A record for that entry with the address 192.168.60.79. You can add other parameters to include additional functionality, such as changing the record type queried or switching the DNS server. But, you’re not here to learn about CMD commands; you’re here because you want more power from PowerShell!

The PowerShell equivalent of NSLookup is Resolve-DnsName
NAME
    Resolve-DnsName

SYNTAX
    Resolve-DnsName [-Name] <string> [[-Type] {UNKNOWN | A_AAAA | A | NS | MD | MF | CNAME | SOA | MB | MG | MR | NULL | WKS | PTR | HINFO |
    MINFO | MX | TXT | RP | AFSDB | X25 | ISDN | RT | AAAA | SRV | DNAME | OPT | DS | RRSIG | NSEC | DNSKEY | DHCID | NSEC3 | NSEC3PARAM | ANY |
    ALL | WINS}] [-Server <string[]>] [-DnsOnly] [-CacheOnly] [-DnssecOk] [-DnssecCd] [-NoHostsFile] [-LlmnrNetbiosOnly] [-LlmnrFallback]
    [-LlmnrOnly] [-NetbiosFallback] [-NoIdn] [-NoRecursion] [-QuickTimeout] [-TcpOnly]  [<CommonParameters>]


ALIASES
    None


REMARKS
    Get-Help cannot find the Help files for this cmdlet on this computer. It is displaying only partial help.
        -- To download and install Help files for the module that includes this cmdlet, use Update-Help.
One of the things I really like about PowerShell is that many of the commands are very descriptive, as is the case with Resolve-DnsName. Descriptive commands come in handy for those of us who literally forget a person’s name about 0.3 seconds after hearing it (guilty).
As you can see from the listed syntax, Resolve-DnsName comes with a lot of options. Once you take into consideration the fact that you can “pipe” or pass the results of Resolve-DnsName into other PowerShell cmdlets, the possibilities of what you can do are endless.
Let’s take a look at a few PowerShell examples using the Resolve-DnsName cmdlet so we can break down how it works and some of its useful features.

Learn PowerShell with the pros
Even the most experienced PowerShell aficionados are constantly learning. Ready to dive into more advanced functions? Check out The PowerShell Podcast to learn more about key people, resources, and modules.
Example 1
Resolve-DnsName -Name "computer"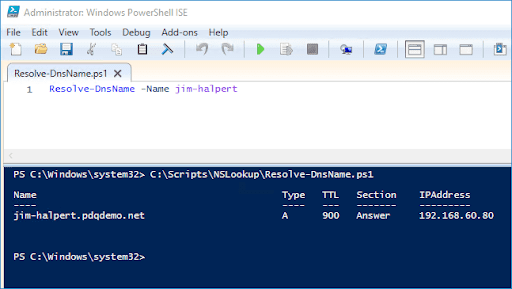
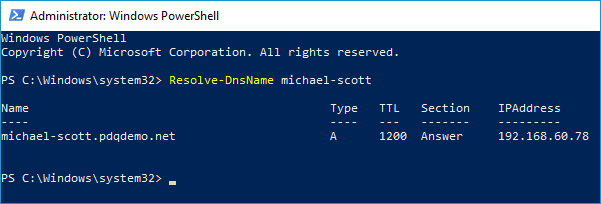
This first example is the bare-bones command. Just add the -Name parameter to the Resolve-DnsName cmdlet and pass it a computer name. It searches the locally assigned DNS server for a record with the matching computer name and returns the record information. Technically, you don’t even have to include the -Name parameter. The command works without it. I like to include it to build good PowerShell habits.
Example 2
$ip = Resolve-DnsName -Name www.google.com -Server 1.1.1.1 -Type A
$ip | Select IPAddress | Test-Connection
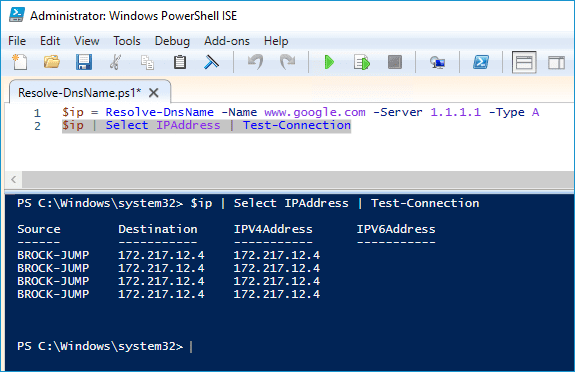
We kick things up a notch with this example. For this one, we query a specific DNS server, 1.1.1.1, and only look for the A record for www.google.com. Next, we assign the returned information to the custom variable $ip. Finally, we call the variable $ip, selecting just the IPAddress property of the variable, and run the Test-Connection cmdlet against it.
Example 3
$computers = Get-ADComputer -Filter * -SearchBase "OU Path" | Select-Object -ExpandProperty Name

foreach ($workstation in $computers){
    Resolve-DnsName -Name $workstation -Type A
}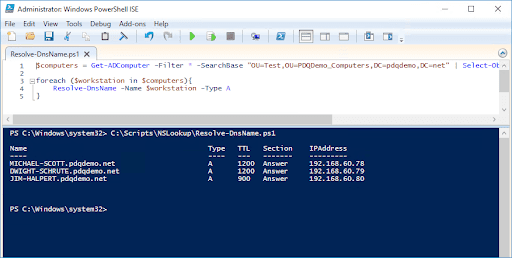
This PowerShell script runs the Resolve-DnsName cmdlet against each computer in a specified OU. We use the cmdlet Get-ADComputer to retrieve all of the computers from a specific OU. (Make sure to replace OU Path with the actual path to the OU you want to run this against.)
We then use the Select-Object -ExpandProperty Name command to retrieve only the computer names, and we are assigning them to the custom variable $computers. Next, we use a foreach loop to run the ResolveDnsName command against every computer name assigned to the $computers variable, using $workstation as a placeholder variable in the foreach loop. You can see the result in the screenshot above.
Mastering PowerShell equivalents like Resolve-DnsName can help future-proof your workflow as you transition away from CMD. While many CMD utilities, including NSLookup, still function in PowerShell, there's no guarantee they won’t be deprecated in the future. Learning PowerShell now ensures you're ready for whatever comes next.
At first, PowerShell may seem complex, but once you get the hang of cmdlets and parameters, it becomes second nature. Whether you have a great memory or rely on some well-timed searches (like many of us do), PowerShell opens the door to powerful automation and efficiency.
Speaking of automation, if you’re looking for an easier way to manage deployments and inventory, check out PDQ Connect. PDQ simplifies IT management — from deploying software across your network to automating reports — to make your life easier. Try it free for 14 days and see the difference for yourself.
Oh, and remember: It’s not DNS … it was DNS.

