So you finally finished automating all of your standard applications using PDQ Deploy, and you’re ready for a one-way trip to Relaxationville when out of the blue, Nick from accounting asks to have Discord updated. After removing Nick from your Christmas card list, you reluctantly manually update Discord while thinking to yourself, “It sure would be nice to automate packages that aren’t in the Package Library.” Well, we’ve heard you loud and clear (I can neither confirm nor deny that PDQ has the ability to read your thoughts).
Overview
PDQ Deploy has access to hundreds of pre-built packages in its package library. These packages include a wide range of the most commonly used applications. Occasionally, you may need to support an application that isn’t included in the package library. Manually building custom packages in Deploy is simple and straightforward; automating custom packages, on the other hand, takes a little more work and know-how. If you’re determined enough to be a truly lazy sysadmin, though, the effort is worth the payoff.
Setting up custom variables
The first thing we need to do is to create some new variables in PDQ Deploy and Inventory. Custom variables will allow us to make versioning comparisons and build dynamic collections. Variables may take a little more work setting up initially, but they save us time and effort in the long run, which we at PDQ are all about. As our custom package gets updated, we’ll use PowerShell to edit the custom variable information automatically.
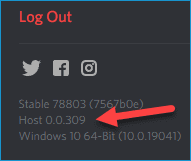
To create our custom variables, we first need to get the initial version number that will be assigned to the variable. Launch Discord and click on User settings. Scroll down, and just below “Log Out,” you will find the current version number.
Now that we have our current version number, we can set up our custom variables in PDQ Deploy:
With PDQ Deploy open, click Options > Variables
Click New Variable
For the name, enter DiscordName. Deploy should automatically update the variable to @(DiscordName)
For the value, enter Discord
Now we’ll create a variable for the version. Click New Variable
For the name, enter DiscordVer. Again this should automatically update to @(DiscordVer)
For the value, enter the version number we identified from the previous step. As of this post, the current version is 0.0.309
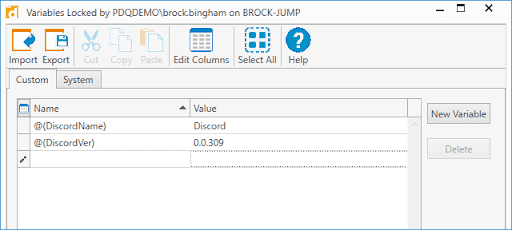
Your variables should look like this, though your version number should be whatever the current version is.
Next, create the same variables in PDQ Inventory following the same steps as above.
Creating a custom Discord package
Now that we have our variables, we’ll create our custom Discord package in Deploy.
Download the Discord install file if you don’t already have it
Save the install file to your Deploy repository (you can view your repository location by clicking on Options > Preferences > Repository). In this example, I’ve saved the Discord example to C:\Users\Public\Documents\Admin Arsenal\PDQ Deploy\Repository\Discord\0.0.309\DiscordSetup.exe
In PDQ Deploy, click New Package
Enter Discord for the name of the package
Click Steps > Install
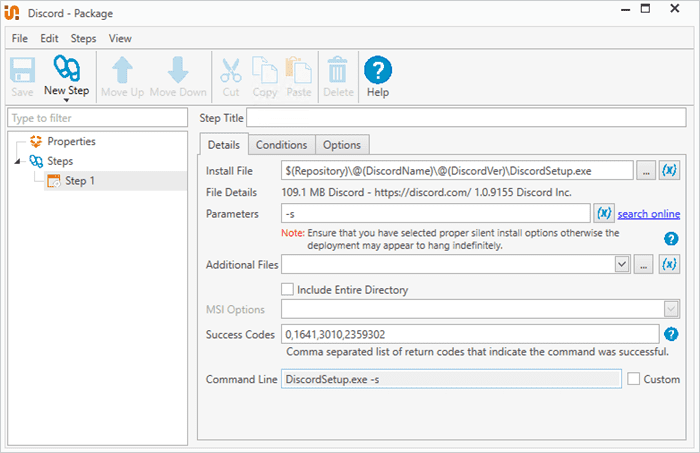
Enter the file path in the Install File field. My file path is $(Repository)\@(DiscordName)\@(DiscordVer)\DiscordSetup.exe
Add the silent parameter -s
Click Save
Here’s a screenshot of the finished package.
Creating dynamic collections in PDQ Inventory
Dynamic collections allow us to filter computers based on evolving information. For this example, we’ll use dynamic collections to filter based on which computers have the newest version of Discord, an old version of Discord, and which computers don’t have Discord installed.
In PDQ Inventory, click New Dynamic Collection
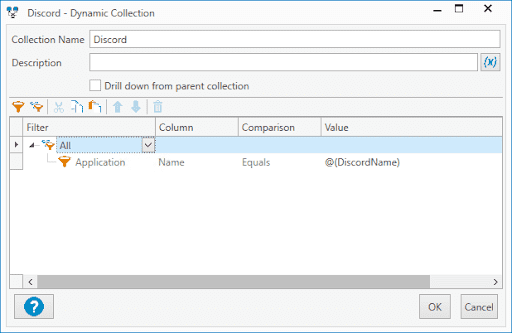
Enter Discord for the Collection Name
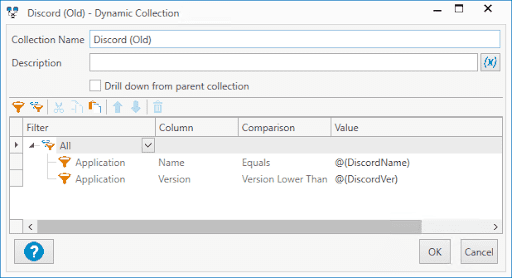
Configure this as your filter Application > Name > Equals >
Use the custom variable button to insert your custom variable @(DiscordName) in the value column
Click OK
Now we will need to create three new dynamic collections nested under this dynamic collection. Right-click on the Discord collection and click New > Dynamic Collection
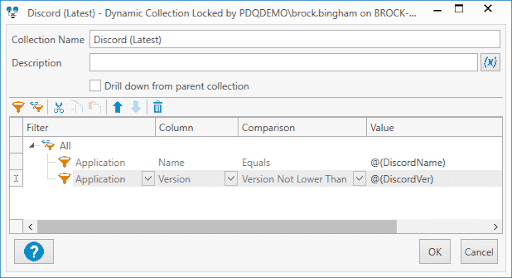
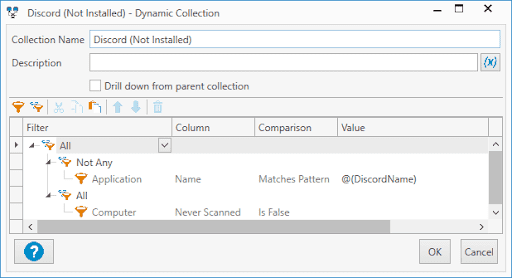
Match these settings for the three nested collections
PDQ Connect user?
Collections are referred to as groups in PDQ Connect — but they're essentially the same. Learn more about static and dynamic groups in PDQ Connect.
Creating a deployment schedule
In order to get this package to push out updates regularly, we need to configure a deployment schedule in PDQ Deploy. Since each network environment is unique, there is no perfect way to configure a deployment schedule. The best approach is to discuss it with your team and decide on a schedule that is effective while limiting the impact it has on your users and bandwidth.
Launch PDQ Deploy
Click on New Schedule
Enter a schedule name
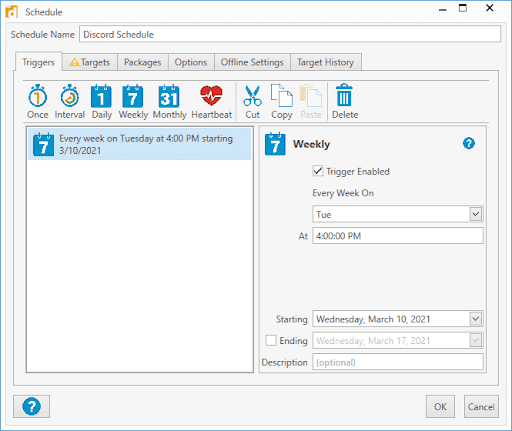
Click on the Triggers tab
I’ve configured my trigger to kick off weekly at 4:00 PM
Click on the Targets tab
Click Choose Targets > PDQ Inventory > Collection
Select the Discord (Old) collection and click OK
Click the Packages tab
If you had Discord selected when you clicked New Schedule, it should have added the Discord package automatically. If Discord wasn’t selected, click Attach Packages, then click on Discord and click > then click OK
Click on the Options tab
Make sure Stop deploying to targets once they succeed is selected
Click OK to finish the schedule
Once the schedule has been created, we get the schedule ID number. Click All Schedules and make a note of the Discord schedule ID number.

Using PowerShell to download updates
Our local PowerShell expert has been hard at work whipping up a script that will go out to the web and retrieve the latest version of Discord and download it to the PDQ Deploy repository. This script can be used for other applications; however, it will take some customizing on your part to identify the web source as well as the best way to extract the version numbers.
The script:
#Database Locations
$PDQDepDB = "C:\ProgramData\Admin Arsenal\PDQ Deploy\Database.db"
$PDQInvDB = "C:\ProgramData\Admin Arsenal\PDQ Inventory\Database.db"
#Get the Current Version
$oldversion = sqlite3.exe $PDQInvDB "Select Value from CustomVariables where Name = 'discord';"
#Repo for this software
$Repository = "C:\Users\Public\Documents\Admin Arsenal\PDQ Deploy\Repository\Discord"
#Download file name
$file = "DiscordSetup.exe"

#Get Version Number
$HTTPFolderUrl = "https://discord.com/api/download?platform=win"
$HTTPRequest = [System.Net.HttpWebRequest]::Create("$HTTPFolderUrl")
$HTTPRequest.Method = [System.Net.WebRequestMethods+Http]::Head
$HTTPResponse = $HTTPRequest.GetResponse()
$NewVersion = $HTTPResponse.ResponseUri.localpath.Split("/")[6]

#If different then download and build folder
if($newversion -ne $oldversion){
    New-Item -Path $($Repository + "\" + $newversion) -ItemType Directory
    Invoke-WebRequest $HTTPFolderUrl -OutFile $($Repository + '\' + $newversion + '\' + $file)}
If there is a newer version of Discord available, this script creates a WebRequest to the Discord servers, downloads the current version, and identifies the current version number. Then it creates a new folder with the version number as the name within the Deploy repository.
Using PowerShell to update variables
Now that we have our PowerShell script downloading the newest version of Discord and putting it into the repository, we need another PowerShell script to update our variables and clean up our repository folder.
The script:
###Define Variables
$autopath = "C:\Users\Public\Documents\Admin Arsenal\PDQ Deploy\Repository"
$autopackages = @()
$DBPath = "C:\programdata\Admin Arsenal\PDQ Deploy\Database.db"
###Build Package Objects
$Discord = New-Object psobject -Property @{
    Path = "\Discord"
    ScheduleID = "5"
    CustomVariable = "DiscordVer"
}
#$App2 = New-Object psobject -Property @{
#    Path = "\App2"
#    ScheduleID = "2"
#    CustomVariable = "App2"
#}
#$App3 = New-Object psobject -Property @{
#    Path = "\App3"
#    ScheduleID = "3"
#    CustomVariable = "App3"
#}
###Populate Array
#$autopackages += $Discord, $App2, $App3
$autopackages += $Discord
###To core of That Thing We Are Doing
Foreach($Package in $autopackages){
###Check to see if there is a new Package to Update
    If((Get-ChildItem -Directory -Path ($autopath + $Package.path)).count -eq "3"){
###Move The old crap to the Audit Folder and Update the Variable in Inventory and Deploy
        $archive = Get-ChildItem -Directory -Path ($autopath + $Package.path) | Where{$_.name -eq "archive"} | select fullname
        Get-ChildItem -Directory -Path ($autopath + $Package.path) | Where{$_.name -ne "archive"} | sort creationtime | select -First 1 | Move-Item -Destination $archive.FullName
        $NewerVersion =  Get-ChildItem -Directory -Path ($autopath + $Package.path) | Where{$_.name -ne "archive"}
        & pdqdeploy updatecustomvariable -name $Package.CustomVariable -value $NewerVersion.Name
        & pdqinventory updatecustomvariable -name $Package.CustomVariable -value $NewerVersion.Name
###Delete Schedule History
        $SQLQuery = "Select Name FROM ScheduleComputers WHERE ScheduleId LIKE $($Package.ScheduleID)"
        $ScheduleHistory = $SQLQuery | sqlite3.exe $DBPath
        foreach($machine in $ScheduleHistory){
            & pdqdeploy DeleteScheduleHistory -Computer $machine -Schedule $Package.ScheduleID
        }
    }
}
As you can see, there are additional applications listed in this script besides just Discord. Normally I would remove these other apps, but this script can handle multiple applications at a time, not just one, so I kept them in the script so you would know how to add more applications to it in the future.
Here are a couple of key takeaways about this script. Remember when I told you to get the schedule ID after you created the schedule? You need to add that schedule ID to the ScheduleID property. Also, you need to have your folders configured correctly. Inside the repository application folder, you need to have it configured with a current version folder and an archive folder, like this.
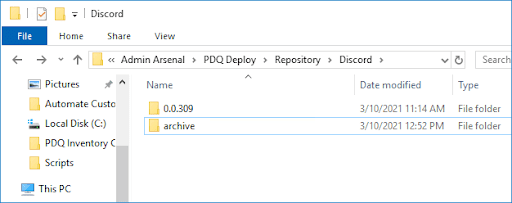
When the script runs, it will check to see if the Discord folder has three folders inside of it. If there are only two folders, the script will skip the folder. When a new Discord update is available and you run the download Discord script, a third folder will be added to the Discord folder with the latest version. With three folders in there, the script will move the old version folder into the archive folder and update the DiscordVer variable in Deploy to the newest version number. Note that if you have the variable window open in Deploy at the time this script runs, the script will not be able to update the variable.
Wrapping up
You now have all the tools to automate your custom packages. The only thing left to do is to configure Task Scheduler to kick off these scripts on a schedule or schedule them to run with PDQ Deploy. If you decide to use PDQ Deploy to run these scripts, have it run locally and make sure to remove the Stop deploying to targets once they succeed setting from the Options tab in the scheduler. I would recommend having these scripts run prior to your scheduled deployment. Make sure to have the download script run first, then have the variable script run. Depending on the size of the application that you are downloading, you may need to give the download script plenty of time to finish running.
Now, with the ability to automate your custom packages, you don’t have to worry about Nick wrecking your precious trip to Relaxationville. He’ll have the latest version of Discord, and you won’t have to lift a finger to do it. Feel free to keep him off your Holiday card list, though; he earned that one.

